background image

RadioRA Setup Guide Addendum

Activating Your  System

1-2

Section 1 - Start-Up

Step 3

Complete Control activation

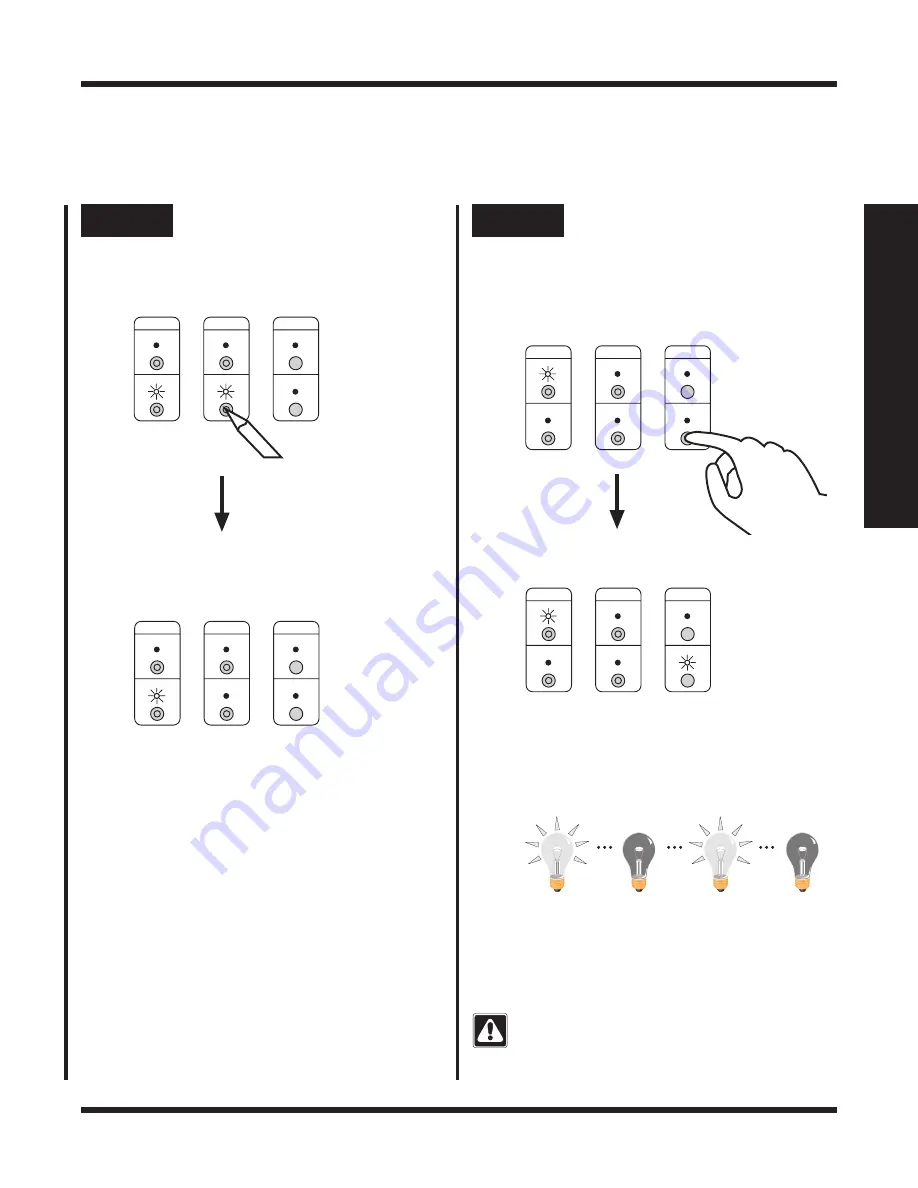
Press and hold the ACTIVATE CONTROLS
button on 

any Repeater until the green LED

turns OFF (approximately 3 seconds).

MAIN

REPEATER

REPEATER

CONTROLS

ACTIVATE

BEEP

FLASH

VERIFY

AUXILIARY

The green ACTIVATE CONTROLS LED on
ALL Repeaters will turn OFF. The MAIN or
AUXILIARY LED will remain on.

MAIN

REPEATER

REPEATER

CONTROLS

ACTIVATE

BEEP

FLASH

VERIFY

AUXILIARY

Step 4

Verify that all GRAFIK Eye
Control Units have been
activated

MAIN

REPEATER

REPEATER

CONTROLS

ACTIVATE

BEEP

FLASH

VERIFY

AUXILIARY

The green FLASH LED on all Repeaters will
turn ON.

GRAFIK Eye Control Units, if activated, will
flash the light(s) they control. (May be difficult
to observe if scene 1 has a long fade time or
low light levels are set.) Make note of any
GRAFIK Eye Control Units which are not
activated.

• GRAFIK Eye Control Units are now

activated.

If any GRAFIK Eye Control Unit has not been
activated, repeat Steps 1 through 4.

After verifying that all GRAFIK Eye Control
Units are activated, press and hold the FLASH
button on any Repeater until the green LED
turns OFF (approximately 3 seconds). The
green FLASH LED on all Repeaters will turn
OFF.

Press and hold the FLASH button on any
Repeater until the green LED turns ON
(approximately 3 seconds).

MAIN

REPEATER

REPEATER

CONTROLS

ACTIVATE

BEEP

FLASH

VERIFY

AUXILIARY

Содержание GRAFIK Eye RA-GRXI

Страница 1: ...etup Guide Addendum For GRAFIK Eye Interface RA GRXI A Comprehensive Step by Step Guide for Programming and Operating the Lutron RadioRA GRAFIK Eye Interface Note Please leave this manual with homeowner ...

Страница 2: ...ment This symbol is intended to alert the user to the presence of important installation and operating instructions Consumer Information Danger This RadioRA system must not be used to control equipment other than lighting which is not visible from every master or local control location It also must not be used to control equipment which could create hazardous situations such as entrapment if opera...

Страница 3: ... wired to the same Interface will carry out ALL commands from the GRAFIK Eye Interface i e go to GRAFIK Eye scene 3 Turn OFF etc Interface commands cannot be sent to one individual GRAFIK Eye Control Unit on a link of multiple GRAFIK Eye Control Units This application may be desired if multiple GRAFIK Eye Control Units are in the same room and it is intended that the same scene be selected on each...

Страница 4: ...ater until the green LED turns ON approximately 3 seconds Proceed to Step 3 when all GRAFIK Eye Control Units have been activated Go to the GRAFIK Eye Control Unit Change the scene by pressing any of the preset buttons on the GRAFIK Eye Control Unit LUTRON The lights that the GRAFIK Eye controls will cycle between scene 1 and OFF a few times when it has been activated May be difficult to observe i...

Страница 5: ...UXILIARY The green FLASH LED on all Repeaters will turn ON GRAFIK Eye Control Units if activated will flash the light s they control May be difficult to observe if scene 1 has a long fade time or low light levels are set Make note of any GRAFIK Eye Control Units which are not activated GRAFIK Eye Control Units are now activated If any GRAFIK Eye Control Unit has not been activated repeat Steps 1 t...

Страница 6: ...Control Units to ROOM buttons What is a ROOM button ROOM buttons can be used to turn a light or a group of lights ON or OFF Pressing a ROOM button once will turn ON all controls assigned to that button to their pre selected light level Pressing the same ROOM button again will turn OFF all controls assigned to that button A ROOM LED will be ON if any control assigned to that button is ON regardless...

Страница 7: ...NG RM FOYER FAMILY DEN DINING READING MORNING NIGHT MOVIE PATIO FR PORCH GARAGE BASEMENT LAUNDRY ALL ON ALL OFF Simultaneously press and hold the 2nd and 4th buttons in the right most column until all LEDs begin to flutter approximately 3 seconds MASTER BR LIVING RM FOYER FAMILY DEN DINING READING MORNING NIGHT MOVIE PATIO FR PORCH GARAGE BASEMENT LAUNDRY ALL ON ALL OFF MASTER BR LIVING RM FOYER F...

Страница 8: ...to setup mode and recalling the desired scene Refer to the GRAFIK Eye Installer s Guide for required steps The GRAFIK Eye Control Unit should remain in setup mode until Step 5 of this section is completed Upper right LED blinks MASTER BR LIVING RM FOYER FAMILY DEN DINING READING MORNING NIGHT MOVIE PATIO FR PORCH GARAGE BASEMENT LAUNDRY ALL ON ALL OFF GRAFIK Eye Control Units that have been assign...

Страница 9: ...er pre programmed scene on any GRAFIK Eye Control Unit assigned to that ROOM button Repeat Step 4 until GRAFIK Eye scenes have been selected for all ROOM buttons which have a GRAFIK Eye Control Unit assigned 1 6 Section 1 Start Up Congratulations Your GRAFIK Eye Control Unit is now programmed to work with your RadioRA system Relax and enjoy your system Simultaneously press and hold the 1st and 5th...

Страница 10: ...ill be ON if and only if that SCENE button was pressed on that Master Control MASTER BR LIVING RM FOYER FAMILY DEN DINING READING MORNING NIGHT MOVIE PATIO FR PORCH GARAGE BASEMENT LAUNDRY ALL ON ALL OFF SCENES ROOMS ROOMS Step 2 Select a SCENE button Press and release the SCENE button that you want to program Its LED will begin to flash Step 1 Begin assigning GRAFIK Eye Control Units to SCENE but...

Страница 11: ...E PATIO FR PORCH GARAGE BASEMENT LAUNDRY ALL ON ALL OFF SCENES ROOMS ROOMS Repeat Steps 1 through 5 to assign GRAFIK Eye Control Units to SCENE buttons on any additional Master Controls Proceed to GRAFIK Eye Scene Selection on page 2 3 MASTER BR LIVING RM FOYER FAMILY DEN DINING READING MORNING NIGHT MOVIE PATIO FR PORCH GARAGE BASEMENT LAUNDRY ALL ON ALL OFF SCENES ROOMS ROOMS Turn ON the GRAFIK ...

Страница 12: ... MOVIE PATIO FR PORCH GARAGE BASEMENT LAUNDRY ALL ON ALL OFF SCENES ROOMS ROOMS Upper right LED blinks Note If the GRAFIK Eye Control Unit has been assigned an address A1 A8 pre programmed scenes 5 through 16 may be selected by putting the GRAFIK Eye Control Unit into setup mode and recalling the desired scene Refer to the GRAFIK Eye Installer s Guide for required steps The GRAFIK Eye Control Unit...

Страница 13: ...e Control Unit assigned MASTER BR LIVING RM FOYER FAMILY DEN DINING READING MORNING NIGHT MOVIE PATIO FR PORCH GARAGE BASEMENT LAUNDRY ALL ON ALL OFF SCENES ROOMS ROOMS MASTER BR LIVING RM FOYER FAMILY DEN DINING READING MORNING NIGHT MOVIE PATIO FR PORCH GARAGE BASEMENT LAUNDRY ALL OFF ALL ON ALL ON ALL OFF SCENES ROOMS ROOMS Section 2 Advanced Features Simultaneously press the 1st and 5th button...

Страница 14: ...ng the system into FLASH mode Reprogram the Master Control Verify whether the Master Control is in range of a Repeater by placing the system in BEEP mode Use a 24VAC transformer to power the GRAFIK Eye Interface Call the Lutron Technical Assistance Hotline 1 800 523 9466 for further details I II III IV Your system has encountered a neighboring system within RF communication range also in ACTIVATE ...

Страница 15: ...and hold the ON OFF button until the orange LED begins to blink approximately 5 seconds ON OFF LINE FREQ 60Hz Orange 50Hz Green GRX Accessory Control Address 15 1 2 3 4 COM V MUX MUX WH RED YEL BL The GRAFIK Eye Control Unit that was controlled by this GRAFIK Eye Interface will turn ON and OFF a few times indicating that the interface has been returned to Default Factory Settings Reattach the face...

Страница 16: ...product may be covered under one or more of the following U S patents 4 835 343 4 954 768 5 248 919 5 399 940 DES 353 798 DES 389 461 DES 389 805 and corresponding foreign patents U S and foreign patents pending Lutron GRAFIK Eye and RadioRA are registered trademarks 1998 Lutron Electronics Co Inc 1998 Lutron Electronics Co Inc MADE AND PRINTED IN U S A P N 044 003 1 98 Rev A World Headquarters Lu...

Отзывы: