RadioLink Electronic Limited
9
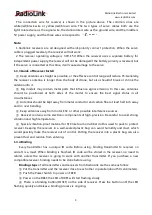
The connection wire for receiver is shown in the picture above. The common ones are
white/red/black wire or yellow/red/brown wire. The two types of servo cables both are the
light-colored wire as the signal wire, the dark-colored wire as the ground wire, and the middle is
5V power supply, and the three wires correspond to “
”.
Note:
1.Radiolink receivers are all designed with anti-polarity connect protection. When the servo
cable is plugged reversely, the receiver will not work.
2.The receiver operating voltage is 3.0V-15V. When the receiver uses a separate battery for
independent power supply, the receiver will not be damaged if the battery polarity is reversed, but
if the servo is connected at this time, it will cause damage to the servo.
1.3.3 Guide of Receiver Install
① Keep antennas as straight as possible, or the effective control range will reduce. PS: Generally,
the receiver
’
s antenna is longer than the body of drone, but also shouldn't break or shrink the
antenna into it.
② Big models may contain metal parts that influence signal emission. In this case, antennas
should be positioned at both sides of the model to ensure the best signal status in all
circumstances.
③ Antennas should be kept away from metal conductor and carbon fiber at least half inch away
and no over bending.
④ Keep antennas away from motor, ESC or other possible interference sources.
⑤ Receiver contains some electronic components of high-precision. Be careful to avoid strong
vibration and high temperature.
⑥ Special vibration-proof material for R/C like foam or rubber cloth is used to pack to protect
receiver. Keeping the receiver in a well-sealed plastic bag can avoid humidity and dust, which
would possibly make the receiver out of control. Putting the receiver into a plastic bag can also
prevent fuel and residue from entering.
1.3.4 Binding
Every transmitter has a unique ID code. Before using, binding transmitter to receiver on
aircraft is a must. When binding is finished, ID code will be stored in the receiver, no need to
rebind, unless the receiver is going to work with another transmitter. If you purchase a new
compatible receiver, binding needs to be done before using.
Binding steps
of all transmitters and receivers from RadioLink are the same as follow:
① Put the transmitter and the receiver close to each other in parallel (about 50 centimeters).
② Push the Power Switch to power on T8FB.
③ Power on the R8EF, the LED of R8EF will start flashing slowly.
④ There is a binding button(ID SET) on the side of receiver. Press the button until the LED
flashing quickly and release, binding process is ongoing.


