


8/17/2015
Easier to Read Pro97/2055 Scanner Manual
http://marksscanners.com/97/97.shtml#open_closed
9/16
To Automatically Store an ID
into the first available ID location while trunking, quickly press TRUNK.
ID saved briefly appears at the bottom of the display. The ID list (04) and ID# (029) will
briefly be displayed on the bottom line. ID was saved briefly appears at the bottom of the display if the ID has previously been stored (or programmed). If you try to enter more than 150 IDs in a
bank, Memory Full! appears.
To Manually Store an ID:
1. In Manual mode select any channel
in the bank containing the ID by entering the bank number and channel number (Ex: 001) then press MAN to advance to the channel.
2. Press PGM then TRUNK
to put the scanner in program and trunk modes. You will see the bank number (09), list number (04), and the list status (ON or OFF) on the top line.
3. Press Mode (each time)
to select the correct trunking mode if needed.
4. Press TRUNK (each time)
to select one of the 5 ID lists (04).
5. Select the ID#
(029) by pressing
or
(or press and hold; faster).
To Enter an ID:
To enter a Motorola Type II ID,
enter the ID
then press ENT to store the ID.
To enter a Motorola Type I ID,
enter
the fleet# then press the decimal point to enter a hyphen, then enter the subfleet#. Press ENT to store the ID.
To enter an EDACS ID in decimal (the default) format,
enter
the ID then press ENT to store the ID. (You don't have to enter leading zeros).
To enter an EDACS ID in AFS format,
press FUNC then 2 to change to AFS format. AFS format will briefly appear on the bottom line. Enter the agency number (xx), use the
decimal key for a hyphen, enter the fleet and subfleet (xxx), then press ENT to store the ID. See also
Switching EDACS Format Display
.
To enter a LTR ID,
enter the ID (no hyphens)
then press ENT to store the ID.
Note: If you enter a duplicate ID, Dupl ID and the list number and location of the ID will appear. Press CL to clear or ENT to accept.
Note: If you enter the ID in the wrong format (ex: an EDACS ID into a Motorola bank), the scanner will beep 3 times and Invalid ID will appear briefly on the bottom
line.
To Text Tag An ID
,
press TEXT.
Move the cursor to the position you want using
to move right, or
to move left, then skip to
Entering Characters
.
To Set the ID Delay for the Bank
,
Press FUNC then DELAY.
Press
or
to select the delay then press ENT to store the setting. You can't set ID delays per ID like channels. See
Changing ID Delay
.
To Lock or Unlock an ID
,
press L/OUT.
LO will appear in the display to the right of the ID# if it is locked out and lo will appear if it is unlocked.
Press
to move to the next ID location and enter the rest of the IDs the same way.
Press MAN to exit programming or SCAN to start scanning.
Changing ID Delay
You have to set the ID delay for the bank to pause on an ID before scanning resumes. Setting the scan delay for the channel has no effect on an ID. The delay can only be set for the whole bank,
not an individual ID. When activated, the ID delay watches the control channel command for the delay time when the signal disappears from the voice channel.
1. In Manual mode select any channel
of the bank you want to turn a list on or off in by entering the bank number and channel number (Ex: 001) then press MAN to advance to the channel.
2. Press PGM then TRUNK
to put the scanner in program and trunk modes. You will see the ID list.
3. Press FUNC then DELAY.
Use Up/Down keys to set ID delay appears in the display.
4. Press
or
to change the delay then press ENT to store the setting.
Press MAN
to exit programming.
Clearing IDs
To Clear a Single ID:
1. In Manual mode select any channel
of the bank that has the ID you want to clear by entering the bank number and channel number (Ex: 001) then press MAN to advance to the
channel.
2. Press PGM the TRUNK.
You will see the bank number (09), list number (04), and the list status (ON or OFF) on the top line.
3. Press TRUNK
(each time) to select the list (04). Select the ID# (029) by pressing
or
(or press and hold; faster).
4. Press FUNC then CL.
Press MAN to exit programming or SCAN to start scanning.
To Clear All IDs in a Bank:
1. In Manual mode select any channel
of the bank you want clear the IDs in by entering the bank number and channel number (Ex: 001) then press MAN to advance to the channel.
2. Press PGM the TRUNK.
You will see the bank number (09), list number (04), and the list status (ON or OFF) on the top line.
3. Press FUNC then 6.
Clear entire list ? Press 1 to clear all, any other key aborts appears. Press 1 and Please wait (if there are a lot of IDs) then List cleared will appear. Then the
ID list will reappear. Press MAN to exit programming or SCAN to start scanning.
Signal Stalker II
Contents
Your scanner's Signal Stalker II feature provides a powerful new tool for you to rapidly detect, monitor, and store frequencies from nearby radio transmissions. The Signal Stalker II feature is more
sensitive than portable frequency counters and will detect transmissions at a greater distance. Signal Stalker II functions by rapidly sweeping through the RF spectrum in 1 MHz segments. If RF
signal energy is detected in a 1 MHz segment, Signal Stalker II will sweep through the 1MHz segment in finer steps until the source of the RF signal energy is found. The Signal Stalker II feature
is similar in functionality to portable frequency counters that cost much more than your scanner, but provides many advantages over typical portable frequency counters. For example: The Signal
Stalker II allows you to sweep the entire range of your scanner's design frequencies, or you can specify just those frequency ranges that you wish to sweep.
The Signal Stalker II feature can be set to watch for activity on all band frequencies or Police/Fire frequencies only. You can turn on/off frequency subbands (groups). You can activate the
Attenuator
and/or turn the
Delay
on also. You can lock out 150 frequencies while searching all bands and 50 frequencies while searching Police/Fire frequencies.
Special Signal Stalker
You can also change the Normal Signal Stalker II operation to the Special Signal Stalker II operation. In the Special Stalker operation, the frequency range is still divided by 1 MHz segments. But,
if you lockout 5 frequencies within a 1 MHz segment, the scanner will skip that entire segment in subsequent sweeps.
Certain segments of the spectrum are used by high power transmitters, such as paging transmitters. You can press L/OUT when the Signal Stalker II stops on these undesired transmissions to
prevent the Signal Stalker II from stopping on them in future sweeps, however, the Signal Stalker II will still see their signal energy when sweeping through the 1 MHz segment. This will cause the
Signal Stalker II to execute another fine step search of the 1 MHz segment. If you have locked out the undesired transmissions, the Signal Stalker II will not stop on them again but the overall
sweep performance of the Signal Stalker II will be slowed accordingly.
Note: Priority mode is not available while using Signal Stalker II.
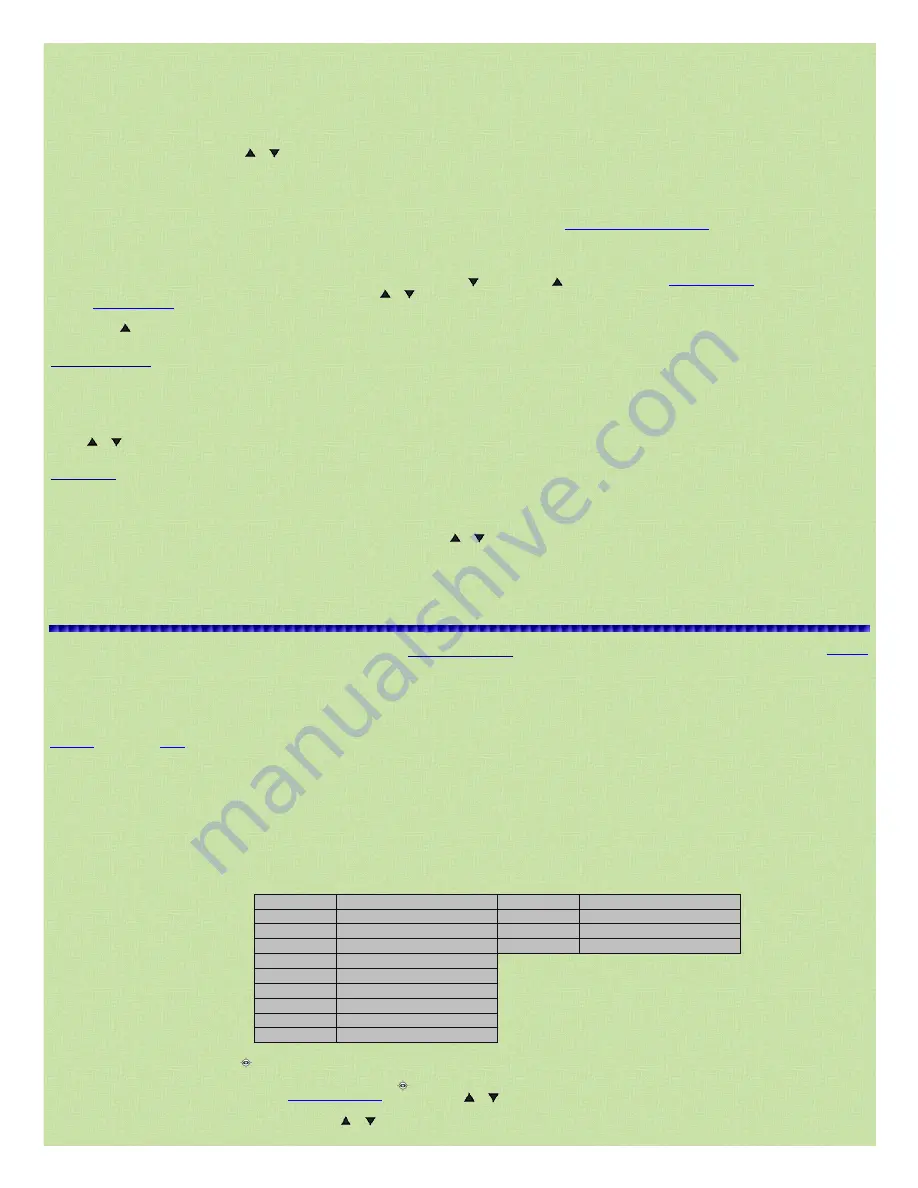
Signal Stalker searches in 2 modes:
All bands and just Police/Fire bands.
All Signal Stalker bands
Band 0
2554
Band 1
108137
Band 2
137174
Band 3
216300
Band 4
300406
Band 5
406470
Band 6
470512
Band 7
806869
Band 8
894960
Band 9
12401300
Police/Fire Signal Stalker bands
Band 0
33.446.5
Band 1
151170
Band 2
453467
Band 3
851869
To Turn Signal Stalker ll On,
Press and hold
(SCAN). Sig.Stalker and the group numbers will appear in the display. The cursor will blink on the group being stalked.
To switch between All groups and Police/Fire groups,
Press FUNC then
(SCAN). Rx: All Bands or Rx: Police/Fire will appear in the bottom of the display.
To switch between Normal Signal Stalker and
Special Signal Stalker
,
Press FUNC then
or
. Sp.Stalker appears in the top of the display when Special Signal Stalker is on.
To turn band groups on or off,
press the number keys (09).
To change search directions or resume stalking,
press the
or
button. An arrow in the upper right of the display shows the direction.
To Pause on a frequency,
quickly press PSE to stop searching and listen to the transmission. **PAUSED** appears in the display. To continue searching, press PSE again.


