20-428 Owner’s Manual
Page 40 of 50
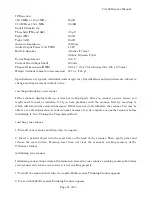
1. Press PROG then TRUNK.
2. For each bank you want to program, repeatedly press FUNC. Then /¥ or ¥/ to select the bank.
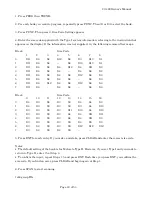
3. Press FUNC. Then press 8. Size Code Setting appears.
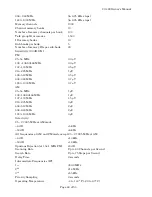
4. Enter the size code supplied with the Type I system information, referring to the instruction that
appears on the display. If the information was not supplied, try the following common fleet maps.
Block
Size
Code
1 2 3 4 5 6 7 8
0 S11 S4 S4 S12 S4 S3 S10 S1
1 S11 S4 S4 – S4 S10 S10 S1
2 S11 S4 S4 S4 S12 S4 S11 S2
3 S11 S4 S4 S4 – S4 S4 S2
4 S11 S4 S4 S4 S4 S12 S4 S3
5 S11 S4 S4 S4 S4 – S4 S3
6 S11 S4 S12 S4 S4 S12 S4 S4
7 S11 S4 – S4 S4 – S4 S4
Block
Size
Code
9 10 11 12 13 14 15 16
0 S4 S0 S4 S0 S3 S4 S4 S3
1 S4 S0 S0 S0 S3 S3 S4 S10
2 S0 S0 S0 S0 S11 S10 S4 S10
3 S0 S0 S0 S0 S4 S4 S11 S11
4 S0 S0 S0 S0 S4 S4 S11 S0
5 S0 S0 S0 S0 S0 S4 S0 S0
6 S0 S4 S0 S0 S0 S12 S12 S12
7 S0 S4 S0 S4 S0 – – –
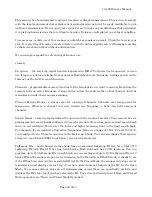
5. Press ENT for each entry. If you make a mistake, press CLEAR and enter the correct size code.
Notes:
•
The default setting of the bank is for Motorola Type II. However, if you set Type I and you want to
return to Type II, enter 15 at Step 4.
•
To confirm the input, repeat Steps 1-5 and press ENT. Each time you press ENT, you confirm the
size code. If you find an error, press CLEAR and begin again at Step 1.
6. Press SCAN to start scanning.
talk group IDs


