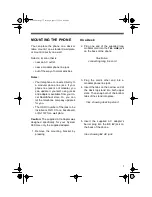
background image

9

On a Wall

To mount the System 999 directly on the
wall, you need two screws (not supplied)
with heads that fit into the keyhole slots
on the bottom of the base.

Note: Check for the proper viewing an-
gle of the liquid crystal display before
mounting this system to a wall.

1. Drill two holes, one above the other,

3

1

/

4

 inches apart. Thread a screw

into each hole, letting the heads
extend about 

1

/

8

 inch from the wall.

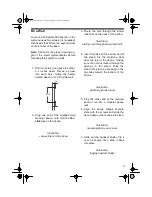
2. Plug one end of the supplied long

modular phone cord into the 

TEL.

LINE

 jack on the phone.

3. Route the cord through the strain-

relief slot on the back of the phone.

4. Insert the tabs on the narrow end of

the stand into the matching slots
near the top of the phone, making
sure the cord is routed through the
opening in the stand. Snap the
stand into place by pressing in the
two tabs toward the bottom of the
phone.

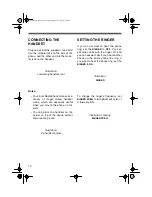
5. Plug the other end of the modular

phone cord into a modular phone
jack.

6. Align the phone stand’s keyhole

slots with the screws and slide the
phone down until it snaps into place.

7. Slide out the handset holder, flip it

over as shown, then slide it back
into place.

1

/

8

"

3

1

/

4

"

Illustration,

connecting cord to phone

Illustration,

routing cord through strain-relief slot

Illustration,

attaching phone stand

Illustration,

mounting phone on screws

Illustration,

flipping handset holder

43-999.fm  Page 9  Tuesday, August 17, 1999  8:28 AM

Содержание Caller ID System 999

Страница 1: ...Cat No 43 999 OWNER S MANUAL Please read before using this equipment Caller ID System 999 Big Button Caller ID Phone with Call Waiting 43 999 fm Page 1 Tuesday August 17 1999 8 28 AM...

Страница 2: ...h Contrast Control shows you an en tire Caller ID record on one screen and lets you adjust the display s contrast Clock displays the current time as provided to Caller ID service subscrib ers by your...

Страница 3: ...is symbol is intended to alert you to the presence of uninsulated danger ous voltage within the product s enclo sure that might be of sufficient magnitude to constitute a risk of elec tric shock Do no...

Страница 4: ...provide the phone s FCC registration number and REN to your telephone company These numbers are shown on the bottom of the phone Note You must not connect your tele phone to coin operated systems part...

Страница 5: ...ing a Number in the Emergency Memory 12 Storing a Number in Indirect Memory 12 Dialing a Stored Number 12 Storing a Number in Voice Mail Memory 13 Using FLASH 13 Using REDIAL 13 Using Tone Services on...

Страница 6: ...ve dead or weak batteries in the phone Dispose of old batteries promptly do not bury or burn them Follow these steps to install batteries 1 If the desk top stand is connected remove it by pressing the...

Страница 7: ...d is RJ11C for a baseboard or RJ11W for a wall plate Caution The supplied AC adapter was designed specifically for your System 999 Use only the supplied adapter 1 Remove the mounting bracket by pressi...

Страница 8: ...ing in the stand Then snap the stand into place by pressing in the two tabs toward the bottom of the phone 4 Plug the other end of the phone cord into the phone jack on the wall plate 5 Align the phon...

Страница 9: ...e 4 Insert the tabs on the narrow end of the stand into the matching slots near the top of the phone making sure the cord is routed through the opening in the stand Snap the stand into place by pressi...

Страница 10: ...of the phone without disconnecting a call SETTING THE RINGER If you do not want to hear the phone ring set the RINGER to OFF You can still make calls with the ringer off and you can answer calls if yo...

Страница 11: ...ther If the dial tone stops you have touch tone service Leave TONE PULSE set to TONE If the dial tone continues you have pulse service Set TONE PULSE to PULSE SETTING THE HANDSET VOLUME Slide the HAND...

Страница 12: ...record the system skips the area code if it matches the one you stored Follow these steps to store your area code 1 Leave the handset resting on the base press MEM 2 Press DIAL BACK Enter area code a...

Страница 13: ...ne numbers Notes The 3 emergency memory buttons are set with the factory default 911 Should you store your own emer gency numbers in the emergency memory buttons when a power fail ure occurs the emerg...

Страница 14: ...t on the base press MEM 2 Enter the access code up to __ dig its then press MEM again 3 Press VOICE MAIL When your voice mail system prompts you for the access code press VOICE MAIL USING FLASH FLASH...

Страница 15: ...cial tone services by following these steps 1 Be sure TONE PULSE is set to PULSE 2 Dial the service s main number 3 When the service answers press Any additional numbers you dial are sent as tone sign...

Страница 16: ...Caller ID memory be comes full any new call replaces the oldest call record REVIEWING CALLER ID RECORDS When you have new Caller ID records ones you have not reviewed ___ ap pears To review Caller ID...

Страница 17: ...you hang up call about 30 seconds after checking the message by the message waiting service NO CALLER ID Appears if there is no Caller ID information stored in the sys tem s memory OUT OF AREA Appears...

Страница 18: ...r ID record then press VIP To call back a VIP number press VIP Press or until you see the desired VIP number then lift the handset and press DIAL DELETING CALLER ID RECORDS You can delete a single Cal...

Страница 19: ...are weak or not installed and AC adapter is not connected appears AC power is interrupted Be sure AC adapter is correctly and securely connected Volume drops or you hear unusual sounds Someone has pic...

Страница 20: ...lly Dropping it can damage circuit boards and cases and can cause the phone to work improperly Use only fresh batteries of the required size and type Old batteries can leak chemicals that damage your...

Страница 21: ...the operation of this telephone The tele phone company notifies you of these changes in advance so you can take the necessary steps to prevent interruption of your telephone service LIGHTNING Your te...

Страница 22: ...RadioShack A Division of Tandy Corporation Fort Worth Texas 76102 11A8 Printed in China 43 999 fm Page 22 Tuesday August 17 1999 8 28 AM...

Страница 23: ...RadioShack A Division of Tandy Corporation Fort Worth Texas 76102 11A8 Printed in China 43 999 fm Page 23 Tuesday August 17 1999 8 28 AM...

Страница 24: ...arranty period take the product and the RadioShack sales receipt as proof of purchase date to any RadioShack store RadioShack will at its option un less otherwise provided by law a correct the defect...

Отзывы: