background image

E-28

Using the Drawbar Organ Mode

735A-E-030A

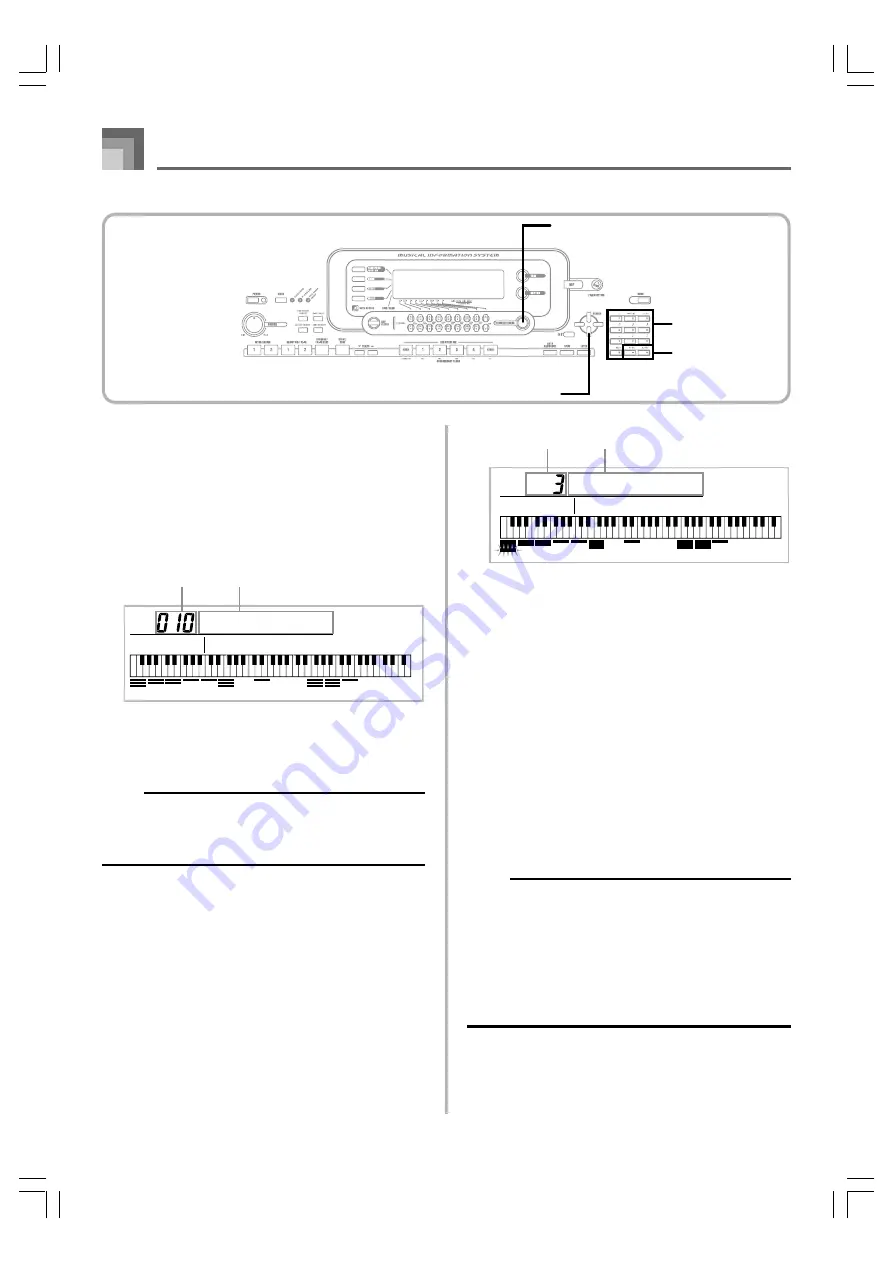
To select a drawbar organ tone

1

Find the drawbar organ tone you want to use in
the tone list and note its tone number.

2

Press the DRAWBAR ORGAN button.

• This causes the drawbar organ tone selection screen

to appear.

3

Use the number buttons to input the three digit tone
number for the tone you want to select.

NOTE

• Always input all three digits for the tone number,

including leading zeros (if any).

• You can also increment the displayed tone number by

pressing [+] and decrement it by pressing [–].

To edit a drawbar organ tone

1

Select the drawbar organ tone (000 to 049, 100 to
199) you want to edit.

2

Use the [

] and [

] CURSOR buttons to display

the drawbar organ tone editing screen. Select the
parameter whose setting you want to change.

Example:  Selecting the “Ft16

” parameter

• There are a total of 13 parameters. You can use the

[

] and [

] CURSOR buttons to cycle through them.

See  “Parameter Details” on page E-29 for more
information.

• While the “More?” screen is on the display, you can

advance to the synthesizer and DSP effect editing
screens by pressing the [

] CURSOR button or the

[+] button.

3

Use the [

] and [

] CURSOR buttons or the [+]

and [–] buttons to change the setting of the currently
displayed parameter.

• You can also change a parameter setting by entering

a value with the number buttons.

• You can monitor the changes in a tone by playing

notes on the keyboard as you adjust parameter
settings.

NOTE

• Selecting a different tone after you edit parameters

replaces parameter settings with those of the newly
selected tone.

• If you have drawbar organ tones assigned to more than

one channel, changing the drawbar organ setting for one
of the channels causes the same setting to be applied
to all of the other channels as well.

• See “To save an edited drawbar organ tone” on page E-

30 for information about saving your edits.

R o c k O r

g

1

Tone Number

Tone Name

F t 1 6 ’

Parameter Setting

Parameter Name

DRAWBAR ORGAN

Number buttons

[+]/[–]

CURSOR

WK3000_e_26-37.p65

03.4.8, 11:51

28

Содержание 735A-E-002A

Страница 1: ...rporation All Rights Reserved RadioShack and RadioShack com are trademarks used by RadioShack Corporation OWNER S MANUAL Please read before using this equipment www radioshack comSM MD 1800 76 Key MID...

Страница 2: ...er or an experienced radio TV technician for help FCC WARNING Changes or modifications not expressly approved by the party responsible for compliance could void the user s authority to operate the equ...

Страница 3: ...if the product is operated incorrectly while ignoring this indication CAUTION This indication stipulates matters that have the risk of causing injury as well as matters for which there is the likelih...

Страница 4: ...ly 1 Turn off power 2 If you are using the AC adaptor for power unplug it from the wall outlet 3 Contact your original retailer or an authorized CASIO Service Provider DANGER Alkaline Batteries Perfor...

Страница 5: ...the wall outlet first Leaving the AC adaptor plugged in creates the risk of damage to the AC adaptor fire and electric shock Batteries Misuse of batteries can cause them to leak resulting in damage t...

Страница 6: ...amage your hearing Heavy Objects Never place heavy object on top of the product Doing so can make the product top heavy causing the product to tip over or the object to fall from it creating the risk...

Страница 7: ...rd memory Auto Accompaniment Simply play a chord and the corresponding rhythm bass and chord parts play automatically One touch Preset instantly recalls the most suitable tone and tempo settings to ma...

Страница 8: ...er You can use your computer to download data from the CASIO MUSIC SITE SmartMediaTM Card Slot A built in SmartMedia card slot helps to simplify transfer of data from a computer and lets you store vol...

Страница 9: ...gan Mode E 26 To select a drawbar organ tone E 28 To edit a drawbar organ tone E 28 Parameter Details E 29 To save an edited drawbar organ tone E 30 Applying Effects to Tones E 31 Effect Blocks E 31 S...

Страница 10: ...ng E 62 Mixer Mode Settings E 63 Playing Back from Song Memory E 64 Recording Melody and Chords with Step Recording E 64 Recording Multiple Tracks E 67 Correcting Mistakes While Step Recording E 69 Ed...

Страница 11: ...101 Formatting External Storage Media E 102 Inputting Characters E 103 SmartMedia Card Error Messages E 104 Disk Drive Error Messages WK 3500 Only E 105 Troubleshooting E 106 Specifications E 109 Care...

Страница 12: ...E 10 735A E 012A General Guide 8 C 0 K L A B I T 3 S R U 1 2 7 3 6 5 4 9 F D G H E M M 2 Q N O P 1 V W X Y Z a b J _ c WK3000_e_10 25 p65 03 4 8 11 51 10...

Страница 13: ...ZE button K SPLIT button L LAYER button M Speaker N Rhythm list O Tone list P Display Q DEMO button 4 R WK 3500 PHONES terminal WK 3000 PHONES OUTPUT terminal S CHORD root names T Percussion instrumen...

Страница 14: ...are 3 demo tunes which continuously play in sequence To stop demo tune play press either the DEMO button or the START STOP button NOTE Pressing the buttons skips to the next demo tune The PIANO SETTIN...

Страница 15: ...SUSTAIN ASSIGNABLE JACK MIDI DC 12V h i j k OUT IN SUSTAIN ASSIGNABLE JACK MIDI LINE OUT R L MONO DC 12V h i j k l WK 3000 h MIDI OUT terminal i MIDI IN terminal j SUSTAIN ASSIGNABLE JACK terminal k...

Страница 16: ...n the keyboard notes played back from song memory chord forms and received MIDI data are shown here 7 Octave symbol 2 One symbol indicates the note being produced by the keyboard is one octave lower t...

Страница 17: ...se Keyboard Settings Mixer Synth Effect or Disk Card mode is currently active Any receive data outside the range of E1 to G7 is not displayed NOTE Display examples shown in this User s Guide are inten...

Страница 18: ...ifficult to read Abnormally low speaker headphone volume Distortion of sound output Occasional interruption of sound when playing at high volumes Sudden power failure when playing at high volumes Flic...

Страница 19: ...ways grasp the AC adaptor when unplugging Insert the AC adaptor into the wall outlet as far as it will go Unplug the AC adaptor from the wall outlet during lightening storms or before leaving on a tri...

Страница 20: ...s the POWER button while a user data store a system initialization a SmartMedia card format or a floppy diskette format WK 3500 only operation is being performed Wait until the ongoing operation is co...

Страница 21: ...put selector to the setting that specifies the terminal such as AUX IN that the keyboard is connected to Use the keyboard s VOLUME knob to adjust the volume level OUT IN SUSTAIN ASSIGNABLE JACK MIDI L...

Страница 22: ...ion that comes with your audio equipment for full details Musical Instrument Amplifier 3 Use a commercially available connecting cord to connect the keyboard to a musical instrument amplifier NOTE Be...

Страница 23: ...ft Pedal Depressing the pedal softens the sound of the notes being played Rhythm Start Stop Pedal In this case the pedal performs the same functions as the START STOP button Accessories and Options Us...

Страница 24: ...e information 4 Area for data transferred from a computer See Using the Data Downloard Service on page E 91 for more information For information about waveforms see Creating a User Tone on page E 54 5...

Страница 25: ...keyboard have been recorded and processed using a technique called digital sampling To ensure a high level of tonal quality samples are taken in the low mid and high ranges and then combined to provi...

Страница 26: ...This causes a rhythm that is optimized for piano will start to play To stop rhythm play press the START STOP button again NOTE Pressing the PIANO SETTING button while a rhythm is playing stops rhythm...

Страница 27: ...rato is applied as long as the MODULATION button is depressed NOTE Modulation can be used to add greater expression to sustained melody notes being played using a violin synthetic reed or other simila...

Страница 28: ...eeen Drawbar Organ Tone Selection Screen DRAWBAR ORGAN button Drawbar Organ Tone Editing Screen More Screen EXIT button CURSOR button DRAWBAR ORGAN button Synthesizer Editing Screen CURSOR button CURS...

Страница 29: ...e display function as drawbar buttons while the drawbar organ tone selection screen is on the display after you press the DRAWBAR ORGAN button Each pair of buttons upper and lower represents a drawbar...

Страница 30: ...hrough them See Parameter Details on page E 29 for more information While the More screen is on the display you can advance to the synthesizer and DSP effect editing screens by pressing the CURSOR but...

Страница 31: ...en a sustained tone configured using the drawbars is played Parameter Name Drawbar 16 Drawbar 5 1 3 Drawbar 8 Drawbar 4 Drawbar 2 2 3 Drawbar 2 Drawbar 1 3 5 Drawbar 1 1 3 Drawbar 1 Parameter Display...

Страница 32: ...ress the YES button to save the data After the save operation is complete the message Complete appears and then the display returns to the tone selection or rhythm selection screen To cancel save pres...

Страница 33: ...effects including Room and Hall CHORUS The chorus effect gives sound greater depth by causing it to vibrate You can choose from among 16 different chorus effects including Chorus and Flanger EQUALIZER...

Страница 34: ...fives seconds after you press the button 3 Use the and buttons or number buttons to select the type of DSP you want See the Effect List on page A 17 for information about the DSP types that can be sel...

Страница 35: ...or the keyboard part to which the Advanced Tone is assigned is turned on The Mixer DSP line setting is automatically turned off for each part that does not have an Advanced Tone assigned Because of th...

Страница 36: ...parameters of the effect you selected if you want See Changing the Settings of REVERB Parameters for more information Pointer About the DSP Button Checking the DSP button will tell you whether or not...

Страница 37: ...evel Range 000 to 127 Specifies the size of the delay sound A higher value produces a larger delay sound Delay Feedback Range 000 to 127 Adjusts delay repeat A higher value produces a greater number o...

Страница 38: ...higher value produces deeper undulation NOTE Whether or not an effect is applied to the parts that are sounding also depends on Mixer Mode Reverb Send Chorus Send and DSP on off settings See Mixer Fu...

Страница 39: ...to select the equalizer type you want See the list on page A 17 for information about the equalizer types that are available Example To select Jazz Pressing the EXIT or EFFECT button exits the equali...

Страница 40: ...to Accompaniment About the MODE Button Use the MODE button to select the accompaniment mode you want to use Each press of the MODE button cycles through the available accompaniment modes as shown in t...

Страница 41: ...rement the displayed rhythm number by pressing and decrement it by pressing Appears when RHYTHM button is pressed Number and name of selected rhythm 8 B e a t 1 Ro c k 2 Playing a Rhythm To play a rhy...

Страница 42: ...ythm you want to use and set the tempo of the rhythm to the value you want To use Auto Accompaniment 1 Use the MODE button to select CASIO CHORD FINGERED or FULL RANGE CHORD as the accompaniment mode...

Страница 43: ...es are marked above the keys of the accompaniment keyboard Note that the chord produced when you press an accompaniment keyboard does not change octave regardless of which key you use to play it Minor...

Страница 44: ...fingering Except for the exception specified in note 2 above all of the keys that make up a chord must be pressed Failure to press even a single key will not play the desired FINGERED chord FULL RANGE...

Страница 45: ...TOP button to start rhythm play 2 Select the fill in variation you want To insert Fill in 1 press the VARIATION FILL IN 1 button while Variation 1 of the rhythm is playing To insert Fill in 2 press th...

Страница 46: ...n the accompaniment keyboard To cancel synchro start standby press the SYNCHRO FILL IN NEXT button one more time Finishing with an Ending Pattern You can end your performances with an ending pattern t...

Страница 47: ...en you are using Auto Accompaniment Auto Harmonize automatically adds additional notes to your melody in accordance with the chord that is being played The result is a harmony effect that makes your m...

Страница 48: ...volume balance See Using the Parameter Edit Mode on page E 48 for details on these procedures NOTE The default harmonize note tone when you first turn on Auto Harmonize is the same tone as the melody...

Страница 49: ...ve the CHANNEL buttons The CHANNEL button name in the above table corresponds to the next marked on the keyboard below the CHANNEL buttons See page E 74 and E 75 for information on layered split and l...

Страница 50: ...nge Example Select volume setting by displaying Volume Each press of or CURSOR cycles through the parameters You can use the and CURSOR buttons to change to another channel at any time during this pro...

Страница 51: ...ow Parameters Work The following are the parameters whose settings can be changed in the Parameter Edit Mode Tone Parameters Tone Range 000 to 803 Drawbar organ tones 000 to 199 This parameter control...

Страница 52: ...arameters DSP Level Range 0 to 127 Sets the post DSP volume DSP Pan Range 64 to 0 to 63 Sets the post DSP stereo pan DSP L e v e l DSPP a n D R v b S n d D Ch o S n d Mixer Function 735A E 052A DSP Sy...

Страница 53: ...f Frequency Resonance Tone Pitch Parameters Vibrato Type Vibrato Delay Vibrato Rate Vibrato Depth Octave Shift Tone Characteristic Setting Parameters Level Touch Sense Reverb Send Chorus Send DSP Line...

Страница 54: ...eter controls the octave of all tones 4 Tone Characteristic Setting Parameters Level This parameter controls the overall volume of the tone Touch Sense This parameter controls changes in volume and ti...

Страница 55: ...data transferred from computer is stored see Using the Data Downloard Service on page E 91 Transfer only is allowed and no parameter editing is allowed Initially nothing is stored in the user drum se...

Страница 56: ...r information on setting range for each parameter 5 After you are finished editing the sound press the SYNTH button to exit the Synthesizer Mode Synthesizer Mode 735A E 056A A t k T i me Currently sel...

Страница 57: ...o the main tone only Modulation Depth Range 0 to 127 WK 3000 only On the WK 3000 this parameter controls the modulation value when the MODULATION button is pressed How the MODULATION button functions...

Страница 58: ...Sqr Square Wave y V i bDe l a V i b R e a t V i bD t e p h Oc t S h i f t L e v e l Synthesizer Mode 735A E 058A Touch Sensitivity Range 64 to 00 to 63 This parameter controls changes in the volume of...

Страница 59: ...ying to create it is always a good idea to start with a preset tone that is similar Experiment with various different settings There are no real rules about what a tone should sound like Let your imag...

Страница 60: ...mentarily on the display followed by the tone or rhythm selection screen To abort the save operation at any time press the SYNTH button or the EXIT button to exit the Synthesizer Mode Pressing the SYN...

Страница 61: ...y disc drive WK 3500 only or card slot page E 94 Registration Memory Setup Names You can assign setups into one of 32 areas which you can select using BANK buttons 1 through 4 and the four REGISTRATIO...

Страница 62: ...d REGISTRATION buttons NOTE The setup is saved as soon as you press a REGISTRATION button in step 3 above Registration Memory B a n k S t o r e To Recall a Setup from Registration Memory 1 Use the BAN...

Страница 63: ...tart End Track 2 Track 3 Track 4 Track 5 Track 6 Auto accompaniment Rhythm Bass Chord 1 2 3 Keyboard play Keyboard play Keyboard play Keyboard play Keyboard play Keyboard play Melody data recorded in...

Страница 64: ...art recording When recording starts the REC indicator flashes on the display After a few moments the indicator stops flashing and remains on the display Real time recording without a rhythm starts If...

Страница 65: ...ogress causes the contents of the track your are currently recording to be lost You can save memory data to external media if you want See Saving Data on page E 92 for more information Remember that y...

Страница 66: ...y keyboard regardless of the MODE button setting To turn off a specific track Press the SONG MEMORY TRACK button of the track you want to turn off or use the Mixer Page E 47 to turn off the channel of...

Страница 67: ...RT STOP button This enters playback standby for the song you have just recorded To play back the song at this time press the START STOP button NOTE Use the procedure under Correcting Mistakes While St...

Страница 68: ...th of a Note During step recording the number buttons are used to specify the length of each note Note lengths Use number buttons 1 through 6 to specify whole notes half notes quarter notes eighth not...

Страница 69: ...recording when you are finished IMPORTANT The length of the ending depends on the rhythm you are using Check the length of the pattern you are using and set the length of the chord accordingly in step...

Страница 70: ...to 4 The song number you select should be the one where you previously input Track 1 S t e p Re c Flash 2 Use the SONG MEMORY TRACK buttons to select the track you want to record to 2 through 6 Examp...

Страница 71: ...orded Correcting Mistakes While Step Recording Memory data can be thought of as a musical score that progresses from left to right with the input point normally at the far right of the recorded data T...

Страница 72: ...ight is deleted Editing Memory Contents After you record to keyboard memory you can recall individual notes and parameter settings such as tone number and make any changes you want This means you can...

Страница 73: ...nnot use the edit procedure to add more data to a recording You cannot move portions of a recording to a different location within the recording Note lengths cannot be changed No t e C4 Pitch Velocity...

Страница 74: ...FILL IN 1 button VARIATION FILL IN 2 button SYNCHRO FILL IN NEXT button operations Press the rhythm controller button you want to change to P o p I n t E n d 1 Editing a Song You can perform the foll...

Страница 75: ...want to delete the track 6 Press the YES button to delete the track NOTE You cannot change the song number while in track delete standby Pressing the SONG MEMORY button while in track delete standby...

Страница 76: ...during record standby or recording in the Song Memory Mode or while you are using the SMF Player Mode Main Tone BRASS GM Layered Tone FRENCH HORN GM F r Ho r nG Parts Up to four parts numbered 1 thro...

Страница 77: ...ile holding down the SPLIT button press the keyboard key where you want the leftmost key of the high end range to be Example To specify G3 as the split point press the G3 key 5 Now try playing somethi...

Страница 78: ...utton so both of the SPLIT and LAYER indicators are displayed Split Tone PIZZICATO GM Layered Split Tone STRINGS1 Main Tone BRASS GM Layered Tone FRENCH HORN GM Split point Using Layer and Split Toget...

Страница 79: ...If a transpose operation causes a note to for the tone being used to be outside of the pitch range the keyboard automatically plays the same note in the nearest octave that falls within the pitch rang...

Страница 80: ...aried in accordance with the amount of pressure applied just like an acoustic piano To turn touch response on and off 1 Press the TRANSPOSE FUNCTION button This causes a pointer to appear on the displ...

Страница 81: ...onize Type Specifies of how sound should change with keyboard pressure Fine adjustment of overall keyboard tuning Adjusts display brightness Assigns of effects to pedals Turns mixer hold on or off Tur...

Страница 82: ...the and CURSOR buttons and the and CURSOR buttons to recall the items whose settings you want to change 735A E 082A Keyboard Settings Tone selection screen MIDI setting Delete setting Initialize setti...

Страница 83: ...of the data to be deleted The data size value represents kilobyte units 5 Now use the number buttons or the increase and decrease buttons to select the data you want 6 Press the CURSOR button This cau...

Страница 84: ...dal effect to a pedal Assigns the START STOP button function to a pedal When Mixer Hold is turned on the parameters of accompaniment parts Part 6 through Part 10 cannot be modified by accompaniment da...

Страница 85: ...r by input from an external sequencer Initializes all parameters except for the display contrast setting Initializes to initial factory defaults Deletes all data in the user area Setting menu SMF Dele...

Страница 86: ...ou can also load SMF data from a SmartMedia card or floppy diskette into the keyboard s user area and then play it back using the SMF Player Mode The follow shows the maximum number of files that can...

Страница 87: ...Playback Mode A 1 PlayMode Playback Mode A L PlayMode Playback Mode int Output OUTPUT out Output OUTPUT S 1 ABC2 Playback Mode File Name S 1 ABC3 Playback Mode File Name Direct input using number but...

Страница 88: ...me corrupted I n t e r n a l To play back an SMF Flash Memory 2 1 Use the SMF PLAYER button to display the Internal indicator in the text area of the screen This causes the SMF PLAYER indicator to app...

Страница 89: ...ers out MIDI OUT NOTE Layer split andAuto Harmonize are automatically turned off in the SMF Player Mode 735A E 089A Using the SMF Player 4 Use the and CURSOR buttons or the and buttons to select the f...

Страница 90: ...yer Mode 735A E 090A Using the SMF Player Use only Format 0 SMF data Use different data You are attempting to play SMF data that is not Format 0 There is a problem with the SMF data you are trying to...

Страница 91: ...I allows you to send the data for multiple parts at the same time with each part being sent over a separate MIDI channel There are 16 MIDI channels numbered 1 through 16 and MIDI channel data is alway...

Страница 92: ...ore information about each MIDI message 735A E 092A MIDI MIDI Settings You can change the settings of a number of parameters that control how MIDI messages are sent and received MIDI Parameters You ca...

Страница 93: ...ation software and data See the application software s online help for information about how to use the software CASIO MUSIC SITE http music casio com 1 Go to the above URL 2 Select a region or countr...

Страница 94: ...e 1 Pack User Memory Capacity 200 16 8 5 4 100 100 20 100 1 File Name Extension MID Z00 Z01 Z02 Z03 Z04 Z05 Z06 Z07 Z08 Z09 All Data 1 Package File A package file combines tone settings DSP effect set...

Страница 95: ...oring and using SmartMedia cards in the following types of locations Such conditions can cause corruption of data stored on the card Areas subject to high temperatures high humidity or corrosive agent...

Страница 96: ...gain simply insert the diskette into the disk drive and load it You can play back SMF standard MIDI file data created on a personal computer and saved to diskette Floppy Diskette Precautions IMPORTANT...

Страница 97: ...This type of diskette does not have a hole in the lower right corner Write Protection IMPORTANT You can write protect a diskette so data on it cannot be deleted and no new data can be stored on the di...

Страница 98: ...2 Remove the diskette from the drive by hand Using External Storage Media This section explains how to use SmartMedia cards and floppy diskettes WK 3500 only for data storage In this manual SmartMedia...

Страница 99: ...to overwrite the existing data with the loaded data Press the YES button to load the data This will cause the data access lamp to light and the message Pls Wait to appear on the display to indicate th...

Страница 100: ...OR button to display the Card Mode or Disk Mode menu 3 Use the and CURSOR buttons to display the Save screen 4 Press the CURSOR button to advance to the file type selection screen 5 Use the and CURSOR...

Страница 101: ...not be able to see any files that are located in a subdirectory PREPARATION SmartMedia Card Insert the SmartMedia card that contains the data you want to load into the keyboard s card slot Floppy Dis...

Страница 102: ...you previously saved to external storage media PREPARATION SmartMedia Card Insert the SmartMedia card that contains the file you want to rename into the keyboard s card slot Make sure that the sticker...

Страница 103: ...eleting a File You can perform the procedure in this section to delete a file from external storage media IMPORTANT Note that the file delete operation cannot be undone Make sure that you no longer ne...

Страница 104: ...lete operation press the DISK CARD button CARD button on the WK 3000 to exit the Card Mode Formatting External Storage Media Use the procedures in this section to format external storage media before...

Страница 105: ...isplay the Format screen 4 Press the CURSOR button WK 3500 Users If you are formatting a floppy diskette a screen will appear here for specification of the floppy diskette density Use the and CURSOR b...

Страница 106: ...memory to save data produced by converting song data from SONG format to SMF format The data on the card is corrupted Use a different card 1 Use a different card 2 Delete files you no longer need fro...

Страница 107: ...kette is corrupted A file with the same name as the one you are trying to use already exists on the floppy diskette Save the new file to a different diskette or use another name 1 Change to a diskette...

Страница 108: ...ned off 7 Mixer channel 1 volume setting is too low 8 The DSP volume parameter is set too low 9 The Expression value of the file data played back on the SMF player is too low Low battery power 1 Accom...

Страница 109: ...layer Mode is currently being use 1 MIDI cables are not connected properly 2 Channel is turned off or volume setting is too low The computer s MIDI Thru function is turned on Accomp Song MIDI Out is t...

Страница 110: ...he system reset operation If this does not solve the problem contact your nearest authorized CASIO Service Provider to request repair Wait until the ongoing operation is complete and then press the PO...

Страница 111: ...CHORD FINGERED FULL RANGE CHORD Rhythm Controller START STOP INTRO ENDING 1 and 2 VARIATION FILL IN 1 and 2 SYNCHRO FILL IN NEXT Accomp Volume 0 to 127 128 steps One touch Presets Recalls settings for...

Страница 112: ...DSP pan DPS system reverb send DPS system chorus send MIDI 16 multi timbre receive GM Level 1 standard Other Functions Pitch Bend Range Adjustable 12 semitones upwards and downwards Modulation Equipp...

Страница 113: ...system Batteries 6 D size batteries Battery Life Approximately 4 hours continuous operation on alkaline batteries AC Adaptor AD 12 Auto Power Off Turns power off approximately six minutes after last...

Страница 114: ...ion of water and a neutral detergent Soak the cloth in the solution and squeeze until it is almost dry Avoid use in areas subjected to temperature extremes Extremely high or low temperature can cause...

Страница 115: ...CmpChoRf 26 E PIANO SOFT E PIANO 5 50 16 N Equalize 27 E PIANO AUTO WAH E PIANO 4 56 32 N Auto Wah 28 E PIANO PHASER E PIANO 4 57 32 N PhaAPan1 29 E PIANO GLASS E PIANO 4 50 16 N Equalize 30 E PIANO...

Страница 116: ...TAR CHORUS STEEL GUITAR 25 50 16 1 ChoDly 4 82 GUITAR UKULELE 24 49 32 N CmpChoRf 83 GUITAR BANJO 105 48 32 N Equalize 84 GUITAR OCT JAZZ GUITAR 26 50 16 1 RvbRoom3 85 GUITAR OVERDRIVE GUITAR 29 48 16...

Страница 117: ...2 54 49 32 N ChoDly 3 140 ENSEMBLE POP HIT 1 55 52 16 N Equalize 141 ENSEMBLE POP HIT 2 55 53 16 N FlanDly1 142 ENSEMBLE RESO SYNTH STRINGS 51 48 32 N ChoDly 3 143 ENSEMBLE SYNTH CHOIR 52 51 16 N StX...

Страница 118: ...REED VELO ALTO SAX 65 51 32 1 GateRvb2 197 REED VELO CLARINET 71 49 16 N Reflect 198 REED OBOE 68 48 32 N GateRvb2 199 REED SOPRANO SAX 64 48 32 N Equalize 200 REED ALTO SAX 65 48 32 1 Equalize 201 R...

Страница 119: ...1 51 16 N Chorus 2 255 SYNTH LEAD ATTACK SQR 2 80 56 16 N 3Tap Dly 256 SYNTH LEAD SQUARE WAVE 1 80 49 32 N Auto Pan 257 SYNTH LEAD SQUARE WAVE 2 80 57 32 N AWhChDly 258 SYNTH LEAD CHIFF LEAD 2 83 50 1...

Страница 120: ...M 7 64 32 N 308 GM CELESTA GM 8 64 32 N 309 GM GLOCKENSPIEL GM 9 64 32 N 310 GM MUSIC BOX 10 64 16 N 311 GM VIBRAPHONE GM 11 64 32 N 312 GM MARIMBA GM 12 64 32 N 313 GM XYLOPHONE 13 64 32 N 314 GM TUB...

Страница 121: ...S 1 62 64 32 N 363 GM SYNTH BRASS 2 63 64 16 N 364 GM SOPRANO SAX GM 64 64 32 N 365 GM ALTO SAX GM 65 64 32 N 366 GM TENOR SAX GM 66 64 32 N 367 GM BARITONE SAX GM 67 64 32 N 368 GM OBOE GM 68 64 32 N...

Страница 122: ...M APPLAUSE 126 64 16 N 427 GM GUNSHOT 127 64 32 N 428 VARIOUS PIANO 1 WIDE 0 65 32 N 429 VARIOUS MELLOW PIANO GM 0 66 32 N 430 VARIOUS PIANO 2 WIDE 1 65 32 N 431 VARIOUS TECHNO PIANO 1 70 32 N 432 VAR...

Страница 123: ...POP HIT 3 55 66 16 N 475 VARIOUS ORCHESTRA HIT 2 55 67 16 N 476 VARIOUS TIMPANI HIT 55 73 16 N 477 VARIOUS TRUMPET 2 56 65 32 N 478 VARIOUS TROMBONE F GM 57 65 32 N 479 VARIOUS MELLOW FRENCH HORN 60...

Страница 124: ...96 10 N Rotary 11 DRAWBAR Soul Organ 2 11 96 16 N Rotary 12 DRAWBAR Gospel Organ 1 12 96 16 N Rotary 13 DRAWBAR Chorus Organ 1 13 96 16 N Rotary 14 DRAWBAR Overdrive Organ 2 14 96 10 N OvdRotry 15 DRA...

Страница 125: ...o Dly4 42 DRAWBAR Tremolo Organ 42 96 16 N Cho Trem 43 DRAWBAR Delay Organ 2 43 96 16 N Cho Dly6 44 DRAWBAR LFO Wah Organ 44 96 16 N LWhChDl2 45 DRAWBAR Dist Organ Lead 45 96 16 N MetalDly 46 DRAWBAR...

Страница 126: ...E7 F7 G7 A7 B7 C8 D8 E8 21 23 24 26 28 29 31 33 35 36 38 40 41 43 45 47 48 50 52 53 55 57 59 60 62 64 65 67 69 71 72 74 76 77 79 81 83 84 86 88 89 91 93 95 96 98 100 101 103 105 107 108 110 112 B 0 C...

Страница 127: ...CHNO KICK 3 SYNTH 1 RIM SHOT TECHNO SNARE 3 HAND CLAP 3 TECHNO SNARE 4 SYNTH 1 LOW TOM 2 TECHNO CHH 1 SYNTH 1 LOW TOM 1 TECHNO PHH SYNTH 1 MID TOM 2 TECHNO OHH SYNTH 1 MID TOM 1 SYNTH 1 HI TOM 2 TECHN...

Страница 128: ...65 ELECTRIC POP 66 DANCE POP 1 67 DANCE POP 2 68 DANCE POP 3 69 DISCO SOUL JAZZ 70 FAST BIG BAND 71 MIDDLE BIG BAND 72 SLOW BIG BAND 73 JAZZ COMBO 74 SWING 75 SLOW SWING 76 MODERAN JAZZ 77 FOX TROT 7...

Страница 129: ...dim m7 5 M7 M m 7 m7 dim7 Chord Type Root C D E F G A B C D D E F G G A A B You can use the above fingerings to finger chords within the accompaniment keyboard range Appendix 735A E 129A WK3000_e_A 0...

Страница 130: ...A 16 aug sus4 C D E F G A B C D D E F G G A A B m add9 7sus4 mM7 7 5 add9 Chord Type Root Appendix 735A E 130A WK3000_e_A 01 16 p65 03 4 8 11 53 16...

Страница 131: ...om 2 Room 2 02 Room 3 Room 3 03 Hall 1 Hall 1 04 Hall 2 Hall 2 05 Plate 1 Plate 1 06 Delay Delay 07 PanDelay Pan Delay 08 Plate 2 Plate 2 09 Plate 3 Plate 3 10 LrgRoom 1 Large Room 1 11 LrgRoom 2 Larg...

Страница 132: ...DistDly 2 Distortion Delay 2 82 M28 MetalDly Metal Delay 83 M28 Fuzz Dly Fuzz Delay 84 M24 CrChoDly Crunch Chorus Delay 85 M24 DsChoDly Distortion Chorus Delay 86 M25 CmpCrDly Compressor Crunch Delay...

Страница 133: ...nd equalizer 3 Mid Gain Range 12 11 10 to 0 to 10 11 12 Adjusts the gain of the mid band equalizer 4 High Frequency Range 0 6 0KHz 1 8 0KHz 2 10KHz Adjusts the cutoff frequency of the high band equali...

Страница 134: ...his is an effector that you can use to set an upper limit value on the level of the input sig nal Parameters 0 Limit Range 0 to 127 Adjusts the volume level from which the limit is applied 1 Attack Ra...

Страница 135: ...the low range and high range of the input signal Parameters 0 Low Frequency Range 0 to 127 Adjusts the low range enhancer frequency 1 Low Gain Range 0 to 127 Adjusts the low range enhancer gain 2 High...

Страница 136: ...output Parameters 0 Delay Time Range 0 to 127 Adjusts the delay time 1 Wet Level Range 0 to 127 Adjusts the level of the effect sound 2 Feedback Range 0 to 127 Adjusts the repeat of the delay 3 High D...

Страница 137: ...everb Function This is gate reverb with a reverse rotation ef fect Parameters 0 LPF Range 0 to 127 Adjusts the cutoff frequency of the low pass filter A smaller value cuts the high range 1 HPF Range 0...

Страница 138: ...horus 2 Tap Delay Function This is a multi effector that is related to Sin 2 Phase Chorus 2 Tap Delay Parameters 0 Chorus LFO Rate 1 Chorus LFO Depth 2 Chorus Feedback 3 Chorus Wet Level 4 Delay Time...

Страница 139: ...n 2 Phase Chorus Flanger Parameters 0 Chorus LFO Rate 1 Chorus LFO Depth 2 Chorus Feedback 3 Chorus Wet Level 4 Flanger LFO Rate 5 Flanger LFO Depth 6 Flanger Feedback 7 Flanger Wet Level M09 Multi09...

Страница 140: ...a multi effector related to Drive Rotary Reflection Parameters 0 Drive Rotary Gain 1 Drive Rotary Level 2 Drive Rotary Speed 3 Drive Rotary Slow Rate 4 Drive Rotary Fast Rate 5 Reflection Wet Level 6...

Страница 141: ...hat is related to Com pressor Sin 2 Phase Chorus Reflection Parameters 0 Compressor Depth 1 Compressor Attack 2 Compressor Level 3 Chorus LFO Rate 4 Chorus LFO Depth 5 Reflection Wet Level 6 Reflectio...

Страница 142: ...ti effector related to Distortion Phaser Parameters 0 Distortion Gain 1 Distortion Low 2 Distortion High 3 Distortion Level 4 Phaser Resonance 5 Phaser Manual 6 Phaser Rate 7 Phaser Depth M30 Multi30...

Страница 143: ...735A E 143A WK3000_e_A 19 31 p65 03 4 8 11 53 29...

Страница 144: ...735A E 144A WK3000_e_A 19 31 p65 03 4 8 11 53 30...

Страница 145: ...735A E 145A WK3000_e_A 19 31 p65 03 4 8 11 53 31...

Страница 146: ...6 17 18 19 64 66 Control 67 Change 71 72 73 74 1 16 1 16 Mode 3 X 0 127 O 9nH v 1 127 X 9nH v 0 X X O O O O O O X 2 O O O O O 3 O 3 O 3 O O O O 1 Depends on tone Bank select Modulation Data entry Volu...

Страница 147: ...O O O O O O X O O 0 127 O X X X O O X X X X Release Time Attack Time Brightness Vibrato rate Vibrato depth Vibrato delay DSP Parameter4 DSP Parameter5 DSP Parameter6 DSP Parameter7 Reverb send Chorus...

Страница 148: ...fect during the warranty period take the product and the RadioShack sales receipt as proof of purchase date to any RadioShack store RadioShack will at its option un less otherwise provided by law a co...

Отзывы: