40
Image Viewer Program — Lets you display and edit captured image data.
Voice Player Program — Lets you play back recorded voice files.
284
"
/CPCIGT
+EQPU
1. Voice Player Icon –
Starts the Voice Player program.
5
6
7
8
9
10 11
12 13
14
1
2
4
3
Страница 1: ...GTC 0641 7 6 10 Your RadioShack 130 Minute Digital Recorder with Camera is ideal for quick note taking Its light weight and ultra small size make it easy to slip into a pocket briefcase or purse You can use it at school at business conferences or anywhere on the go You can start recording manually set the recorder so sound activates recording or program delayed recordings With 8 MB of built in mem...
Страница 2: ...ure Recording records voice into picture data Automatic Focus and Exposure lets you easily take pictures Flash Memory retains all data even without power Level 2 Heading 106 065 Preparation 7 Installing Batteries 7 Setting the Clock 8 Connecting Earphones 8 Connecting an External Microphone 11 Attaching the Wrist Strap 11 Locking the Recorder s Controls 12 Recorder Operation 12 Setting the Recordi...
Страница 3: ...ack notes anywhere 6 9 065 17 61 019 This equipment has been tested and found to comply with the limits for a Class B digital device pursuant to Part 15 of the FCC Rules These limits Displaying Recording Information 19 Editing Messages 19 Dividing a Message File 20 Playing Back Messages 22 Camera Operation 26 Setting the Image Compression Mode 26 Taking a Picture 27 Locking Images 28 Adding a Mess...
Страница 4: ...uipment does cause harmful interference to radio or television reception which can be determined by turning the equipment off and on the user is encouraged to try to correct the interference by one or more of the following measures Reorient or relocate the receiving antenna System Require ments 31 Installing PVR Man ager 32 Connecting the Recorder to Your PC 34 PVR Manager Structure 39 Running PVR...
Страница 5: ...u stop using your recorder Changes or modifications not expressly approved by RadioShack may cause inter ference and void the user s au thority to operate the equipment You must use shielded interface cables with this equipment Material you record is for your personal use or pleasure only It is prohibited to record copy righted material without per mission of the copyright holders according to cop...
Страница 6: ...o conditions 1 this device may not cause harmful interference and 2 this device must accept any interference received including interference that may cause undesired operation Product Digital Recorder with Camera Model 14 1197 Respon sible Party RadioShack 100 Throckmorton Fort Worth TX 76102 Phone 817 415 3200 ...
Страница 7: ... the polarity symbols and marked inside the compartment 3 Replace the cover When the batteries are low appears and the recorder automatically shuts off Replace the batteries Rý 76 105 Use only fresh batteries of the required size and recommended type Do not mix old and new batteries different types of batteries standard alkaline or rechargeable or rechargeable batteries of different capacities con...
Страница 8: ... the year then press MENU to store the setting 3 Repeat Step 2 to set the month day and time 100 6 0 42 10 5 You can use an optional mono earphone or headphones with a 1 8 inch 3 5 mm mini plug for 76 105 continued If you do not plan to use the recorder for a month or longer remove the batteries Batteries can leak chemicals that can destroy electronic parts 016 If you do not press any button for 3...
Страница 9: ... After you begin listening adjust the volume to a comfortable level Do not listen at extremely high volume levels Extended high volume listening can lead to permanent hearing loss 016 5 Hours are shown in 12 hour for mat For ex ample set 1 AM as 0 0 0 0 and 1PM as Fý 0 ý Fý 0 ý Fý 0 ý Fý 0 ýYou can change to the 24 hour format by press ing the clock icon in the PVR Man ager See PVR Manager Icons o...
Страница 10: ...comfort might still damage your hearing 6TCHHKE 5CHGV Do not wear earphones while operating a motor vehicle or riding a bicycle This can create a traffic hazard and could be illegal in some areas Even though some earphones let you hear some outside sounds when listening at normal volume levels they still can present a traffic hazard ...
Страница 11: ...tore carries a wide selection of microphones Insert the microphone s plug into the recorder s MIC jack The built in microphone automatically disconnects 66 0 6 94 56 564 2 Thread the strap s small loop through the holes on the bottom of the recorder Slip the larger end of the strap through the smaller loop Pull the larger loop to tighten it ...
Страница 12: ... To unlock the recorder s controls slide HOLD in the opposite direction of the arrow 4 14 4 12 4 6 10 The recorder has one folder for image files and two folders A and B for message files The folder for images can store up to 250 standard image files and the folders for messages can store up to 100 messages each To select message folders see 016 If you try to record more than 100 message files or ...
Страница 13: ...ptions menu These options include Folders Recording Mode Microphone Sensitivity Voice Operated Recording System Programmed Recording File Lock and Continuous Play 1 Repeatedly press MENU while the recorder is stopped to cycle through the options menu 016 5 If you do not press any button for about 5 seconds the recorder automatically exits the options mode Image and message files share the same mem...
Страница 14: ...in SP mode and 30 minutes in HQ mode 4 While C 9 C 9 C 9 C 9 Microphone Sensitivity appears press or to select or BE BE BE BE 5 While LEI LEI LEI LEI Voice Operated Recording System appears press or to select ED ED ED ED or E E E E See Using Voice Operated Recording System VOS on Page 17 6 While FHE H FHE H FHE H FHE H Programmed Recording appears repeatedly press or to select E E E E C C C C C C ...
Страница 15: ...uous Play appears press orý to select ED ED ED ED or E E E E 4 14 0 55 5 1 Press POWER to turn on the recorder The current date and time briefly appear 2 If the camera icon appears at the upper left corner of the display press POWER PAUSE DISPLAY to select the recorder mode The number at the top line indicates the current message file number and the number at the bottom line indicates the recordin...
Страница 16: ...IF IF and the elapsed recording time 4 To temporarily stop recording press PAUSE DISPLAY F7KI F7KI F7KI F7KI appears To resume recording press PAUSE DISPLAY again 5 During recording you can press so the recording starts from the next file number 6 Press REC STOP to stop the recorder A B 016 The recorder automatically turns off if it is set to pause for more than 30 minutes ...
Страница 17: ...n Page 13 2 Set the mic sensitivity if necessary See Setting the Recording Options on Page 13 3 Press REC STOP When the recorder detects a voice input it automatically starts recording When the voice input stops the recorder automatically stops recording within 1 second and enters standby mode 016 If you set the mic sensitivity to ambient noise might cause the recording to continue ...
Страница 18: ... FHE H FHE H appears The recorder starts recording after the preset time 3 To cancel the programmed recording press REC STOP again 1 0 55 5 To prevent messages from being accidentally erased 1 Select the message you want to lock 2 Repeatedly press MENU until E ýBE9A E ýBE9A E ýBE9A E ýBE9A appears press or to select ED ED ED ED or E E E E ...
Страница 19: ...To display the recorded date and time of a file select the file and press PAUSE DISPLAY while the current date and time appear To display the remaining available recording time press PAUSE DISPLAY again while the recorded date and time appears 6 0 55 5 FFKPI VQ VJG PF QH C GUUCIG 1 Select the message you want to add to ...
Страница 20: ...end of the selected message 8 0 55 1 During play press PAUSE at the point where you want to divide the message 2 Hold down MENU until E ý E ý E ý E ý Z L Z L Z L Z L appears 3 Press or so E E E E changes to ED ED ED ED 4 Press MENU The next number and IJEF IJEF IJEF IJEF appear For example when file 4 is successfully divided ý ý ý ý IJEFý IJEFý IJEFý IJEFýappears ...
Страница 21: ... E D E D briefly flash followed by the lower of the two numbers and IJEF IJEF IJEF IJEF For example if file 3 and 4 are successfully combined the display briefly flashes ý ý ý ý ý ý ý ý E D E D E D E D followed by IJEF IJEF IJEF IJEF 016 5 You cannot divide a file less than 2 seconds long If the file number exceeds 100 KBB KBB KBB KBB appears and editing is canceled The recording dates of the two ...
Страница 22: ...s 5 Repeatedly press or until the desired file number position appears 6 Press MENU to move the file 2 0 55 5 1 Repeatedly press or hold down ý ý ý ýor until the 016 5 continued The recorded date of the first message file number remains in the combined file If either of the files is locked the lock is applied to the combined file You cannot combine files made using different recording modes For ex...
Страница 23: ... PLAY STOP during playback the recorder remembers the position When you press PLAY STOP again the recorder starts playing the message from the point where you stopped it If you press any button other than PLAY STOP that memory is lost 016 5 continued File locations start with 7 7 7 7 or 8 8 8 8 as the first location 7 7 7 7 or 8 8 8 8 as the second and continue in this fashion throughout the folde...
Страница 24: ... for more than 1 second The recorder continues fast forwarding or rewinding as long as you hold down ý ýý ýor 7UKPI QTYCTF 5MKR1 4GXGTUG 5MKR To skip forward or backward to a message repeatedly press or hold down or until the desired message number appears 5ECPPKPI GUUCIGU Press PLAY STOP for more than 1 second The recorder plays back the first 5 seconds of each message ...
Страница 25: ...NU at the point where you want to start the repeat 7ý appears 2 Press MENU again at the point where you want to finish the repeat 8 appears The recorder automatically repeats the selected part 3 Press PLAY STOP to cancel the repeat QPVKPWQWU 2NC 1 Turn on continuous play See Setting the 016 If you do not designate point B the recorder repeats between point A and the end of the message ...
Страница 26: ... mode press POWER appears in the display 5 66 0 6 1 24 55 10 1 1 Press MENU IFýCE IFýCE IFýCE IFýCE standard mode or GýCE GýCE GýCE GýCE 016 5 If you do not press any button for 30 seconds in camera mode the recorder automatically shuts off to save battery power If you do not press any button for about 5 sec onds during the options mode the recorder automatically exits options mode Image and messa...
Страница 27: ...icator in the viewfinder lights red for several seconds then changes to green to indicate that the camera is ready 2 Hold the unit horizontally so the view finder is at the left and the display is toward you 3 Press CAPTURE to take a picture 016 5 For best results point the camera away from direct sunlight You cannot take a picture while the indicator lights red Hold the camera still when you pres...
Страница 28: ...rent file 1 0 5 To prevent images from being accidentally erased 1 Select the file you want to lock 2 Press MENU twice E ý E ý E ý E ý BE9A BE9A BE9A BE9A or EDýBE9A EDýBE9A EDýBE9A EDýBE9A appears Then press or to select ED ED ED ED or E E E E 3 Press MENU The image number and BE9A appear 0 55 61 0 1 Press or to select the image file to which you want to add a message ...
Страница 29: ...e recording KUVGPKPI VQ VJG VVCEJGF GUUCIG 1 Press or to select the image file 2 Press PLAY STOP to play the message 3 Press PLAY STOP again to stop 016 When adding a message to an image file the recording mode is preset to standard mode You cannot select high quality mode ...
Страница 30: ...and the end of the message for a few seconds 3 Press ERASE again while H7I H7I H7I H7I flashes to delete the file 4 5 0 5 0 1 4 1 Select the folder you want to erase 2 Hold down ERASE and REC STOP until H7I H7I H7I H7I appears and 7BB 7BB 7BB 7BB flashes 016 5 You cannot erase a file or all files in a folder if they are locked If you erase an image file with a voice message the voice message is al...
Страница 31: ...ASE again while 7BBý9B 7H 7BBý9B 7H 7BBý9B 7H 7BBý9B 7H flashes 75 0 6 4 14 4 9 6 2 5 56 4 37 4 065 Processor Pentium 133 MHz or better OS Windows 98 with Internet Explorer 5 0 or higher Windows Me Windows 2000 Windows XP Interface Port USB 76 10 This procedure clears all the files in all folders including locked files 016 To update Internet Explorer 4 0 visit http windowsupdate microsoft com ...
Страница 32: ...fore installing PVR Manager The USB driver is automatically installed when you install PVR Manager and connect the recorder to the PC 1 Place the RadioShack PVR Manager DR 97 016 5 The installation procedure might vary depending on your computer s operating system If you are installing the software on Windows 2000 or Windows XP Professional you must log on as the administrator The installation mus...
Страница 33: ...tall RadioShack PVR Manager by following the on screen instructions 4 After setup is complete click OK on the screen and remove the CD ROM from the CD ROM drive 7PKPUVCNNKPI 284 CPCIGT 1 Click Start Settings Control Panel and double click Add Remove Programs 2 Follow the on screen instructions to uninstall the PVR Manager ...
Страница 34: ...ýM_pWhZ WhZmWh ýM_pWhZ appears to prompt you to install Reset Driver Confirm that Install the software automatically H Yecc dZ Z H Yecc dZ Z H Yecc dZ Z H Yecc dZ Z is selected and follow the instructions to install the driver After the Reset Driver is installed ekdZýD mý ekdZýD mý ekdZýD mý ekdZýD mý WhZmWh ýM_pWhZ WhZmWh ýM_pWhZ WhZmWh ýM_pWhZ WhZmWh ýM_pWhZ appears again to prompt you to instal...
Страница 35: ...SB driver might not be installed properly Follow these steps to install the USB driver QT 9KPFQYU 1 G 1 Click Start Settings Control Panel then double click Add New Hardware and follow the instructions on the wizard 2 When eýoekýmWdjýM_dZemiý eýoekýmWdjýM_dZemiý eýoekýmWdjýM_dZemiý eýoekýmWdjýM_dZemiý jeýi WhY ý ehýoekhýd mý jeýi WhY ý ehýoekhýd mý jeýi WhY ý ehýoekhýd mý jeýi WhY ý ehýoekhýd mý W...
Страница 36: ...ceZ býe ý oekhý WhZmWh oekhý WhZmWh oekhý WhZmWh oekhý WhZmWh appears click Have Disk 5 On the Install From Disk screen click Browse 6 After selecting the disk drive open the USB_STEP_1 folder and click PortRst inf and OK 7 When installation is complete click Finish 8 Double click Add New Hardware select and opent the USB_STEP2 folder Click fnd1197 inf and OK 9 When installation is complete follow...
Страница 37: ...ch to Classic View if necessary then double click the System icon 3 Select Hardware Device Manager 4 Choose Other device then click USB Device 5 Click the right button of the mouse on USB Device 6 Select Uninstall and click OK to confirm The USB driver is deleted 7 Disconnect the recorder from the PC Then restart the PC ...
Страница 38: ...oekhýd mý jeýi WhY ý ehýoekhýd mý jeýi WhY ý ehýoekhýd mý WhZmWh 5 WhZmWh 5 WhZmWh 5 WhZmWh 5 appears select De ý ýmWdjýjeýi b Yjýj ý De ý ýmWdjýjeýi b Yjýj ý De ý ýmWdjýjeýi b Yjýj ý De ý ýmWdjýjeýi b Yjýj ý WhZmWh ý hecýWýb_ij WhZmWh ý hecýWýb_ij WhZmWh ý hecýWýb_ij WhZmWh ý hecýWýb_ij and click Next 3 When I b Yjýj ýjof ýe ý I b Yjýj ýjof ýe ý I b Yjýj ýjof ýe ý I b Yjýj ýjof ýe ý WhZmWh ýoekým...
Страница 39: ...pears click Have Disk 5 On the Install From Disk screen click Browse 6 After selecting the disk drive open the HQ_Driver folder and click mi sc4 inf and OK 7 When installation is complete follow the instructions on the wizard 284 0 4 5647 674 The supplied RadioShack PVR Manager DR 97 software consists of the following programs Image Window Program Lets you display uploaded image data from each fol...
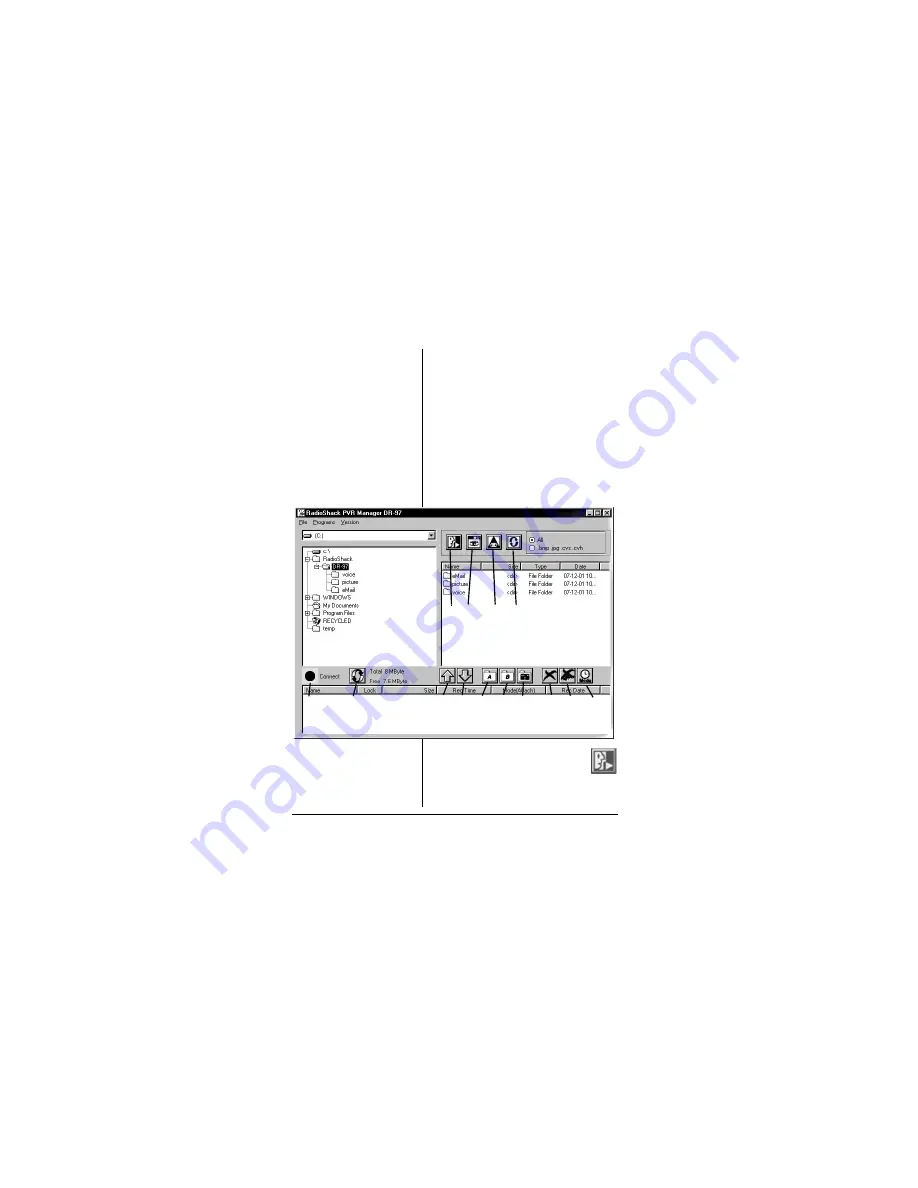
Страница 40: ... Program Lets you display and edit captured image data Voice Player Program Lets you play back recorded voice files 284 CPCIGT EQPU 1 Voice Player Icon Starts the Voice Player program 5 6 7 8 9 10 11 12 13 14 1 2 4 3 ...
Страница 41: ... 4 Folder Refresh Icon Updates the data to the PC 5 ConnectionIndicator Indicates the connection status between the recorder and the PC 6 Refresh Icon Refreshes the connection between the recorder and the PC 7 Upload Icon Uploads selected files from the recorder to the PC 8 Download Icon Downloads selected ...
Страница 42: ...10 Voice B Folder Icon Displays the files in Folder B of the recorder 11 Camera Folder Icon Displays the files in the recorder s Image Folder 12 Erase Selected File Icon Erases the selected file 13 All Erase Icon Initializes the recorder 14 Clock Mode Icon Switches the time display between 12 and 24 hour formats ...
Страница 43: ...e picture and email folders are automatically created under C RadioShack DR 97 when PVR Manager is installed Specify one of the folders so the folder opens If you do not specify a folder files will be uploaded to the DR 97 folder 016 Once the recorder and the PC are connected with USB connecting cable 9edd Yj 9edd Yj 9edd Yj 9edd Yj appears If the connection did not work or was obstructed B DAý hh...
Страница 44: ...les in the folder 3 Select the file s you want to upload To upload many files at the same time press Shift and click the first file and the last file To select many files which are not successive press Ctrl and click the desired files 4 Click the Upload icon to start uploading ...
Страница 45: ...mp Folder Voice file SP mode Voice file HQ modes Image file A A001 cvs A002 cvh B B001 cvs B002 cvh Image P0001 cis Uploaded image files are renamed follow ing the conven tion P0001 bmp 76 10 If you change the name of a V I P image file in the PVR Manager you must change the voice file name at the same time Otherwise the PVR Manager will not recognize them as related files ...
Страница 46: ...it in the picture folder of the PVR Manager The Image Viewer program opens see Using the Image Viewer on Page 48 To open a voice file double click it in the PVR Manager s voice folder The Voice Player opens see Using the Voice Player on Page 52 QYPNQCFKPI C KNG 1 Select a voice file which you want to download from the voice folder 2 Select the download destination Voice A Folder or Voice B Folder ...
Страница 47: ...ge files in the folder appear If you double click the file which you want to open the Image Viewer program and the selected image file opens 016 5 Downloadedfiles are sequentially re numbered and the new number is used as the file name If you download a file with prefix A to Folder B the prefix changes to B If the total number of files in the recorder and the files to be downloaded is over 100 9kh...
Страница 48: ...or contrast of the image drag either the Bright or Contrast control clockwise To decrease the brightness or contrast drag either control counterclockwise Color Balance Adjusts the image color balance Rotate Lets you rotate the image in 90 180 or 270 angles Mirror Flips the image left or right up or down Image Resize Resizes the image based on ...
Страница 49: ...sions you enter Unlike Zoom In Out it changes the image data JPG Convert Converts a BMP to JPG to save storage space and speed email transmissions KNVGTKPI To access the filtering tools click Transfer Filtering ...
Страница 50: ...htness and makes other parts dark Emboss Makes the boundary of the image three dimensional QR KPI C 5GNGEVGF TGC To copy a part of opened image file click Edit CopySelection Area Selection and select the screen area you want to copy by dragging the mouse and clicking Edit Copy Selection Area Copy Another image file with a different file name will be created in the Image Viewer ...
Страница 51: ...om Out Changes the size of the image on the Image Viewer screen without changing the image data Original Size Reverts the zoomed image into the original size NKIPKPI 9KPFQYU Cascade Align Aligns image files in a cascade format Horizontal Align Aligns image files horizontally Vertical Align Aligns image files vertically ...
Страница 52: ...lay back the voice file If you click and drag the play bar the selected file will be played from the part where the icon is located 016 To send a voice file open the voice file then click Send Send Mail and follow the on screen instructions If the voice file is a cvs file SP mode it is automatically converted to an exe file so the recipient can play it with the Voice Player If the voice file is a ...
Страница 53: ...n is skipped in the forward direction or backward direction FLWUVKPI 8QNWOG Drag the VOL bar up or down to adjust the volume level QV G 1RGTCVKQP 5 0 0 0 1 If the image file is BMP change it to JPG to make the file smaller See To Do This Press These Keys Play Ctrl Alt F2 Reverse Ctrl Alt F3 Fast Forward Ctrl Alt F4 Stop Ctrl Alt F5 ...
Страница 54: ...sion on Page 48 2 Click File E Mail 3 Follow the instructions on the windows To send a V I P file open its voice file using the Voice Player click Send Send Mail to convert it to an exe file then attach the image file ...
Страница 55: ...s after pressing a button Make sure HOLD is set in the opposite direction from the arrow Make sure that fresh batteries are correctly installed There is no sound Make sure the volume is turned up Make sure an earphone is not connected to the recorder ...
Страница 56: ...ully do not drop it Keep the recorder away from dust and dirt and wipe it with a The recorder will not record KBB KBB KBB KBB appears when there should be ample space Make sure the number of recorded messages in the selected folder has not reached 100 Confirm there is remaining recording time See Displaying Recording Information on Page 19 2TQDNGO 5WIIGUVKQP ...
Страница 57: ...to dry Use air blowers and lens paper designed for photographic lenses to clean the lens and optical elements 5 48 0 4 2 4 If your recorder is not performing as it should take it to your local RadioShack store for assistance Modifying or tampering with the recorder s internal components can cause a malfunction and might invalidate its warranty and void your FCC authorization to operate it ...
Страница 58: ...Range 2 0 m to Infinity Min Illumination 2 5 lux Image Sensor Exposure Automatic View Finder Optical Recording Time HQ 30 minutes Recording Time SP 130 minutes Max File No to Record 2 Folder 100 Files Frequency Response 500 Hz 3 500 Hz Max Output Power 200 mW at 10 THD Speaker Dynamic 28 mm Dimensions HWD 47 16 111 16 x 3 4 Inches 112 42 18 mm ...
Страница 59: ...tery Life Camera Approx 150 images at intervals of one minute of capture Battery Life Recorder About 9 Hours SP 16 Hours HQ Operating Temperature 32 110 F 0 43 C Accessories USB Cable CD Wrist Strap Specifications are typical individual units might vary Specifications are subject to change and improvement without notice ...
Страница 60: ...e event of a product defect during the warranty period take the product and the RadioShack sales receipt as proof of purchase date to any RadioShack store RadioShack will at its option unless other wise provided by law a correct the defect by product repair without charge for parts and labor b replace the product with one of the same or similar design or c refund the purchase price All replaced pa...