background image

Radial Engineering Ltd.

MR5™  User Guide

4

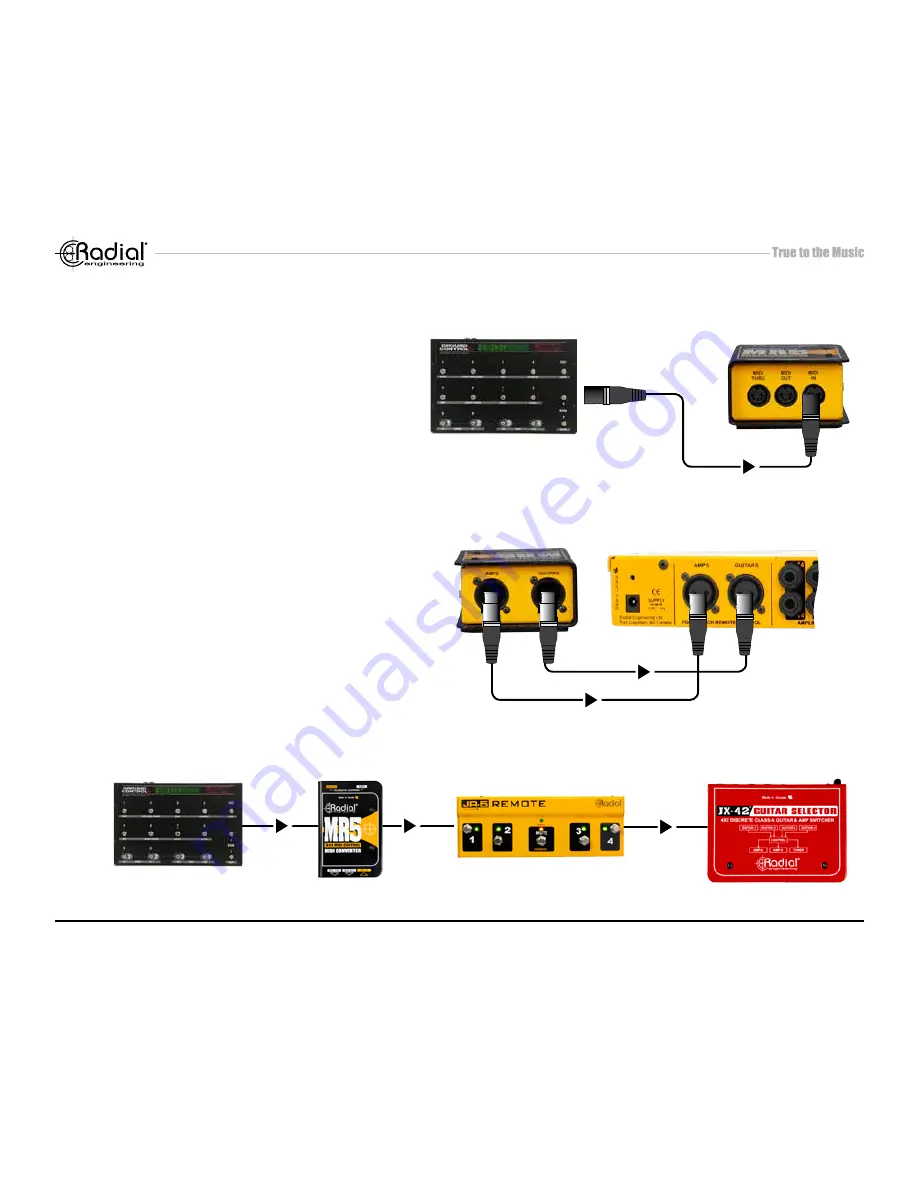
MAkING CONNECTIONS

1. 

Connect  the  MIDI  output  from  your  MIDI 

controller or pedal board to the input of the MR5 

using a standard 5-pin MIDI cable. Additional 

MIDI devices can be daisy chained via the 

MR5’s MIDI THRU connector.

2. 

Connect the MR5 XLR outputs to the JR5 inputs 

of the Radial JX44, JX42 or any other product 

that employs a JR5 footswitch. The MR5 is 

equipped with dedicated XLR outputs for both 

‘Amps’ and ‘Guitars’. No power is required, as 

the MR5 will derive its power from the Radial 

device that you are controlling. 

3. 

If you wish to use a JR5 footswitch in conjunction 

with the MR5, simply connect one of its XLR 

jacks to the MR5 and the other to the JR5 input 

on your Radial device. The pedal will now be 

in-line with the MR5, and your Radial device will 

respond to commands from both.

MIDI CONTROLLER

MIDI CABLE

JX44

JX42

Instrument select only

MIDI

XLR

Содержание MR5

Страница 1: ...Radial Engineering Ltd 1588 Kebet Way Port Coquitlam BC V3C 5M5 Tel 604 942 1001 Fax 604 942 1010 Email info radialeng com MIDI Converter User Guide...

Страница 2: ......

Страница 3: ...he MR5 for the first time we suggest that you review this manual It will explain what features and functions can be controlled by MIDI control and program changes along with channel selection and othe...

Страница 4: ...instrument JR5 input on Radial device 6 DIP SWITCHES Configure MIDI channel setup 7 SAVE RESET Save MIDI configuration after changing DIP switch position or reset if errors such as stuck notes occur d...

Страница 5: ...nces The Radial JR5 itself employs a proprietary interface that uses standard XLR connectors It is important to note that the reason the JR5 or products like the JX44 or JX42 do not employ MIDI is tha...

Страница 6: ...product that employs a JR5 footswitch The MR5 is equipped with dedicated XLR outputs for both Amps and Guitars No power is required as the MR5 will derive its power from the Radial device that you are...

Страница 7: ...stage remote and have the MR5 send control messages to the JX44 or JX42 from a midi sequencer or MIDI control pedals or MIDI playback from a MIDI track from back ground orchestration software This al...

Страница 8: ...m changes on any MIDI channel 1 16 Setting the MR5 to a specific channel is particularly useful when linking multiple MIDI devices as they can all be set to only respond to changes on their assigned c...

Страница 9: ...P DOWN Midi Ch 7 DOWN UP DOWN UP Midi Ch 8 DOWN DOWN UP UP Midi Ch 9 UP UP DOWN DOWN Midi Ch 10 UP DOWN DOWN UP Midi Ch 11 DOWN UP UP DOWN Midi Ch 12 DOWN DOWN UP DOWN Midi Ch 13 DOWN UP DOWN DOWN Mid...

Страница 10: ...es can select both guitars and individualamplifiersontheJX44 Programchangesarereservedforamplifierselectiononly whichallowsforcustomconfigurations with multiple amplifiers on devices like the JX44 The...

Страница 11: ...ram C2 ON Program C3 ON Program C4 ON Program C5 ON ON Program C6 ON ON ON Program C7 ALL AMPS ON Program C8 ON ON Program C9 ON ON ON Program C10 ON ON ON Program C11 ON ON ON Program C12 ON ON Progr...

Страница 12: ...rmed under this limited and transferable warranty This warranty shall not apply if the product has been damaged due to abuse misuse misapplication accident or as a result of service or modification by...

Отзывы: