RADEMACHER RolloTube Comfort Small Series Скачать руководство пользователя страница 46

46

EN

Contact with the drive housing can cause burns.

  The tubular motor gets hot during operation. Allow the motor to cool down prior to  

  undertaking any further work on the motor.

  Never touch the hot drive housing.

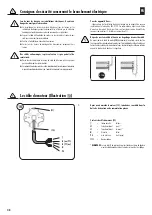
There is always danger of a potentially fatal electric shock when 

working with electrical systems.

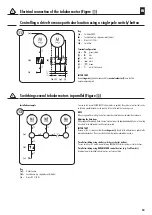
 The tubular motor must only be connected to and all work performed on electrical  

  equipment must only be carried out by a qualified electrician in accordance with  

  the diagrams provided in these instruction (see pages 52/53/54).

 Carry out the installation and connection with all devices disconnected from the  

 mains.

Non-observance can cause danger to life!
Observe installation instructions for installation in damp rooms.

Please observe regulation DIN VDE 01000, part 701 and 702 in particular when 

using the motor in damp rooms. These regulations detail mandatory safety measures.

Use of a defective device can endanger people and equipment 

(electrical shock, short circuit).

  Never use defect or damaged devices. 

  Please make sure that the drive and mains cable are free from damage. 

 Please notify our customer service department (see page 72) of any faults/ 

  damage on the device.

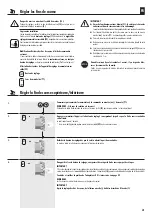
According to the standard DIN EN 13659, care must be taken that the sli-

ding conditions stipulated in EN 12-045 for the hangings are adhered to.

When unrolled, the movement must be at least 40 mm at the lower edge with an upward force 

of 150 N. Particular care must be taken here to ensure that the outward running speed 

of the hanging is less than 0.2 m/s over the last 0.4 m of travel.

Potential risk to life and limb resulting from uncontrolled starting of 

the drive.

Never attempt to manually stop the motor /shutters in the event of uncontrolled 

movement. In such cases, switch off all power to the drive and take appropriate safety 

precautions to prevent unintentional switching on. Arrange to have the system checked 

by a specialist engineer.

General safety instructions

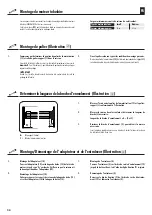
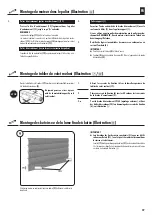
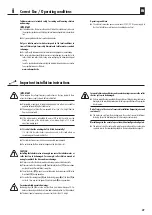
General View (Figure 

Please compare:

 The contents of the package with the content description on the packaging  

  after unwrapping it.

  The motor designation with the relevant information included on the type plate.

(1)

  Counter bearing

(2)


Ball bearing

(3)


Axle of the roller cap

(4)


Roller cap

(5)


Winding shaft

(6)


Tie

(7)


Securing clip 

(8)


Driver

(9)


Tubular motor

(10)


Adapter

(11)


Set button

(12)


Drive head

(13)

  Drive end bearing

(14)

  Fixing bracket 

(15)

  Motor cable

(16)


Control device (e.g. Troll Comfort)

(17)


Roller shutter curtain

(18)


Limit ring

(19)


Gearbox output shaft

(20)


Hanging brackets


Please note:  


Customer-specific supply package 

Improper use increases risk of injury. 

  Please instruct all people concerned in the safe use of the tubular motor.

  Prohibit children from playing with stationary control units.

  Prevent persons with limited abilities or children from playing with fixed controllers  

  or with the remote control.

Roller shutters:

 Always monitor roller shutters while they are moving and keep people at a 

   distance until movement has finished.

 When cleaning the roller shutter, the equipment must always be at zero  

 voltage.

For awning structures that can be operated outside your range of vision:

  Do not operate the awning if any work is being carried out in its immediate proximity  

  (e. g. window cleaning).

For automatically operated awnings:

 Disconnect the awning from the mains when performing work in its immediate  

 proximity.

Servicing awnings regularly increases their operating safety.

  Please inspect the awning regularly for defective balance and damage to cables and  

 springs.

  Damaged awnings must only be repaired by specialists.

Содержание RolloTube Comfort Small Series

Страница 1: ...service de moteurs tubulaires RADEMACHER 31 EN Installation and operation instructions for RADEMACHER tubular motors 45 NL Montage en gebruiksaanwijzing bij RADEMACHER buismotoren 59 Bitte notieren P...

Страница 2: ...heit und Leben der betroffenen Person Hier geht es um Ihre Sicherheit Beachten und befolgen Sie bitte alle so gekennzeichneten Hinweise HINWEIS WICHTIG ACHTUNG Auf diese Weise machen wir Sie auf weite...

Страница 3: ...llustrations Illustrations Afbeeldingen i 16 17 1 6 1 2 4 5 6 8 9 10 12 13 3 11 14 15 11 12 13 14 5 4 1 2 10 5 8 9 5 2 3 4 5 B C A L L A B C 4 8 5 20 6 20 5 6 7 SW 50 SW 60 SW 70 D 2 2 3 7 SW 40 10 8...

Страница 4: ...heitshinweise Bei unsachgem em Gebrauch besteht erh hte Verletzungsgefahr Unterweisen Sie alle Personen im sicheren Gebrauch des Rohrmotors Verbieten Sie Kindern mit ortsfesten Steuerungen zu spielen...

Страница 5: ...an de motor in de lagers 65 Montage van het rolluikpantser 65 Montage van de rolluikstopper of eindrail 65 Veiligheidsinstructies bij elektrische aansluiting 66 Elektrische aansluiting van de buismoto...

Страница 6: ...r Aufwicklung des Rollladens k nnen Sch den am Motor oder am Rollladen entstehen Der Deckel des Rollladenkastens muss leicht zug nglich und abnehmbar sein Demontieren Sie auf keinen Fall die Stopper d...

Страница 7: ...ieben Sie den Adapter 10 ber den Limitring 18 am Antriebskopf bis er einrastet Achten Sie dabei auf die richtige Lage der Nut im Adapter 10 1 Befestigen Sie die Lager je nach Lagertyp und bauseitigen...

Страница 8: ...mitring 18 am Antriebskopf 12 abrutscht es kommt sonst zu Fehlfunktionen s Seite 15 DE Vorbereitungen bei Verwendung von Pr zisionsrohren Abbildungen 1 Messen Sie den Abstand zwischen Adapter und dem...

Страница 9: ...Verwendung von Pr zisionsrohren Abbildungen Markieren Sie vier Befestigungsl cher und bohren Sie diese anschlie end durch das Pr zisionsrohr in den Mitnehmer ACHTUNG u Bohren Sie nie tiefer als 10 mm...

Страница 10: ...ube Die Walzenkapsel 4 muss mindestens mit 2 3 ihrer L nge in der Wickelwelle 5 stecken Gegenlager 1 3 Montage des Rollladenpanzers Abbildung Nie im Bereich des Antriebs bohren oder schrauben um den R...

Страница 11: ...tz und sichern Sie sie gegen unbeab sichtigtes Einschalten Pr fen Sie die Anlage auf Spannungsfreiheit F hren Sie alle Montage und Anschlussarbeiten nur im spannungslosen Zustand aus Das Motorkabel Ab...

Страница 12: ...ten Parallelschaltung mit RADEMACHER Steuerungen z B Troll Comfort Anzahl der jeweils parallel schaltbaren Rohrmotore s Technischen Daten Die Parallelschaltung mehrerer RADEMACHER Rohrmotoren ist m gl...

Страница 13: ...j zum nachtr glichen Ver ndern der Endpunkte Wollen Sie nachtr glich die Endpunkte einer bestehenden Rollladeninstallation ndern m ssen Sie einen Elektriker beauftragen die Setzleitung j gem demAnsch...

Страница 14: ...leinen Schritten korrigieren WICHTIG Kommt es w hrend der Einstellungen zu einer Fehlfunktion l uft z B der Rohrmotor nur eine Umdrehung lang auch beim Dr cken der Setztaste ist Ihr Rohrmotor wahrsche...

Страница 15: ...0 Schrauben Sie ggf die Walzenkapsel 4 mit einer Sicherungsschraube in der Wickelwelle 5 fest und montieren Sie den Motor nach den Angaben auf den Seiten 7 10 neu M gliche Ursache 2 Der Thermoschutz h...

Страница 16: ...H I IP 44 PVC 465 45 2 70 Typ 10 16 10 16 230 50 121 0 53 4 5 0 75 3 32 H I IP 44 PVC 462 35 3 70 20 16 20 16 230 50 145 0 64 4 5 0 75 3 32 H I IP 44 PVC 465 45 2 70 30 16 30 16 230 50 191 0 83 4 5 0...

Страница 17: ...as instrucciones y en caso de cambio de propietario haga entrega de las mismas al propietario siguiente En caso de da os que se originen por no respetar las instrucciones y las indicacio nes de seguri...

Страница 18: ...de seguridad En caso de utilizaci n inadecuada existe un alto riesgo de lesiones Instruya a todas las personas en el uso seguro del motor tubular Proh ba a los ni os jugar con los controles fijos Evit...

Страница 19: ...Se debe montar el eje enrollador en posici n horizontal Si la persiana se enrolla torcida se pueden producir da os al motor o a la persiana La tapa de la caja de persiana debe ser f cilmente accesibl...

Страница 20: ...s indicaciones de montaje son v lidas para las situaciones de montaje est ndares junto con motores tubulares y accesorios RADEMACHER El cabezal de accionamiento 12 del motor se puede montar en el late...

Страница 21: ...l tal n de arrastre 8 en el eje enrollador 5 IMPORTANTE En ejes enrolladores con resquicio interior el motor 9 debe tener suficiente espacio libre ES Preparaci n en caso de uso de tubos de precisi n F...

Страница 22: ...raci n en caso de uso de tubos de precisi n Figuras Marque cuatro orificios de perforaci n y a continuaci n tal drelos en el arrastrador a trav s del tubo de precisi n ATENCI N u Nunca perfore m s de...

Страница 23: ...tar bien accesible Los motores tubulares se pueden integrar en 4 configuraciones en el cojinete de clic 13 Extendiendo la grapa ret n 14 puede soltar los motores en cualquier momento del nuevo cojinet...

Страница 24: ...le en forma de lazo el lazo hace que el agua que sale del cable se recoja en el punto m s bajo del lazo y no gotee 1 Lleve el cable del motor 15 hasta la caja de derivaci n o la caja mural previstas p...

Страница 25: ...punto de conexi n y del fusible NOTA En caso de conexi n en paralelo deja de poderse controlar individualmente cada motor Ajuste de los puntos finales Al conectar en paralelo varios motores tubulares...

Страница 26: ...n j para cambiar a posteriori los puntos finales Si desea modificar a posteriori los puntos finales de instalaci n de persianas existente debe encargar a un electricista que conecte el cable de defin...

Страница 27: ...r Compruebe y corrija si es necesario el correcto asiento del adaptador 10 ver p gina 28 NOTA Los puntos finales se conservan tambi n en caso de apag n el ctrico duraderamente IMPORTANTE La l nea de d...

Страница 28: ...esario atornille la c psula de cilindro 4 con un tornillo fijador al eje enrollador 5 y monte el motor seg n las indicaciones de las p ginas 20 23 Posible causa 2 Ha saltado el disyuntor t rmico Soluc...

Страница 29: ...blemas de los motores tubulares RADEMACHER con actores de celos as EIB KNX se deben ajustar los siguientes par metros antes de la puesta en funcionamiento Servicio de intervalo breve Si es posible se...

Страница 30: ...30 ES...

Страница 31: ...de la sant et de la vie de la personne concern e Ici il s agit de votre s curit Veuillez observer et respecter toutes les instructions ainsi identifi es REMARQUE IMPORTANT ATTENTION Ici nous attirons...

Страница 32: ...par lectrocution Le raccordement au secteur du moteur tubulaire et tous les travaux sur les installations lectriques pourront uniquement tre effectu s par un lectricien homologu et conform ment aux pl...

Страница 33: ...ouvercle du caisson de volet roulant doit tre facilement accessible et simple d monter Ne d monter en aucun cas les but es m caniques de la derni re lamelle du volet roulant Importantes consignes de m...

Страница 34: ...les conditions de montage pr sentes Montez le palier de la motorisation 13 de telle sorte que le bouton de r glage 11 reste bien accessible et que le c ble du moteur puisse tre pos sans tre pli FR Me...

Страница 35: ...d enroule ment 5 IMPORTANT Si les broches d enroulement ont un agrafage int rieur veillez ce que le moteur 9 ait suffisamment d espace libre FR Pr parations en cas d emploi de tubes de pr cision Illu...

Страница 36: ...de pr cision Illustrations Tracez quatre trous de fixation puis percez les dans l entra neur au travers du tube de pr cision ATTENTION u Laprofondeurdeper agedansl entra neurnedoitenaucuncasd passer10...

Страница 37: ...en chement de RADEMACHER fixez le moteur si n cessaire l aide d une deuxi me goupille fendue Rectifiez de l g res inexactitudes des mesures en enfon ant ou en sortant l embout 4 IMPORTANT Pour finir a...

Страница 38: ...ctions S parez le c ble d alimentation du secteur sur tous les p les et rendez impos sible une remise sous tension involontaire V rifiez si l installation se trouve bien hors tension Faites tous les t...

Страница 39: ...it REMARQUE Toutefois en cas de montage en parall le une commande individuelle de chaque moteur n est plus possible R gler les fins de course En pr sence d un montage en parall le de plusieurs moteurs...

Страница 40: ...liaison navette j pour une modification ult rieure des fins de course Si vous souhaitez modifier ult rieurement les fins de course de volets roulants existants il vous faut demander un lectricien de...

Страница 41: ...deux sens de marche mont e descente au niveau desquelles le moteur se d connecte Pour cela le moteur tubulaire doit tre compl tement install Ne d monter en aucun cas les but es m caniques de la derni...

Страница 42: ...s la broche d enroulement 5 l aide d une vis de s ret et montez le moteur conform ment aux indications des pages 34 37 Cause possible 2 La protection thermique du moteur s est d clench e Solution 2 Re...

Страница 43: ...s probl me des moteurs tubulaires RADEMACHER avec des acteurs pour stores EIB KNX il est imp ratif de r gler les param tres avant la mise en service Service intermittent Il faut si possible d connecte...

Страница 44: ...44 FR...

Страница 45: ...ns be taken to protect the health and life of the person concerned This concerns your safety Please pay particular attention to and carefully follow all instructions with this symbol NOTE IMPORTANT CA...

Страница 46: ...or shutters in the event of uncontrolled movement In such cases switch off all power to the drive and take appropriate safety precautions to prevent unintentional switching on Arrange to have the syst...

Страница 47: ...e original manufacturer s parts and accessories Only use tubular motors which correspond to the local conditions in terms of their output Incorrectly dimensioned tubular motors can lead to damage An i...

Страница 48: ...Figure 2 1 Please check the position of the drive end 13 and counter bearing 1 in the roller shutter box before commencing any work Wind the entire shutter curtain onto the winding shaft and measure d...

Страница 49: ...sions of the notch 1 depend on the type of tubular motor see figures 5 a 5 b 5 c Pushing the tubular motor into the winding shaft Figure 1 STOP Do not push the motor 9 into the winding shaft 5 using f...

Страница 50: ...o the driver CAUTION u Never drill deeper than 10 mm into the driver u Never drill close to the drive as this will cause it to malfunction Screw fix or rivet the precision tube to the driver using sel...

Страница 51: ...ick bearings 13 By opening the fixing brackets 14 you can release the motors from the new click bearing 13 at any time 2 Insert the other end of the winding shaft 5 with the ball bearing 2 into the co...

Страница 52: ...th the diagrams provided in these instructions Disconnect all poles of the mains cable from the mains and prevent them from being switched on again Check that the system has zero potential Carry out a...

Страница 53: ...parallel using RADEMACHER shutter switches or shutter buttons Parallel switching using RADEMACHER control devices e g Troll Comfort Number of parallel switchable tubular motors see Technical data You...

Страница 54: ...u want to change the limit stops of an existing roller shutter installation all your electrician needs to do is to connect the setting wire j to a conventional external switch 230 V 50 Hz in accordanc...

Страница 55: ...increments by briefly pressing the set button IMPORTANT If you encounter any problems while adjusting the limit stops e g such as the tubular motor operating for one rotation only even when pressing t...

Страница 56: ...at the motor head 10 Solution Please check whether the adapter 10 is flush with the motor head 12 of the drive and is fully inserted into the winding shaft 5 Adjust the adapter 10 in such a way that i...

Страница 57: ...minal torque Idle speed Rated voltage Frequency Nominal output Current consumption Operating time Number of cable cores Wire cross section Cable length standard Limit switch range number of revolution...

Страница 58: ...58 EN...

Страница 59: ...g van de gezondheid en het leven van de betrokken persoon vereist Hier gaat het om uw veiligheid A u b alle op deze manier gekenmerkte aanwijzingen in acht nemen en opvolgen OPMERKING BELANGRIJK LET O...

Страница 60: ...doelde inbedrijfstelling Laat de installatie in elk geval door een expert controleren Algemene veiligheidsinstructies Bij onjuist gebruik bestaat verhoogd gevaar voor letsel Zorg ervoor dat alle perso...

Страница 61: ...5 m hoogte De wikkelbuis altijd horizontaal monteren Indien de rolluik schuin omhoog wordt gebracht kan er schade aan de motor of aan het rolluik ontstaan De deksel van de rolluikkast moet makkelijk t...

Страница 62: ...weer gegeven Bevestig de lagers Let daarbij op het type lagers en de omstandig heden ter plaatse Monteer de motorlager 13 op zo n manier dat de insteltoets 11 later goed te bereiken is en de motorkabe...

Страница 63: ...op de motorkop 12 afglijdt dit kan anders tot storingen leiden zie pagina 70 NL Voorbereidingen bij toepassing van precisiebuizen Afbeeldingen 1 Meet de afstand tussen de adapter en het achterste derd...

Страница 64: ...ij toepassing van precisiebuizen Afbeeldingen Markeer de vier bevestigingsgaten en boor deze vervolgens door de precisiebuis in de meenemer LET OP u Boor nooit dieper dan 10 mm in de meenemer u Boor n...

Страница 65: ...de kliklager 13 worden ingebouwd Door dehouderklem 14 teopenenkuntudemotorenaltijdweeruitdekliklager 13 halen Plaats het andere uiteinde van de wikkelbuis 5 met de kogel lager 2 in de tegenlager 1 Ind...

Страница 66: ...worden uitgevoerd Haal de toevoerleiding met alle polen van het stroomnet en zorg ervoor dat deze niet weer per ongeluk kan worden ingeschakeld Controleer of de installatie spanningsloos is Voer alle...

Страница 67: ...n de zekering OPMERKING Bij parallelschakeling is echter geen individuele besturing van de afzonderlijke motoren meer mogelijk Eindposities instellen Bij de parallelschakeling van meerdere buismotoren...

Страница 68: ...j voor het achteraf veranderen van de eindposities Indien de eindposities van een bestaande rolluikinstallatie moeten worden veranderd moet een elektricien de insteldraad j overeenkomstig het aanslui...

Страница 69: ...op afgegleden Controleer of de adapter 10 mogelijk is verschoven en zet deze weer op de juiste plaats zie pagina 70 OPMERKING Ook bij een stroomuitval blijven de ingestelde eindposities intact BELANGR...

Страница 70: ...0 op de juiste plek zitten Schroef evt de wikkelbuiskap 4 met een borgschroef in de wikkelbuis 5 vast en monteer de motor volgens de aanwijzingen op pagina 62 65 Mogelijke oorzaak 2 De thermische beve...

Страница 71: ...ensor kleiner is dan de tijd tussen kortstondig en langdurig bedrijf in de actor Daardoor wordt het kortstondig uitschakelen van de actor tijdens het ingedrukt houden van de sensortoets verhinderd Lan...

Страница 72: ...oorspronkelijke garantieperiode NL ES RADEMACHER Ger te Elektronik GmbH accorde une garantie de 60 mois sur les appareils neufs dans la mesure o ces appareils ont t install s conform ment la notice d...

Отзывы: