GENERAL OVERVIEW OF PRODUCTS
Congratulations on your purchase of the most advanced smoking detection system and voice warning system
available on the market today. All the Cig
-
Arrête and SpeechPOD products are compatible with any PC running
Windows® Operating System using ‘Drag and Drop’ file programming. In this installation guide, we will take you
through the various programming options and also how to connect your products together to form a system.
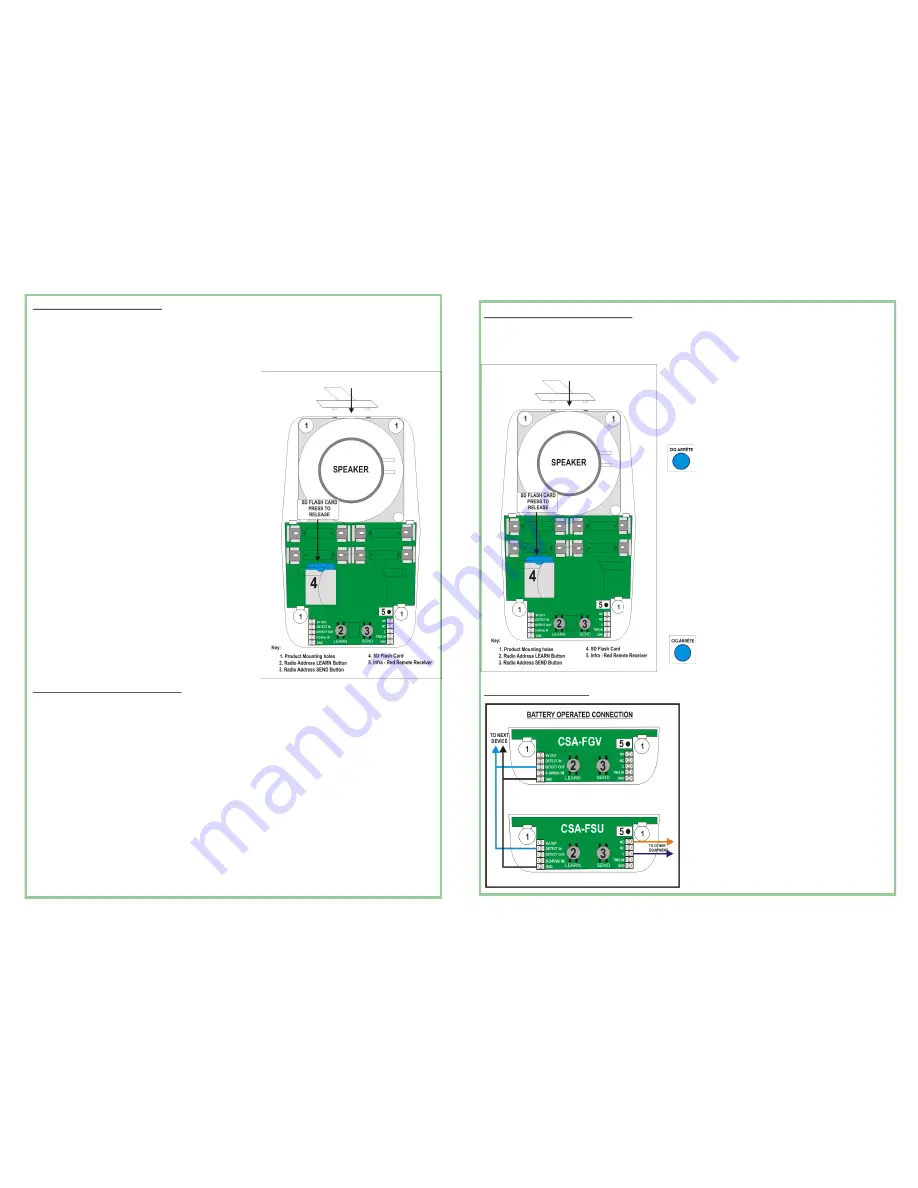
All product models have the same basic layout although func-
tionality will vary. The diagram opposite shows where the
various components are located.
1.
OPENING THE FRONT COVER
Use the special key and insert the two prongs into the
holes on the top side of the product. Press down firmly
and pull the front cover away from the back plate. The
front cover is hinged and can be removed completely past
a certain point.
2.
REMOVING THE SD FLASH CARD
Press the SD card into the holder and release. The SD card
will spring away from the holder allowing removal. Once
you have programmed the SD Flash Card, re
-
insert it into
the holder and push gently until it clicks into position.
3.
INSERTING THE BATTERIES
Insert the batteries (4 x AA Alkaline) into the battery clips
and ensure that connections are firmly made. Be sure to
observe the correct polarity as printed on the PCB.
4.
CONNECTING TO AN EXTERNAL POWER SUPPLY
The products can be connected to an external 9
-
24Vdc
regulated power supply. The connections are made on the
bottom left hand corner of the PCB marked as 9
-
24Vdc and
GND. DO NOT INSERT BATTERIES WHEN OPERATING THE
UNIT ON A POWER SUPPLY.
GENERAL INSTALLATION REQUIREMENTS
1.
Do not install Cig
-
Arrête® smoke detectors in outdoor areas or smoky atmospheres such as car parks,
loading bays, near gas operated fork trucks, or where welding or cooking may occur as fumes and gases
may cause unwanted alarms. Consider using flame detection in these areas.
2.
Do not exceed the coverage area of each smoke detector (3m x 3m x 3m)
3.
Do not place installation cabling close to mains voltage cables as they may cause interference. Always
use stranded multi
-
core cable.
4.
Do not install flame detectors in direct sunlight of facing high frequency ballast lighting such as metal
halide lamps as the lighting frequency may trigger unwanted alarms.
5.
For SpeechPOD installations, if the number of message plays is expected to be high, consider using an
external 9
-
24Vdc power supply to avoid draining of batteries.
RADIO COMMUNICATION SETUP
The radio communication modules (if fitted) only transmit alarm conditions from the Cig
-
Arrête® elements—ie.
Flame and smoke sensors. They do not transmit any PIR activations on the SpeechPOD product.
In order to configure the radio system communication you will need
to prepare two devices. For example, to connect a CSA
-
FGV Com-
bined Flame and Smoke Detector to a CSA
-
FSU Combined Sounder
Flasher Unit please follow these instructions.
In this example, the CSA
-
FSU is the receiving unit and will operate
when it receives an alarm signal from the CSA
-
FGV.
Press the CIG
-
ARRETE button on both products to enter
the Configuration menu. The product will tell you how it is
configured.
On the CSA
-
FSU, press the LEARN button (2). The product will then
ask you the following:
“PLEASE PRESS SEND ON THE DEVICE TO BE ADDED”
On the CSA
-
FGV, press the SEND button (3). This action sends a
transmission and unique address to all units. Only the product that is
in LEARN mode will accept the transmission. Once the CSA
-
FSU has
verified that the data is good, it will confirm the following:
“DEVICE ADDED”
You can repeat this process and add several devices to the same CSA
-
FSU if required.
Once you have completed your radio set up, press the
CIG
-
ARRETE button to exit Configuration mode. The
product will confirm by saying
“DEVICE CONFIGURED”
WIRING CONNECTIONS
If you are not using a power supply, then decide which prod-
uct will be the Master Unit of the system. This will normally be
the CSA
-
FSU installed outside the washroom area. You can
connect up to 10 devices to the CSA
-
FSU as shown in the
diagram opposite.
When any device generates an alarm condition, this will be
relayed to the Master Unit which will also generate an alarm
condition simultaneously. You can use any of the devices as a
Master Unit, the diagram opposite is by way of example only.
Use 7 x 0.2mm stranded alarm cable for all the connections.
Once the wiring is complete insert 4 x AA batteries into each
device to power them. Each device will provide a message
stating how it is configured. If you have a gas (smoke) ele-
ment, the device will flash its LED for 2 minutes to normalise.
DO NOT TEST THE DEVICE UNTIL THE FLASHING STOPS.
Your system is now installed and running normally.


