Racing RAC62PRRS Скачать руководство пользователя страница 20

To start the engine:
1. sit on the seat and press the brake pedal right down(

4.3);

2. put the transmission into neutral («N») (

4.4);

3. disengage the blade (

4.6);

4. for cold starting, put the accelerator lever in the «CHOKE»
position (if fitted) as shown on the label (

4.12 ).

Alternatively, if the engine is still hot or without a choke, position the lever between
«SLOW» and «FAST»;

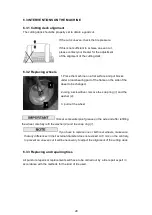
5.take the starter cable handle (

4.21) and firmly tug it.

6.once the engine has started, put the handle back in its seat

.

7. After the machine has run for a few seconds, put the accelerator lever on
«START» and then on «SLOW».

The choke (if fitted) must be closed as soon as possible.

Using it when the engine is already warm can foul the spark plugs and cause the
engine to run erratically.

If you have difficulty starting, do not make several

attempts to avoid flooding the engine or running down the battery (if present).

– Check that the conditions allowing the engine to start are met
– Turn the key (electric start) to «OFF». Wait for a few seconds and repeat the start

operation. Should the malfunction persist, refer to chapter «8» of this manual and the
engine manual.

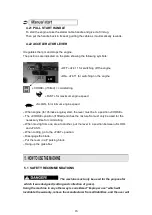
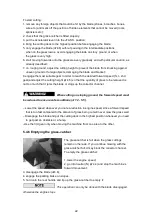
5.4.2 Starting and moving without mowing

this machine has not been approved for use on public

roads. It has to be used (as indicated by the Highway Code) in private areas closed
to traffic.

When moving the machine, the blade must be disengaged

and the cutting deck put at its highest position.

To start the forward movement:

1. put the accelerator control between the «SLOW» and «FAST» positions;
2.push the pedal right down (

4.2) and put the gear change lever in 1st gear (

4.4a).

3.release the pedal gradually to begin the movement.

20

Содержание RAC62PRRS

Страница 1: ...IGINAL INSTRUCTIONS RIDE ON LAWN MOWER Model RAC62PRRS WARNING Please read all instructions carefully before operating the machine BUILDER SAS 32 rue Aristide Berg s ZI 31270 Cugnaux France Made in PR...

Страница 2: ...which will invalidate the guarantee and the manufacturer will decline all responsibility placing the blame with the user for any damage or injury to himself or others in such cases Since the product i...

Страница 3: ...cular importance for safety and operation are highlighted and signify the following These give details or further information on what has already been said and aim to prevent damage to the machine Non...

Страница 4: ...slopes B PREPARATION 1 While mowing always wear sturdy footwear and long trousers Do not operate the equipment barefoot or wearing open sandals 2 Thoroughly inspect the area where the equipment is to...

Страница 5: ...king brake stop the engine and remove the ignition key in the electric start models 10 Disengage the blade stop the engine and remove the ignition key in the electric start models before clearing bloc...

Страница 6: ...s Even if you use this product in compliance with all safety requirements the potential risks of injury and damage remain The following hazards may arise in the structure and design of this product Al...

Страница 7: ...elow Warning Read the Operator s Manual before operating this machine Warning in the manual start models disconnect the spark plug cap and read the instructions before carrying out any maintenance or...

Страница 8: ...s at the ends help convey the cut grass towards the collector channel 13 Collector channel this is the part connecting the cutting deck to the grass catcher 14 Grass catcher as well as collecting the...

Страница 9: ...quipment 3 1 UNPACKING When unpacking the machine take care to gather all the individual parts fittings and documentation To avoid damaging the cutting deck when getting the machine down from the pall...

Страница 10: ...the end of the lever 1 on the projecting part of the pin 2 and fix it all by tightening the screw 3 and nut 4 3 5 FITTING THE GRASS CATCHER Identify the screws to be used by following the drawing tha...

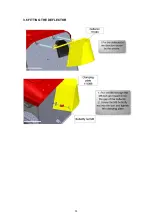
Страница 11: ...3 6 FITTING THE DEFLECTOR 11...

Страница 12: ...cts as a clutch engaging and disengaging drive to the wheels and in the second part it works the brake Do not keep the pedal half way of clutch engagement or disengagement as this can cause overheatin...

Страница 13: ...osition A 4 4 SPEED CHANGE LEVER This lever has six positions for the four forward gears the neutral position N and reverse R To change gear press the pedal 4 2 halfway down and move the lever as per...

Страница 14: ...eir rotation within a few seconds 4 12 ACCELERATOR LEVER Regulates the engine s r p m The positions are indicated on a plate showing the following symbols CHOKE if fitted cold starting FAST for maximu...

Страница 15: ...engine for Chinese engine start the lever must be in a position CHOKE The CHOKE position if fitted enriches the mixture So must only be used for the necessary time for cold starting When moving from...

Страница 16: ...r feet next to or beneath the rotating parts and always keep away from the discharge opening Do not use the machine when in a precarious state of health or under the effect of medicines or other subst...

Страница 17: ...change is activated 4 4 with the parking brake on 5 3 PRELIMINARY OPERATIONS BEFORE STARTING WORK These controls ensure that the work gives the best results and is done in maximum safety 5 3 1 Seat a...

Страница 18: ...ual With the engine stopped check its oil level 1 to reach the plug 1 remove the engine cover 2 with the aid of a screwdriver 2 by closely following the methods described in the engine manual make sur...

Страница 19: ...y 1 Check that the safety devices function as described 5 2 2 Check that the brake is in perfect working order 3 Do not start mowing if the blade vibrates or if you are unsure whether they are sharp e...

Страница 20: ...ne to run erratically If you have difficulty starting do not make several attempts to avoid flooding the engine or running down the battery if present Check that the conditions allowing the engine to...

Страница 21: ...achine by reducing the engine speed 2 push the pedal right down 4 2 to lower the speed even more until the machine stops 3 Move the speed gear shift 4 4 to idle N to permit gradual motion 5 4 4 Retrom...

Страница 22: ...ght 4 5 so that the quantity of grass to be removed is not too much that it jams the blade or clogs up the collector channel When cutting on sloping ground the forward speed must be reduced to ensure...

Страница 23: ...ave finished mowing stop the machine and engage the parking brake 1 shift the accelerator lever to OFF Always make sure that the accelerator level is in the OFF position before leaving the machine una...

Страница 24: ...on where it can dry quickly b To clean the upper part of the cutting deck lower the cutting deck completely position 1 blow a jet of compressed air to remove any remains of grass 5 4 11 Storage and in...

Страница 25: ...ide the machine on slopes in neutral or with the clutch out Always engage a low gear and the parking brake before leaving the machine at a stopped and unattended Take care when beginning forward movem...

Страница 26: ...four hour period The first time at maximum cutting height possibly reducing the cutting width and the second cut at the height desired 8 The appearance of the lawn will improve if you alternate the cu...

Страница 27: ...work is done correctly without affecting the safety of the machine You must go to a specialized Service Centre or contact your Dealer of the following are malfunctioning the brake the engagement and...

Страница 28: ...to be changed 2 using a screwdriver remove the snap ring 1 and the washer 2 3 pull out the wheel Smear some waterproof grease on the axle and after refitting the wheel carefully refit the washer 2 and...

Страница 29: ...oexistence and the environment in which we live Try not to cause any disturbance to the surrounding area Scrupulously comply with local regulations and provisions for the disposal of waste Scrupulousl...

Страница 30: ...heck connections disconnected 5 Starting is difficult or the engine fault in carburetion clean or replace the air filter engine runs erratically flush out the float chamber empty fuel tank and refill...

Страница 31: ...manufacturer is not held responsible if repairs are done badly Change Blade 1 Make sure there is no machine oil and gasoline in the tank side lay the machine as the picture above 2 Loosen blade bolts...

Страница 32: ...F 98 dB A Vibration level Max Whole body vibration 3 761m s2 Max Hand arm vibration steering wheel 4 969m s2 K 1 5m s2 Engine type Max Output power 4 8kW Speed 3000 min Fuil tack capacity 1000ml Fron...

Страница 33: ...chnical file Mr Olivier Patriarca have been designed in compliance with the following standards EN ISO 5395 1 2013 A1 2018 EN ISO 5395 3 2013 A1 2017 A2 2018 EN ISO 14982 2009 And in accordance with t...

Страница 34: ...user manual Due to our policy of continuous product improvement we reserve the right to alter or change specifications without notice Consequently the product may be different from the information co...

Страница 35: ...pairs will be done by approved engine manufacturers of these manufacturers see their site http www briggsandstratton com eu fr http www honda engines eu com fr service network page jsessionid 5EE8456C...

Страница 36: ...ssary for repairs and more generally the costs related to the immobilization of the product The costs of a second opinion established by a third party following an estimate by a SWAP Europe repair sta...

Отзывы: