background image

19 


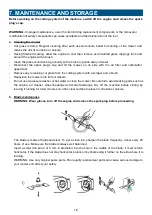
To remove the blade, loosen the screw, check the blade bracket, and replace all parts if they are worn or 

damaged. 

When  reassembling  the  blade,  make  sure  that  the  cutting  edges  are  in  the  same  direction  as  the 

direction of rotation of the motor. The tightening torque of the blade screw should be 3.7 kg * m / s 2 (37 

Nm) and can be checked with a torque wrench. 


c.  Storing the mower 

Store your mower in a dry, well-ventilated area, away from flames, sparks or heat sources. If the storage 

area is accessible to children, immobilise the machine by disconnecting the spark 

plug’s cap. Storing the 

mower  beneath  a  tarpaulin  or  similar  cover  is  not  recommended  as  it  may  cause  a  build

up  of 

condensation resulting in corrosion of the mower. 


Extended shutdown and winter storage 

Thoroughly clean the mower. Ideally, run the engine outdoors until the fuel tank is empty. Alternatively, 

empty any remaining fuel using a fuel suction pump. 

Dispose of discarded fuel safely and responsibly, remembering that petrol vapours can cause explosion 

or  fire.  Run  the  engine  until  any  remaining  fuel  is  consumed.  Allow  the  engine  to  cool.  Check  the 

condition  and  cleanliness  of  the  air  cleaner.  Remove  the  spark  plug  from  the  engine  and  pour  a 

tablespoon  of  engine  oil  into  the  cylinder.  Gently  pull  the  starter  rope  several  times  to  turn  over  the 

engine, distributing the oil to protect the cylinder over winter. Replace and tighten the spark plug. 


At the start of the new season 

Remove the spark plug and gently clean off any carbon deposits from the tip with a small copper wire 

brush, finishing off with petrol. Allow the spark plug to dry. Pull the starter rope several times to expel 

excess oil from the cylinder. Replace and tighten the spark plug. Fill the fuel tank with unleaded petrol. 

Turn over the engine until it starts. 


Before transporting the mower 

Thoroughly clean the mower. Empty the fuel tank using a suction pump. Dispose of discarded fuel safely 

and responsibly, remembering that petrol vapours can cause explosion or fire. Run the engine until any 

remaining fuel is consumed. 

Allow the engine to cool. Remove the grass collection bag. Loosen the quick release and fold down the 

top section of the handles taking care not to bend the cables. 

To avoid scratching the mower, insert corrugated cardboard or similar padding between the upper and 

lower handlebars and the engine. 

Due to the 

mower’s weight, use ramps or seek assistance when lifting or loading the mower. 


d.  Mower maintenance 


Cutting system 

Before and after each mowing session, check that the blade, its attachment bolts and drive shaft are not 

damaged or excessively worn. Never try to straighten a bent blade. Replace a damaged, worn or bent 

blade  as  soon  as  possible.  Use  only  genuine  parts.  Excessive  vibration  when  mowing  is  a  good 

indication of a problem with the cutting system. 

WARNING: Vibration from a bent or damaged blade can cause costly damage to the mower. Working 

with an excessively worn blade wastes fuel and can lead to injury if the blade becomes detached from 

the machine. 

Содержание RAC5614F-A

Страница 1: ...ORIGINAL INSTRUCTIONS EN PETROL LAWN MOWER RAC5614F A USER GUIDE CAUTION Read the instructions before using the machine...

Страница 2: ...YINSTRUCTIONS 3 2 YOURPRODUCT 8 3 INTENDEDUSE 10 4 SETUPYOURMOWER 10 5 FILLINGFUELTANK 15 6 OPERATION 16 7 MAINTENANCEANDSTORAGE 18 8 DECLARATIONOFCONFORMITY 21 9 WARRANTY 22 10 PRODUCTFAILURE 23 11 W...

Страница 3: ...g a source of ignition until the gasoline vapors has dissipated o Refuel only outside and do not smoke during refueling o Store fuel in tanks specifically designated for this purpose o Replace the fue...

Страница 4: ...in a safe place Move slowly when moving The lawnmower should not be used in slopes and near drop offs ditches or embankments if the tool must be used in these kinds of emplacements take an extreme pre...

Страница 5: ...tool on daylight or under a good lighting Always keep bystanders away Warning Take an extreme precaution when operating the lawnmower in slopes and near drop offs ditches or embankments always be sure...

Страница 6: ...injuries and accidents caused by flying objects Prolonged use of this product exposes the operator to vibrations and can produce so called white finger disease To reduce the risk wear gloves and keep...

Страница 7: ...tion hot surface Caution Risk of fire Unplug the spark plug before maintenance and repair Read the instruction manual Release switch handle to stop the motor Self propeller Potential risk of electrica...

Страница 8: ...e discharge board 7 Side discharge switch 8 Muffler 9 Front wheel 10 Primer bulb 11 Engine 12 Baffle plate 13 Quick fix handle 14 Self propeller lever 15 Front wheel locker 1 Rear discharge with grass...

Страница 9: ...switch Push out the side discharge board and then tighten the side discharge switch Close state Open state 3 Mulching Remove the grass catcher Lift and hold the flap then install the mulch kit Close...

Страница 10: ...grass Never use the mower for any other purpose Any other use may endanger your safety and may result in damage to the mower Persons under the age of 16 and persons unfamiliar with the operating instr...

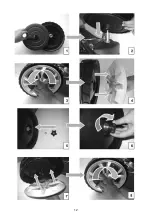
Страница 11: ...heel and place it on the pins located on the rear of the machine fig 1 2 Take out the frame of the wheel fig 3 place the wheel on the pin then add the washer the knob and screw it fig 5 6 Place the fr...

Страница 12: ...12...

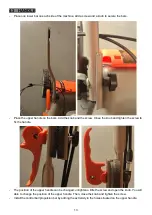
Страница 13: ...screw Close the knob and tighten the screw to fix the handle The position of the upper handle can be changed untighten a little the screw and open the knob You will able to change the position of the...

Страница 14: ...ight to suit your requirements Medium position is best for most lawns 6 positions 25 75mm height can be selected 1 Adjust the front wheel position in 1 6 holes 25 35 45 55 65 75mm with different heigh...

Страница 15: ...e dipstick bottom edge of the dipstick Do not overfill Replace the oil tank plug dipstick WARNING Gasoline is extremely flammable Store fuel in specially designed cans for this purpose Fill the fuel t...

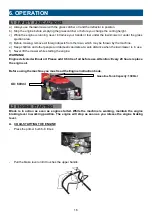
Страница 16: ...animals at a safe distance when the lawnmower is in use f Never lift the mower while starting the engine WARNING Engine delivered without oil Please add 0 6 litre of oil before use Attention Every 20...

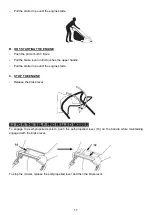
Страница 17: ...he upper handle Pull the starter rope until the engine starts C STOP THE ENGINE Release the brake lever 6 3 FOR THE SELF PROPELLED MOWER To engage the self propelled system push the self propelled lev...

Страница 18: ...cut grass from the cutting system with a scraper and a brush Reposition the mower onto its four wheels Do not use a pressure washer or hot water to clean the mower Be careful to avoid soaking parts s...

Страница 19: ...ug At the start of the new season Remove the spark plug and gently clean off any carbon deposits from the tip with a small copper wire brush finishing off with petrol Allow the spark plug to dry Pull...

Страница 20: ...yer of oil to the outside of the cartridge filter with a brush you can use clean engine oil for this Insert the filter cartridge into its housing and replace the air box lid ensuring that each compone...

Страница 21: ...g European Directives Machinery Directive 2006 42 EC EMC Directive 2014 30 EU Emission Regulation EU 2016 1628 Applicable harmonized standards EN ISO 5395 1 2013 A1 2018 EN ISO 5395 2 2013 A1 2016 A2...

Страница 22: ...bed in the user manual Due to our policy of continuous product improvement we reserve the right to alter or change specifications without notice Consequently the product may be different from the info...

Страница 23: ...is available before dropping off the machine Go to the repair station with the complete machine packed accompanied by the purchase invoice and the station support sheet downloadable after the service...

Страница 24: ...oduct during the time necessary for repairs and more generally the costs related to the immobilization of the product The costs of a second opinion established by a third party following an estimate b...

Страница 25: ...BUILDER SAS 32 rue Aristide Berg s ZI 31270 Cugnaux France Made in PRC...

Отзывы: