


910088
1-inch Hydraulic Impact Wrench
racinerailroad.com
racinerailroad.co.uk
3.2023 Rev 2.3
Original Instructions
Page
17
of
25
Section 4: Maintenance
It is highly recommended to practice regular check-ups and maintenance in accordance with the usage
frequency to keep your tool in better condition and reduces total running costs.
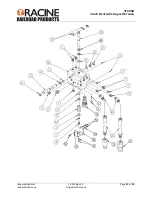
Complete disassembly of the Impact Wrench
is not
recommended. Return to Racine Railroad for repairs.
All maintenance must be done with the tool disconnected from a
power source.
•
Wipe all external surfaces after each use with a clean, lint free cloth to remove surface contaminants
from the tool.
•
To extend the life of the handle padding, do not allow sharp edges or foreign objects to rub on the
padding.
•
Store all tools in an enclosed area to prevent weather from contaminating their systems.
Daily
1. Wipe all tool surfaces, fittings, and couplings free of grease, dirt, and foreign materials.
Do not attempt to locate hydraulic leaks by feeling around hoses
and fittings with your hands. Pinhole leaks can penetrate the skin.
2. Inspect the tool, hydraulic system, hoses, and fittings for signs of leaks, cracks, wear, and/or damage.
Replace if necessary.
3. To prevent contamination, always install dust caps over the hydraulic ports when disconnected.
Weekly
1. Grease the impact mechanism using the grease zerk located on top of the motor adapter plate.
2. Apply 2 to 3 strokes (approximately 4 cc /ml) from a standard grease gun using a suitable grease.
Grease leakage from around the square drive is common after lubrication and during hard use. Wipe
the grease off to prevent it from splattering all over.
Note
: Do not attempt to repair this product. Only properly trained personnel should perform any
maintenance service, and or repair to this tool.
Monthly
1. Perform a detailed inspection of the systems hoses, and fittings according to the hydraulic hose
operator’s manual and as stated in SAE standard j1273, May 1989 or latest revision.
Replace the hoses and/or fittings if necessary.
Semi-annually
1. Remove the impact head (Item 41) and clean the grease off the impact components.
2. Remove the grease from the impact housing.
3. Before assembly, check for damage and replace any components in poor condition. Mount the impact
head (Item 41) to the motor adapter plate (Item 40) after placing the assembled hammer mechanism
in the impact head.
4. Make sure all the shims (Item 44) are in position before mounting the impact head. There may be
more than one shim. After assembly, apply 100 strokes of grease (133 cc / ml) to the lubricating zerk.