

D
A
B
C
F
E
H
G
I
J
K
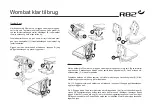
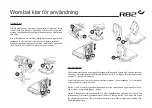
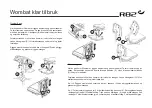
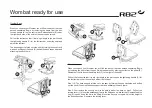
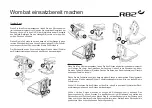
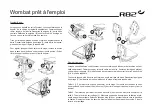
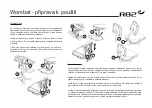
Wombat ready for use
Wombat Upgrade:
When you unpack your Wombat, you will find the back of the chair packed separately. Begin
by removing the frame from the box. Raise the seat unit by placing your foot on the pedal (E).
Remember first to loosen the safety lock (F) to the right of the pedal.
Pull out the footrest so that it is at a right angle to the bar. Loosen the tightening handle (C) for
the footrest bar under the seat and adjust the footrest.
Size 1+2: The back support is fitted on to the seat by turning the knob clockwise and pulling
out the knob (D) behind the back support bar and attaching the back there.
Size 3: First remove the security nut (I) to be able to mount the back on size 3. Pull out the
locking lever (J). Mount the backsupport bar in the fitting and tip into vertical. Depress the blue
ring (K) to push down the bar in the fitting. Mount the security nut again. Adjust the height to
the desired position. Resecure the locking lever.
Wombat Basic:
When you unpack your Wombat, you will find the back of the chair
packed separately. Begin by removing the frame from the box.
Loosen handle (A) on the central bar. Release handle (B) under
the right-hand side of the seat so the seat can be raised.
Pull out the footrest so that it is at a right angle to the bar. Loosen
the tightening handle (C) for the footrest bar under the seat and
adjust the footrest.
The back support is fitted on to the seat by turning the knob clock-
wise and pulling out the knob (D) behind the back support bar and
attaching the back there.


