QView QD1200 Скачать руководство пользователя страница 6

AUTO

 (To auto adjust brightness, auto white balance and auto focus) 

CCD/PC1/PC2 

(CCD/RGB input signal selection) 

S-VIDEO/ VIDEO 

(S-VIDEO/ VIDEO input signal selection) 

/- 

(Increase or decrease the volume) 

RED+/- 

(Increase or decrease the red hue) 

BLUE+/- 

(Increase or decrease the blue hue) 

/- 

(Increase or decrease the brightness) 

SCROLL /

  (Move the image up/down) 
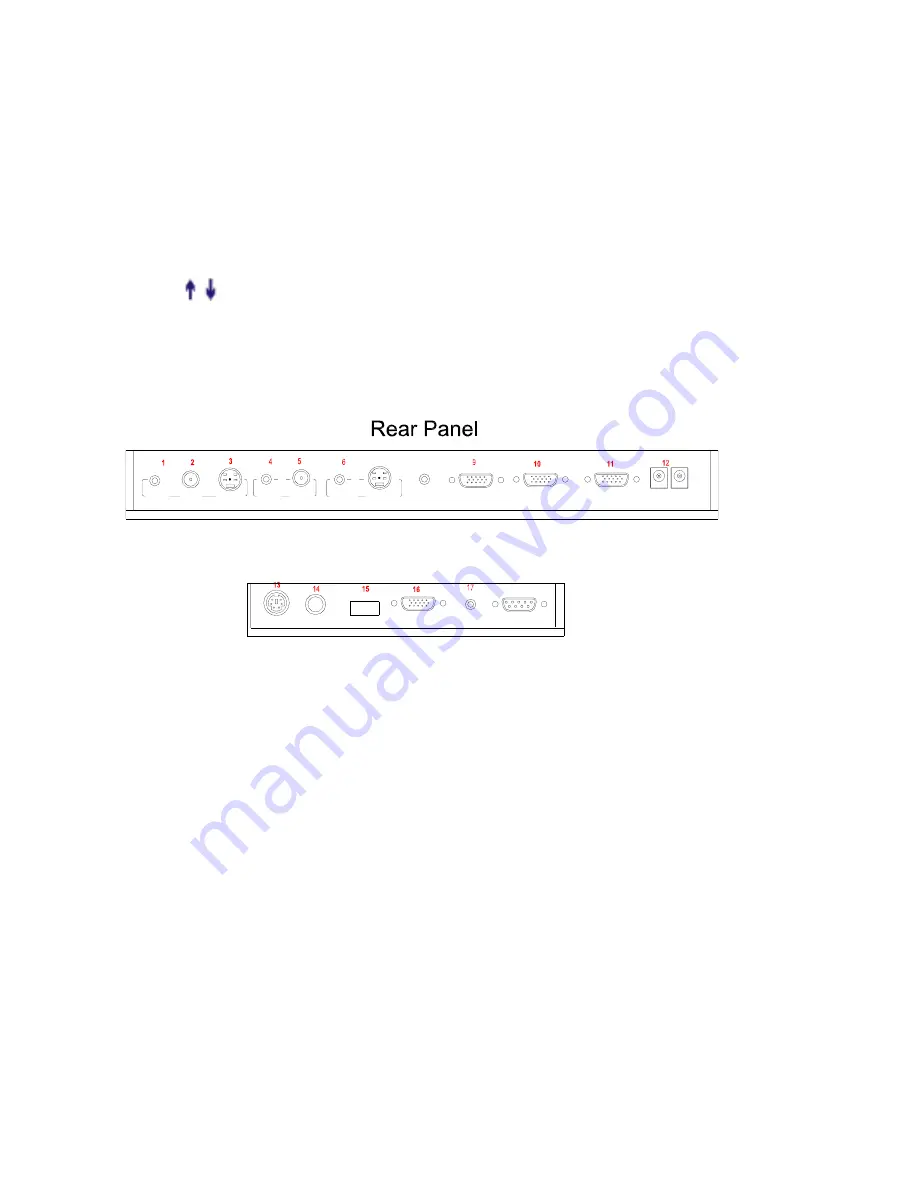
 

CONNECTIONS 

#1 AUDIO OUT 

#2 VIDEO OUT   

#3 S-VIDEO OUT 

#4 VIDEO AUDIO IN 

#5 VIDEO IN 

#6 S-VIDEO AUDIO IN 

#7 S-VIDEO IN 

#8 PC AUDIO IN 


#9 PROJECTOR Connector 

#10 COMPUTER OUT 

USB

PROJECTOR MIC

VIDEO 

OUT

AUDIO 

AUDIO 

OUT

S-VIDEO

IN

VIDEO 

RGB IN

AUDIO IN

RS232

Side Panel

#11 COMPUTER IN 

#12 POWER OUT/IN     

#13 PROJECTOR RS232 Connector 

  #14 MIC IN


#15 USB Connector  #16 RGB IN 


#17 RGB AUDIO IN 

#18 COMPUTER RS-232 Connector 


BASIC PREPARATIONS 

8

PROJECTOR  

OUT   -COMPUTER-   IN  

OUT-12V- IN  

AUDIO IN 

S-VIDEO

7

IN

AUDIO 

18

6


Содержание QD1200

Страница 1: ...r liquids onto the unit or allow combustible or metallic objects to get inside the cabinet Unplug the visualizer from the wall outlet when it is not being used for a long period of time Clean the cabi...

Страница 2: ...TSIDE THE STAGE 13 LIGHT 14 ADJUSTING IMAGE SIZE 14 WORKING WITH NEGATIVES 14 FOCUSING 15 FREEZING IMAGE 15 BRIGHTNESS ADJUSTMENT 15 WHITE BALANCE ADJUSTMENT 15 AUTO ADJUSTMENT 15 TEXT IMAGE MODE 15 C...

Страница 3: ...HE UNIT 23 SPECIFICATIONS 24 TECHNICAL SUPPORT 26 PARTS IDENTIFICATION Arm lights Camera Camera stand Back light Remote control slot Operation panel Stage Connectors Connectors Button instruction CONT...

Страница 4: ...signal selection Move the image up down POWER Control the visualizer On Off CCD PC1 PC2 CCD RGB input signal selection S VIDEO VIDEO S VIDEO VIDEO input signal selection LAMP Control the arm lights an...

Страница 5: ...V reverse the image XGA Switch between SVGA mode and XGA mode RECALL Multiple screen display TEXT Switch between image text mode B W Switch between Color mode and Black White mode SPLIT Image split fu...

Страница 6: ...CROLL Move the image up down CONNECTIONS 1 AUDIO OUT 2 VIDEO OUT 3 S VIDEO OUT 4 VIDEO AUDIO IN 5 VIDEO IN 6 S VIDEO AUDIO IN 7 S VIDEO IN 8 PC AUDIO IN 9 PROJECTOR Connector 10 COMPUTER OUT USB PROJE...

Страница 7: ...hts and rotate the camera head until they are in proper positions Arm lights 3 Making connections Before making any connection turn off all the power including power of the visualizer and the equipmen...

Страница 8: ...cable in addition to this standard RS232 cable to connect to the projector control port for the pin locations and shape of some projectors control port connector may be different from the connector o...

Страница 9: ...projector and will be displayed on the projector screen as RGB1 These signals can be seen in turn when pressing CCD PC1 PC2 and S VIDEO VIDEO on the control panel of the visualizer AUDIO IN S VIDEO OU...

Страница 10: ...onnection enables capturing still images video streams from the visualizer to the computer Special software is required for this operation 4 Turn on the power by pressing the POWER button OUTPUT MODE...

Страница 11: ...the media player in Windows XP A Connect the computer and visualizer with the USB cable Insert the software CD that comes with your purchased visualizer into the CD ROM drive Turn on the visualizer T...

Страница 12: ...he setup F Shut down your computer when prompted so the changes will take effect Please pay attention to the following 1 Computer hardware requirement CPU 2 4GHz RAM 256M or above Graphic card 64M USB...

Страница 13: ...hange a computer s USB port If this port has installed USB2 0 driver then no need to install USB driver again WORKING ON THE STAGE 1 Place your material on the working surface 2 Select the enlargement...

Страница 14: ...der to reduce or enlarge the image size displayed on the screen press the T or W button WORKING WITH NEGATIVES The visualizer is automatically set to display normal materials on the screen when the po...

Страница 15: ...ESS ADJUSTMENT If the image effect is not satisfactory you can adjust the brightness to get a better image effect Use the BRIGHT or BRIGHT button to adjust the brightness To increase the brightness pr...

Страница 16: ...outputs RGB IN signals PROJECTOR ON STANDBY Press the POWER button to turn on the QD1200 s power and press the Ppw button to turn the projector power on To turn the projector standby after use press t...

Страница 17: ...en you not use it PRESET FUNCTION Use the SET button to preset 8 steps of the Zoom Focus position when the button is pressed it moves step by step Press RUN button to the run preset On the remote cont...

Страница 18: ...Double click X USB Capture you can open this file from the CD and double click this software or copy this file into any directory on your computer hard drive and double click it you will see the foll...

Страница 19: ...trol Panel you can open this file from the CD and double click it or copy this file to any directory on your computer s hard drive and double click to launch it CONTROLLING PROJECTOR BY VISUALIZER The...

Страница 20: ...then click Send If you can not find your particular projector model in the Projector please do the following 1 Select Baud rate and parity and input the projector control code The baud rate parity an...

Страница 21: ...he visualizer s projector control port to the RS232 port with a RS232 cable Please disconnect the computer from the RS232 port first Then use buttons on the operation panel to control the projector Th...

Страница 22: ...Please disconnect the projector from the RS232 port first and select the Baud Rate and Parity based on the projector s Baud Rate then click the TEST button to pop up the Projector Code Test dialog box...

Страница 23: ...ction between the visualizer and the projector is correct FOLDING THE UNIT 1 Fold the right arm light down first onto the base then the left arm down Rotate the camera head clockwise until the camera...

Страница 24: ...Y SPECIFICATIONS Color system NTSC or PAL system Pickup device 1 3 CCD Resolution XGA 1024 x 768 Total Pixels 850 000 12 x optical zoom 8 x electrical zoom Lens F 1 8 2 7 mm f 5 4 64 8 mm Zoom Powered...

Страница 25: ...tors Audio OUT Mini Jack 1 Operating system Windows XP SP2 Service pack 2 Hardware Requirement CPU higher than P2 4GHz Memory higher than 256 MB USB connector 15 20 frames sec RS 232 connector D Sub 9...

Страница 26: ...xpert personnel provide technical assistance from 9 00AM through 5 00PM Eastern Standard Time Monday through Friday Please gather the following information before calling Product model name s and numb...

Отзывы: