Quooker PRO7 Скачать руководство пользователя страница 16

1

2

3

4

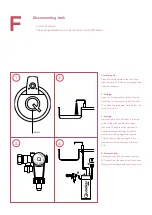
1. Cutting through cold water pipe
Close the main shut-off valve. Cut through 
the cold water pipe at a suitable point.
 
2. Fitting T-joint
Fit a T-joint (not supplied) between the 
pipe sections.
 
3. Fitting pressure reducing valve
Connect the pressure reducing valve to 
the T-joint with a piece of copper piping 
(Ø 15 mm). Note: The pressure reducing 
valve must be fitted in the correct 
direction (see image).

4. Fitting the inlet combination
Connect the inlet combination to the 
pressure reducing valve. The inlet 
combination can be fitted in any direction, 
but the grey funnel must always be 
pointing straight downwards. Close the 
stop valve on the inlet combination, open 
the main shut-off valve and check for 
leaks.

Connecting water

•  The PRO7 operates under mains water pressure and must always be fitted with the supplied 
  inlet combination and pressure reducing valve. 
•  The Nordic single tap, the Fusion tap or the Flex tap must be installed according to the locally 
  applicable regulations.
•   The inlet combination will release drips of expansion water while the water in the tank is 
  heating up in order to regulate the pressure inside the tank.
•   Position the inlet combination as high as possible to create a sufficient height distance 
  between the inlet combination and the point where the waste hose connects to the waste pipe. 
  This is necessary to allow the expansion water to flow away and to prevent water from backing 
  up from the waste pipe (see the  figure at step D4).

C

COL

D

COLD

Содержание PRO7

Страница 1: ...Installation guide PRO7 Before installing read this guide first...

Страница 2: ...eneral Incorrect use can lead to injury Therefore always read the manual carefully before use Installation maintenance and warranty The Quooker can be installed in almost any location provided there i...

Страница 3: ...nd for use by visitors at hotels motels bed breakfasts and other residential accommodation Always follow the installation method described in the manual Avoid spilling water on the plug If defective t...

Страница 4: ...ectromagnetic Compatibility Directive 2014 68 EU Pressure Equipment Directive And are in conformity with the following standards EN60335 1 2012 A11 2014 EN60335 2 15 2002 A1 2005 A2 2008 A11 2012 EN62...

Страница 5: ...Max mains pressure 600 kPa 6 bar Max working pressure 800 kPa 8 bar Mounting bracket optional yes Safety features maximum temperature fuse pressure relief valve 800 kPa 8 bar Water shut off valve elec...

Страница 6: ...on tap packing ring brass fixing plate fixing nut white tap support for thin work tops and two inlet hose screens or Flex tap hoses fibre washer s steel washer screw ring with two screws coupling with...

Страница 7: ...1 4 2 5 2 PRO7 tank 3 Pressure reducing valve 4 Quooker inlet combination 5 PVC connector Quooker drill bit large packing ring and waste hose COLD...

Страница 8: ...B1 Fitting Nordic single tap C Connecting water D Connecting waste E Connecting tank Note Bear in mind that the tank inlet combination and socket must remain accessible for servicing For an overview o...

Страница 9: ...e Quooker in the following order A Drilling hole B2 Fitting Fusion tap C Connecting water D Connecting waste E Connecting tank Note Bear in mind that the tank inlet combination and socket must remain...

Страница 10: ...install the Quooker in the following order A Drilling hole B3 Fitting Flex tap C Connecting water D Connecting waste E Connecting tank Note Bear in mind that the tank inlet combination and socket mus...

Страница 11: ...r the Nordic single tap should be 32 mm in diameter The Fusion and Flex tap hole should be 35 mm in diameter The Nordic single tap should ideally be positioned at the corner of the sink to enable use...

Страница 12: ...lied 3 Securing tap screws Tighten the screws in the screw ring Fitting Nordic single tap The total length of the hose between the boiling water tap and tank is only 70 cm The tank must therefore be f...

Страница 13: ...tap thread Adjust the position of the tap to ensure that the Quooker logo is facing the user When the handle is in the cold position it will be parallel to the edge of the work top Tighten the fixing...

Страница 14: ...the work top 3 Tighten the brass plate Put the tap in the required position and fully tighten the brass plate 4 Securing tap screws Tighten the screws in the screw ring Fitting Flex tap When installi...

Страница 15: ...ick release fitting while ensuring that the hose pillar is fully inserted 7 Connect Place the hose screens in the ends of the hot and cold water supply pipes Connect the hot and cold water hoses to th...

Страница 16: ...the inlet combination open the main shut off valve and check for leaks Connecting water The PRO7 operates under mains water pressure and must always be fitted with the supplied inlet combination and...

Страница 17: ...m flowing back out of the funnel in the inlet combination D 1 Drilling hole Using the drill bit supplied drill and tap in one operation a threaded hole in the waste pipe Drill slowly so that the PVC d...

Страница 18: ...Norit carbon from the filter and completely harmless 4 Switching on tank Switch on the tank After the water has heated up the entire content of the Quooker must be flushed out once before use E Connec...

Страница 19: ...ff valve or the stop valve on the inlet combination small grey knob Check that the Quooker is depressurised by opening the Nordic single tap or the boiling water handle of the Fusion or Flex tap again...

Страница 20: ...Quooker Emirates LCC Al Bateen C2 Tower 10th floor 5100939 Abu Dhabi UAE info quooker ae quooker ae AE 30 225 11 V08...

Отзывы: