background image

11

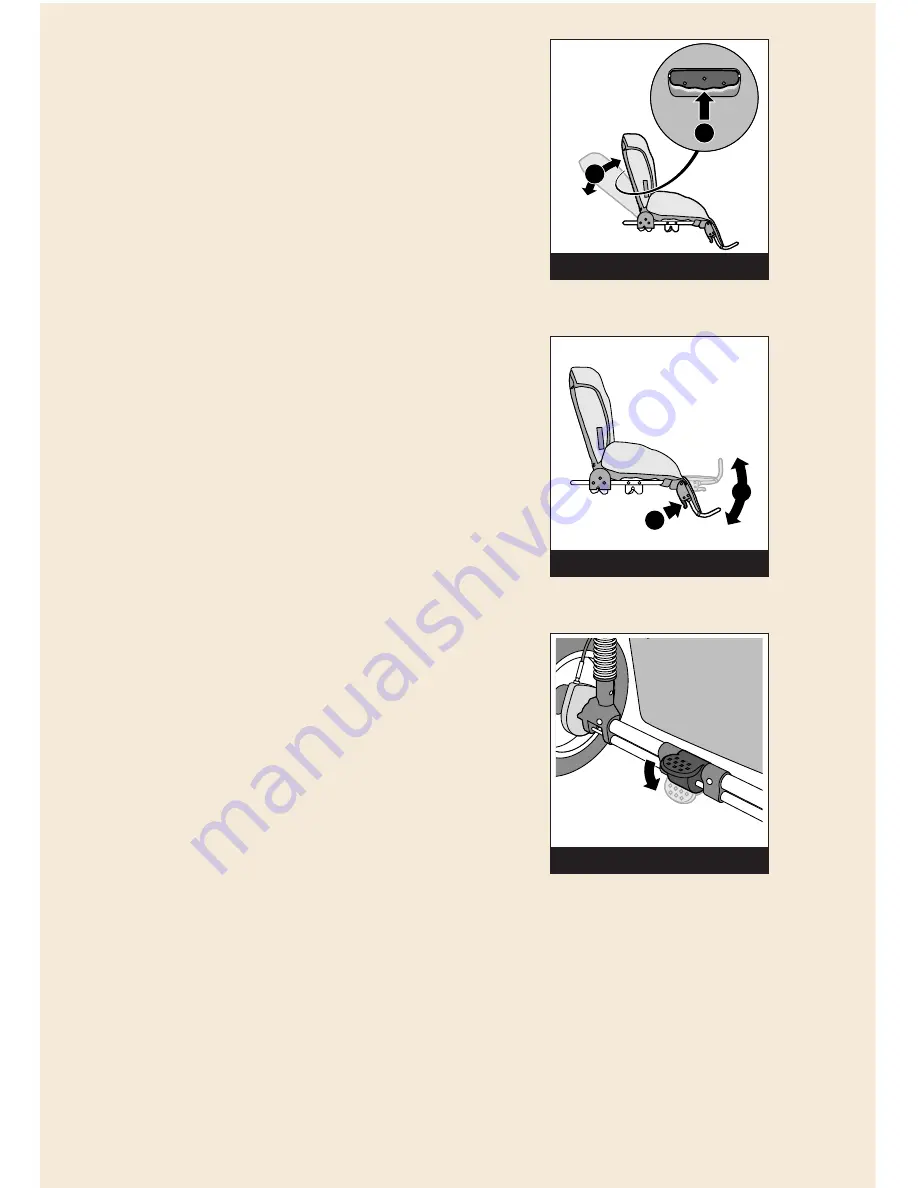
Recline Seat Back:

- The back of the seat has a three-position adjustment.

- To adjust the back, pull the handle in the middle of the back upward (1)

while pushing the seat back up or down (2). 

Picture 18

Pour incliner le dossier:

- Le dossier peut-être réglé à trois positions.

- Pour ajuster le dossier, remontez la poignée au centre du dossier (1) tout

en poussant le dossier vers le haut ou le bas (2). 

Illustration 18

Adjust Footrest:

- The footrest can be adjusted into two positions.

- Press both buttons under the footrest at the same time and move the

footrest to the desired position. 

Picture 19

- IMPORTANT: Never let your child sit or stand on the footrest.

Pour ajuster le repose-pieds:

- Le repose-pieds peut être ajusté à deux positions.

- Press both buttons under the footrest at the same time and move the

footrest to the desired position. 

Illustration 19

- IMPORTANT: Never let your child sit or stand on the footrest.

Use Parking Brake:

- Always use the brake when parking the Freestyle 4, also when at a

standstill.

- Step on the pedal on the rear axle to lock the wheels. 

Picture 20

- Release the parking brake by pulling the pedal upward.

- The handbrake is for slowing down and should not be used as a parking

brake. The handbrake works on both rear wheels. If you squeeze the
handbrake too firmly or quickly, there is a risk that you will stumble over
the Freestyle 4, thus endangering your child.

- Always check whether the wheels are locked.

Pour utiliser le frein de stationnement:

- Toujours utiliser le frein lorsque vous stationnez le «Freestyle 4», ou si

vous vous immobilisez pour un certain temps.

- Du bout du pied, appuyez sur la pédale sur l'essieu arrière pour bloquer

les roues. 

Illustration 20

- Débloquez le frein de stationnement en remontant la pédale du bout 

du pied.

- Le frein à main sert à ralentir et ne devrait pas être employé comme frein

de stationnement. Le frein à main travaille aux deux roues arrière. Si vous
serrez le frein à main trop fermement ou rapidement, il y a un risque que
vous trébuchiez par-dessus le «Freestyle 4», de ce fait mettant en danger
votre enfant.

- Vérifiez toujours si les roues sont verrouillées.

1

2

2

18

2

1

2

19

20

Содержание 01-936

Страница 1: ...bus IN 47201 7494 Dorel Canada 12345 Albert Hudon suite 100 Montreal QC Canada H1G 3K9 01 05 2005 Dorel Juvenile Group Fabriqu en CHINE www djgusa com 800 544 1108 Les styles et les couleurs peuvent v...

Страница 2: ...for use Warranty WARNING Keep for future reference Mode d emploi Garantie MISE EN GARDE Conservez pour r f rence future Model Mod le 01 936 Freestyle 4XL Travel System Syst me de transport Freestyle...

Страница 3: ...he stroller may tip over or the canopy may collapse This product will become unstable if a parcel bag or rack is used when there is no provision for one This product may become unstable if a parcel ba...

Страница 4: ...er ou suspendre de colis de sacs ou des accessoires sur la poign e ou l auvent La poussette pourrait renverser ou l auvent pourrait s effondrer Cette poussette sera instable si vous utilisez un panier...

Страница 5: ...uvre harnais Auvent Roues arri res Roues avant Essieu avant Panier de rangement Dorel Canada Service la client le P O Box 2609 Columbus IN 47202 2609 1 800 544 1108 PARTS LIST LISTE DES PI CES ORDER R...

Страница 6: ...t to Dorel Canada Consumer Relations Department at the address noted and all other freight or insurance costs associated with the return Dorel Canada will bear the cost of shipping the repaired or rep...

Страница 7: ...u en tirant le verrou de s curit gauche de la poign e dans la direction de la fl che Illustration 1 Pull the handle upwards until it clicks into the handle safety lock Check this by pushing down on th...

Страница 8: ...on ouverture jusqu ce que la roue s enclenche en position Illustration 6 Assurez vous que la roue est bien fix e en tirant dessus V rifiez la pression des pneus et gonflez les si n cessaire voir la se...

Страница 9: ...e s enclenche en position Illustrations 8 et 9 Assurez vous que la roue est bien fix e en tirant dessus V rifiez la pression des pneus et gonflez les si n cessaire voir la section sur l entretien pour...

Страница 10: ...auvent d tachez les agrafes et retirez l auvent Install Comfort bar Place the two ends of the comfort bar into the openings on the adapter connections with the comfort bar facing upward Picture 13 IMP...

Страница 11: ...d Ceinture de s curit Appliquez les freins sur le Freestyle 4 Assurez vous que la ceinture de s curit est desserr e avant de placer votre enfant d licatement dans le si ge Bouclez les ceintures abdomi...

Страница 12: ...ion 16 The shoulder belts are height adjustable To adjust the height unzip the zippers on each side of the stroller on the seat back Separate the seat back cover from the seat back frame Open the cove...

Страница 13: ...estyle 4 also when at a standstill Step on the pedal on the rear axle to lock the wheels Picture 20 Release the parking brake by pulling the pedal upward The handbrake is for slowing down and should n...

Страница 14: ...fournis et n exc dez pas l allocation de poids maximum Adjusting the Handle To adjust the height of the handle push the release buttons at the same time 1 and rotate the handle into the desired posit...

Страница 15: ...k of the seat in the recline position see Recline Seat Back Place the footrest in the highest position see Adjust Footrest Tilt up lock above the right handle safety lock Picture 26 Pour plier Pliez l...

Страница 16: ...enclenche dans le verrou de s curit de transport Illustration 28 Enlevez les roues et le si ge pour rendre la poussette encore plus compacte To disassemble the wheels press the button on the hubcap a...

Страница 17: ...Pour des raisons de s curit veuillez toujours utiliser des pi ces d origine Pour vous assurer d utiliser le Freestyle 4 longtemps essuyez le avec un chiffon doux apr s une sortie par temps pluvieux Ne...

Страница 18: ...a The tires are equipped with air valves and can be inflated using the pump supplied or a bicycle pump with adapter Tire Pump Use Remove hose from inside pump handle Reverse hose and thread into end o...

Страница 19: ...situ sur le ch ssis de la poussette Illustration 34 Pousser le bout l int rieur et ins rer le bout rigide dans le support situ sur le c t oppos du ch ssis de la poussette Illustration 35 Assurez vous...

Страница 20: ...autour de la barre confort Illustration 38 Serrer solidement Tirer sur le si ge d auto pour vous assurer qu il est solidement en place Pour enlever le si ge d auto d tacher la ceinture de s curit et...

Отзывы: