background image

5

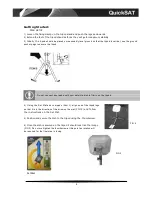
Micro speaker
output socket

Getting Started:

DISH CONNECTIONS

Elevation Meter

F-type

Connector

3.5mm input socket

7)

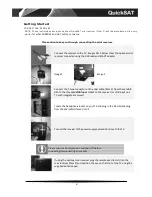
Connect the F-type connector (screw in

connector) on the 10 metre dual cable (Item C) to
either of the matching screw sockets on the rear

of the dish and the 3.5mm jack plug to the input
socket as indicated above.

8)

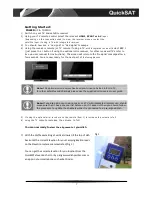
Attach the magnetic base of the elevation

meter (Item D) to the bracket

9)

Insert the micro speaker (Item E) in to the

output socket located on the side of the bracket

Please

ensure the micro speaker has batteries inserted and the switch is set

to ON

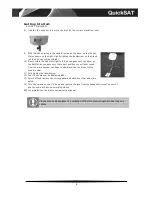
Once you have assembled your

QuickSAT dish it should look like the

image below:

Содержание QS65

Страница 1: ...QS65 USER MANUAL...

Страница 2: ...a pre tuned dual voltage 240 volt AC 12 volt DC satellite receiver The product can easily be transported and stowed away in the supplied carry bag and is quite possibly the lightest most portable pro...

Страница 3: ...e Contents Thanks for purchasing QuickSAT the easy to use touring satellite system With your purchase you will find the following contents Note Items F G H I are only included with the optional mini r...

Страница 4: ...tripod 4 Using the Sat Mat and compass Item J align one of the tripod legs so that it is in the direction of the arrow on the mat FIG 2 and follow the instructions on the Sat Mat 5 Position and secure...

Страница 5: ...crew sockets on the rear of the dish and the 3 5mm jack plug to the input socket as indicated above 8 Attach the magnetic base of the elevation meter Item D to the bracket 9 Insert the micro speaker I...

Страница 6: ...ect the F type connector on the dual cable Item C from the satellite dish to the threaded LNB Input socket on the receiver or LNB input on a TV with integrated receiver Locate the headphone socket on...

Страница 7: ...s been pre tuned to Astra 28 for UK TV for other satellites and channels please use the supplied mini receiver user guide Note If you are using your own receiver or a TV with integrated receiver you s...

Страница 8: ...as you pass over the correct position you will hear sound from the micro speaker continue to slowly position the dish until the sound is clear 11 Fully tighten the thumbscrew 12 Your TV should now be...

Страница 9: ...n already aligned dish and run a channel search 3 Due to encryption used by sky it is better to move the dish in staggered movements at step 10 pausing for a few seconds every degree to allow time for...

Страница 10: ...collection facilities 2 In other Countries outside the EU If you wish to discard this product please contact your local authorities and ask for the correct method of disposal The batteries supplied wi...

Страница 11: ...BURG 33 16 LERWICK 17 4 VIENNA 33 46 If you have an iPhone or Android smartphone you can use one of the apps such as Satfinder to use the phones GPS receiver to pinpoint your location and tell you the...

Страница 12: ...Italy WROCLAW 30 54 UMEA 17 7 AJACCIO 37 67 BARI 41 05 AGESTA 22 21 BASTIA 37 17 BOLOGNA 36 Portugal BIARRITZ 31 66 BRINDISI 41 86 FARO 32 86 Switzerland BORDEAUX 30 95 CAGLIARI 40 46 FUNCHAL 28 85 BA...

Отзывы: