background image

MK-100084 Rev. A

25

Q UI C KI E   7 R

IX.  DEALER  SERVICE  AND  ADJUSTMENT

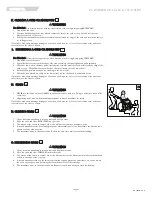
N. BACK ANGLE ADJUSTMENT 

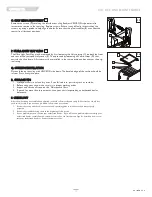
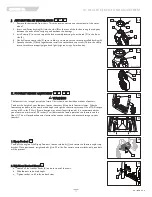
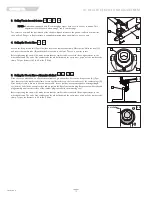
1.   Backrest Adjuster Stop

The preset stop allows the ability to place a firm stop at desired angle. The hole pattern in the backrest adjuster
stop corresponds with the hole pattern in the backrest bracket (4 holes for each piece).  

a.

Determine the desired Stop Position. 

b.

Remove the lower backrest bracket butten head fastener (C) and loosen the top slightly (A). 

c.

Adjust the Backrest Adjuster Stop (B) into the Backrest Frame (A) to desired position.

d.

Insert backrest bracket hardware (C) and retighten to 62 in.-lbs (7 Nm)

e.

Repeat process on opposite side. Ensure both sides are using the same Stop Position.

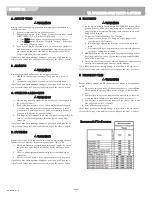
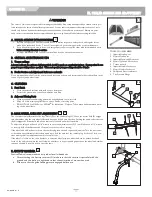
2.   Lanyard tension adjustment 

The pin mechanism in the lanyard allows for 1/2” adjustment so that the lanyard strap can be tightend.  It can
be adjusted to prevent binding, and to optimize the ease of Back release.

a.

Use a 3mm hex key to loosen the set screw (D)

b.

Adjust the Lanyard to the desired tension.

c.

Re-tighten the set screw.

d.

When the lanyard is released and the backrest is in the locked position, make sure that the head of the
backrest pin is exposed and/or flush with the outer surface of the backrest bracket.  Check this condition
for both sides of the chair.

e.

If the backrest pin is not fully engaged (locked) in the backrest bracket, your lanyard is too tight, and you
should not put the chair into normal use..  Repeat steps a-d to achieve the correct lanyard tension so
that the backrest locks correctly

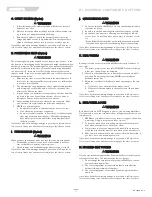
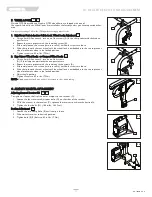
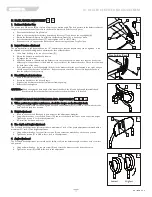
3.   Non-folding back instructions

a.

Remove backrest bracket bolt (E). 

b.

Rotate the backrest to the desired angle.

c.

Align desired backrest bracket hole with seat frame opening. 

d.

Reinsert bolt and tighten.

CAUTION –

When changing the back angle of the wheelchair both the left and right angle adjustable back
bracket must be in the same hole position before the wheelchair is to be used.

O. FREESTYLE BACK MAINTENANCE AND ADJUSTMENT 

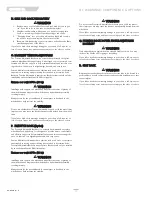
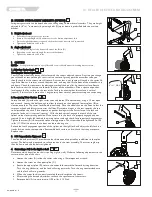
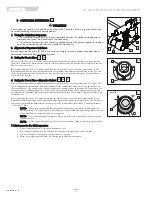
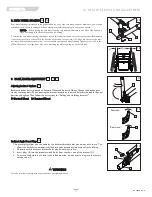
1.   When performing regular maintenance, check the torque on the Freestyle back.

a.

Using a torque wrench check and tighten if needed the hardware (E) (F) to 200 in-lbs to make sure the
back shell is locked into position.

2.   Height adjustment

a.

Remove the cover and Back pad to gain access to the adjustment hardware

b.

Using a 4mm hex key, loosen the 4 screws (G) and move the back shell up or down to desired height.
Tighten the screws to lock in the adjustment.

c.

Re-install the back pad and cover.

3.   Fine depth and height adjustment

The Freestyle back adjustment system provides a maximum of  inch of fine depth adjustment combined with a
maximum of  1 inch of fine height adjustment. 

a.

Using an 8mm hex key, loosen all two screws (F) and rotate the backshell to the desired position.

b.

Tighten the screws (F) to 200 in-lbs to lock in the adjustment.

4.   Angle adjustment 

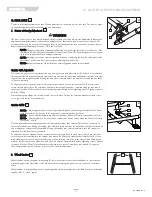
The Freestyle back adjustment system allows the ability to adjust the backrest angle to achieve user’s comfort
and position. 

a.

Using an 8mm hex key,  loosen the screw (E) and rotate the backrest to the desired position.

b.

Tighten the screw (E) to 200 in-lbs lock in the adjustment.

55

54

57

56

58

54

55

Non-Folding Back

A

C

B

E

56

57

F

E

58

Lowest

Highest

H

G

G

D

Содержание 7RS

Страница 1: ...espagnol et en fran ais sont votre disposition en format PDF sur le site www SunriseMedical com Veuillez vous rendre la page de votre produit pour t l charger le manuel dans la langue souhait e ou con...

Страница 2: ...________________________________________________ Address _______________________________________________ _______________________________________________________ Telephone _____________________________...

Страница 3: ...Rear Wheels 13 L Rear Wheel Locks 13 M Modified Seat Systems 13 N Seat and Back Upholstery 14 O Backrest Tension Adjustable 14 P Freestyle Back Option 14 Q Folding Lock Down Adjustable Backrest 14 R...

Страница 4: ...Cover Angle Adjustable Platform Ultra lite platform footrest Carbon Fiber Platform Casters Std 5 Low profile Polyurethane Opt 4 Low profile Poly 4 Micro Light Up 4 x1 Aluminum Poly 4 x1 5 Aluminum sof...

Страница 5: ...rider and or attendant are put at risk E KNOW YOUR CHAIR WARNING Every wheelchair is different Take the time to learn the feel of this chair before you begin riding Start slowly with easy smooth stro...

Страница 6: ...ing and transfers until you know the limit of your ability Have someone help you until you know what can cause a fall or tip over and how to avoid doing so 3 Be aware that you must develop your own me...

Страница 7: ...rk with the rider s doctor nurse or therapist to learn safe methods best suited to your abilities and those of the rider 2 Tell the rider what you plan to do and explain what you expect the rider to d...

Страница 8: ...r If you fail to heed this warning you are at a high risk of damage to your chair a fall tip over or loss of control that may occur and cause severe injury to the rider or others A CENTER OF BALANCE W...

Страница 9: ...of a slope or ramp A drop off as small as 3 4 inch can stop a front caster and cause the chair to tip forward 8 To Reduce The Risk Of A Fall Or Tip Over a Lean or press your body UPHILL This will hel...

Страница 10: ...This will reduce the risk that the chair will tip or move away from you If you fail to heed these warnings damage to your chair a fall tip over or loss of control may occur and can possibly cause seve...

Страница 11: ...all tip over or loss of control may occur and cause severe injury to the rider or others M STAIRS WARNING 1 NEVER use this chair on stairs UNLESS you have someone to help you Doing so is likely to cau...

Страница 12: ...If set higher than 2 inches they may not prevent a tip over b If set lower than 1 1 2 inches they may hang up on obstacles and cause a fall or tip over 3 If you have to climb or descend a curb or over...

Страница 13: ...rol may occur and cause severe injury to the rider or others J QUICK RELEASE AXLES WARNING 1 Do not use this chair UNLESS you are sure that both quick release rear axles are locked 2 An axle is not lo...

Страница 14: ...d to provide simple com fortable and effective support to help maximize function and increase seat ing tolerance In addition it is lightweight durable and easy to use Sunrise Medical recommends that a...

Страница 15: ...Camber Plugs Inspect the camber tubes and plugs every 6 months ensuring that all fasten ers are tight and that no parts have moved from their preset positions C CLEANING 1 Paint Finish a Clean the pai...

Страница 16: ...adjusted after making sure the tires have the correct air pressure When fully engaged the arm D should be imbedded into the tire at least 1 8 to be effective If you find the wheel locks have slipped...

Страница 17: ...he adjustment bolt A position b Slide the armrest into the receiver tube B on rear of frame until the adjustment bolt is securely seated locked in the receiver tube slot 2 Swinging Away a Lift armrest...

Страница 18: ...the backrest to be sure it is locked before use N TENSION ADJUSTABLE UPHOLSTERY Installing standard Tension Adjustable Backrest Upholstery 1 Slide Velcro straps F over the backrest frame G section Mak...

Страница 19: ...nt Press firmly into place R STORAGE TIPS 1 Store your chair in a clean dry area If you fail to do so parts may rust or corrode 2 Before using your chair make sure it is in proper working order 3 Insp...

Страница 20: ...Wipe off or blow away any fluff dust or dirt on axles or moving parts c DO NOT USE 3 in ONE oil or WD 40 for lubrication Only use Teflon based Lubricant when work ing on this wheelchair D REAR WHEEL A...

Страница 21: ...sing a 4mm Allen wrench turn one of the screws A in the clamp counterclockwise one quarter turn b Repeat the same process with the remaining three screws A c Alternately loosen the screws two turns ea...

Страница 22: ...splines B to clear one another The caster fork should pivot freely Place the wheelchair on the floor so that the two rear wheels and left caster contact the floor Place some weight in the seat toward...

Страница 23: ...ld not be ridden without a footrest To adjust the height of your footrest loosen the screw H on both footrest clamps Slide the footrest up or down to the new desired height and tighten the two set scr...

Страница 24: ...tion d If the desired back depth is 1 greater move the plunger bushing back one hole If the desired back depth adjustment is 2 the plunger bushing must be moved to the most rearward hole Insert the pi...

Страница 25: ...t the backrest locks correctly 3 Non folding back instructions a Remove backrest bracket bolt E b Rotate the backrest to the desired angle c Align desired backrest bracket hole with seat frame opening...

Страница 26: ...surface Loosen the cap screws C 3 per side unless equipped with anti tips then 4 per side that secure the camber tube clamp Locate the flat surfaces on the front and rear of the camber plugs Place an...

Страница 27: ...ke sure both sides are adjusted symmetrically before tightening screws Tighten screws to 62 in lbs 7 Nm Once the axle plate clamps are secured attach the rear wheels Occupy the chair and maneuver it w...

Страница 28: ...f the camber tube should be flush with the outer most portion of the camber tube clamp Torque fasteners A to 62 in lbs 7 Nm 5 Setting the Toe to Zero Alternative Method Place the entire wheelchair on...

Страница 29: ...BACK ANGLE ADJUSTMENT Adjusting Backrest Options Backrest bracket has two positions Forward Mount and Rearwad Mount Change the bracket posi tion by removing bolt D and pivoting the bracket forward or...

Страница 30: ...ck out sections and operating guide to make sure chair was properly prepared 2 Review the troubleshooting chart at the beginning of this section 3 If your problem persists contact your authorized deal...

Страница 31: ...ery pads and push handle grips b Damage from neglect accident misuse or from improp er installation or repair c Products modified without Sunrise Medicals express written consent d Damage from exceedi...

Страница 32: ...es de usar esta silla de ruedas lea este manual en su totalidad y gu rdelo para futura referencia Cada una de las sillas se env a con un manual de instrucciones en ingl s El manual en espa ol o franc...

Страница 33: ...ibuidor __________________________________________________ Direcci n ____________________________________________________ ____________________________________________________________ Tel fono ________...

Страница 34: ...3 M Sistemas de asiento modificados 14 N Tapicer a del asiento y del respaldo 14 O Respaldo de tensi n ajustable 14 P Respaldo Freestyle Opci n 14 Q Respaldo abatible ajustable y con bloqueo 14 R Resp...

Страница 35: ...ndar poliuretano de perfil bajo de 12 7 cm 5 Opcional poliuretano de bajo perfil de 10 1 cm 4 Micro luz de 10 1 cm 4 Poliuretano de aluminio aluminio de rodado suave de 10 1 cm x 3 1 cm 4 x 1 25 semi...

Страница 36: ...ero o el ayudante cor ren riesgos E CONOZCA SU SILLA ADVERTENCIA Cada silla de ruedas es diferente T mese su tiempo para conocer las car acter sticas de esta silla antes de empezar a usarla Empiece le...

Страница 37: ...t seguro de que puede hacerla sin riesgos 5 Conozca las reas donde planea usar su silla Tenga cuidado con los peligros y aprenda a evitarlos 6 Use los tubos contra volcaduras a menos que sea un pasaje...

Страница 38: ...Si hace caso omiso de estas advertencias pueden ocurrir da os a su silla una ca da volcadura o p rdida del control y provocar lesiones severas al pasajero o a otras personas M CUANDO NECESITE AYUDA A...

Страница 39: ...rueda trasera o un reposabrazos con una mano Esto ayudar a evitar una ca da si la silla se vuelca Si hace caso omiso de estas advertencias pueden ocurrir da os a su silla una ca da volcadura o p rdid...

Страница 40: ...vocar que su silla vire sin control 7 SIEMPRE tenga en cuenta a Las superficies mojadas o resbalosas b Un cambio en el grado de inclinaci n o un bordillo bache o depresi n Podr a provocar una ca da o...

Страница 41: ...ueva los reposapi s 3 Aseg rese de que est colo cado el seguro de la rueda Posici n ptima de cambio GET READY TRANSFER ADJUST 8 1 2 3 Realice los ajustes Prep rese C mbiese J ACERAS Y ESCALONES NICOS...

Страница 42: ...pacidades N PARA SUBIR ESCALERAS ADVERTENCIA 1 Utilice al menos a dos ayudantes para subir la silla de ruedas y al pasajero por las escaleras 2 Suba la silla de ruedas y al pasajero HACIA ATR S por la...

Страница 43: ...evitar que su silla se vuelque hacia atr s en condiciones normales 1 Sunrise recomienda el uso de tubos contra volcaduras 2 Cuando est n asegurados en la posici n de abajo los tubos contra volcaduras...

Страница 44: ...dante aseg rese de que esta silla tenga asideros de empuje 1 Los asideros de empuje ofrecen puntos seguros para que un ayu dante sostenga la parte posterior de la silla para evitar una ca da o volcadu...

Страница 45: ...uso de un sistema de asiento no aprobado por Sunrise puede afectar el mecanismo de doblado de esta silla 3 Para el tr nsito se proh be usar un sistema de asiento no propor cionado por Sunrise Si hace...

Страница 46: ...r n agarre si no mantiene la presi n del aire mostrada en la pared lateral de la rueda 2 Ejes y mangas de los ejes Al controlar los ejes y sus mangas cada seis meses aseg rese de que est n limpios y f...

Страница 47: ...e la rueda sacando completamente el eje B del obturador de inclinaci n lateral C c Repita estos pasos en el otro lado NOTA El eje no estar asegurado hasta que el bot n de liberaci n r pida sobresalga...

Страница 48: ...rueda contra volcaduras G de tal manera que ambos pasadores de lib eraci n se muevan hacia adentro Eleve o baje hacia uno de los tres orificios perforados previamente H Suelte el bot n Ajuste la segun...

Страница 49: ...MENOS que est seguro de que los ajustes est n bloqueados en este par metro de tensi n M DESEMPE O DEL NGULO DEL RESPALDO Ajuste el ngulo del respaldo a Suelte el respaldo jalando del cord n de tensi...

Страница 50: ...s Velcro de la eslinga del asiento para asegurarla en su sitio L ADVERTENCIA Cualquier modificaci n de las tiras afectar el centro de gravedad Se recomienda que el pasajero de la silla indique al ayud...

Страница 51: ...es de usar la S REVISI N Una vez que la silla est ensamblada y ajustada debe funcionar uniforme y f cilmente Todos los accesorios tam bi n deben funcionar uniformemente Si tiene alg n problema siga es...

Страница 52: ...con un trapo h medo no mojado b Limpie o sacuda la pelusa polvo o suciedad en los ejes o las partes m viles c NO USE aceite 3 en 1 ni WD 40 para lubricar Use solo lubricantes con tefl n cuando trabaje...

Страница 53: ...s tornillos A de la abrazadera en sentido antihorario un cuarto de vuelta b Repita el mismo proceso con los tres tornillos restantes A c Afloje los tornillos de manera alterna dos vueltas cada uno has...

Страница 54: ...re s La horquilla de la rueda pivotante debe moverse libremente Coloque la silla de ruedas sobre el piso para que las dos ruedas traseras y la rueda pivotante izquierda hagan contacto con el suelo Col...

Страница 55: ...silla sin un reposapi s Para ajustar la altura del reposapi s afloje el tornillo H en ambas abrazaderas del reposapi s Deslice el repos api s hacia arriba o abajo hasta la altura deseada y apriete nu...

Страница 56: ...respaldo Guarde las piezas del respaldo para su reinstalaci n d Si desea que el respaldo tenga una profundidad de 2 5 cm 1 pulg m s mueva el casquillo un orificio hacia atr s Si el ajuste de profundi...

Страница 57: ...rrectamente 3 Instrucciones para respaldo no plegable a Remueva el tornillo E del soporte del respaldo b Gire el respaldo al ngulo deseado c Alinee el agujero del soporte del respaldo con la apertura...

Страница 58: ...n C 3 a cada lado a menos que se encuentre equipada con tubos contra volcaduras en tal caso ser n 4 tornil los a cada lado que aseguran la abrazadera del tubo de inclinaci n lateral Ubique las superf...

Страница 59: ...traseras Si ntese en la silla y realice maniobras mientras otra persona sirve de observador para que se compruebe si el nuevo ajuste es adecuado para usted Quickie Q7RS NOTA Si ajusta el centro de gra...

Страница 60: ...del tubo de inclinaci n lateral debe quedar al ras de la parte m s externa de la abrazadera del tubo de inclinaci n Apriete los sujetadores A con una ten si n de 62 pulg lb 7 Nm 5 Ajuste de la converg...

Страница 61: ...AJUSTE DEL NGULO DEL RESPALDO Opciones de ajuste del respaldo La abrazadera del respaldo puede estar en dos posiciones diferentes montada hacia delante y montada hacia atr s Cambie la posici n de la a...

Страница 62: ...idor autorizado de Sunrise m s cercano Con excepci n de las garan t as expresas aqu establecidas se excluyen todas las dem s garant as incluyendo las garant as impl citas de comercializaci n y las gar...

Страница 63: ...manuel doit tre remis l utilisateur utilisatrice de ce fauteuil roulant Utilisateur Utilisatrice Avant d utiliser ce fauteuil roulant lisez enti re ment ce manuel et conservez le pour le consulter ult...

Страница 64: ...les renseignements suivants Fournisseur __________________________________________________ Adresse _____________________________________________________ ______________________________________________...

Страница 65: ...ion 13 J Essieux d blocage rapide 13 K Roues arri re 13 L Freins de roues arri res 13 M Syst mes de si ge modifi 14 N Garnissage du si ge et du dossier 14 O Dossier tension r glable 14 P Dossier Frees...

Страница 66: ...cm 5 po surbaiss es en polyur thane En option 10 1 cm 4 po surbaiss es en polyur thane 10 1 cm 4 po commuta teur micro pression 10 1 cm x 2 54 cm 4 po x 1 po aluminium et polyur thane 10 1 cm x 3 81...

Страница 67: ...fauteuil avant de l utiliser Commencez lentement par mouvements doux et r guliers Si vous tes habitu un fauteuil diff rent vous risquez d exercer trop de force et de basculer Si vous exercez trop de...

Страница 68: ...des transferts jusqu ce que vous connaissiez vos limites Faites vous aider jusqu ce que vous sachiez ce qui peut causer une chute ou un bascule ment et comment les viter 3 Vous devez savoir qu il vous...

Страница 69: ...tes quelques centim tres du sol Cela peut l endom mager ou blesser l utilisateur 7 Pour viter de tr bucher ou d accrocher des objets d bloquez et tournez les tubes anti basculement vers le haut pour l...

Страница 70: ...s ces avertissements votre fauteuil peut tre endom mag et une chute un basculement ou une perte de contr le peut se pro duire et causer des blessures graves l utilisateur ou d autres personnes G ESCAL...

Страница 71: ...us par la pente ou la descente b Continuez d appuyer sur les mains courantes pour contr ler la vitesse en descente Si vous roulez trop vite vous pouvez perdre le contr le du fauteuil 9 Rampes la maiso...

Страница 72: ...etirez ou d placez les repose pieds 3 Assurez vous que le frein est bien configur Position de transfert optimale GET READY TRANSFER ADJUST 8 1 2 3 J BORDURES DE TROTTOIRS ET MARCHES INDIVIDUELLES AVER...

Страница 73: ...IERS AVERTISSEMENT 1 N utilisez JAMAIS ce fauteuil dans un escalier SANS personne pour vous aider Vous risqueriez fort de tomber ou de basculer 2 N gocier les escaliers avec un fauteuil roulant n cess...

Страница 74: ...chute ou un basculement 3 Si vous devez monter ou descendre un trottoir ou surmonter un obstacle il faudra peut tre qu un accompagnateur v rifie que les tubes anti basculement sont tourn s vers le ha...

Страница 75: ...eut se produire et causer des blessures graves l utilisateur ainsi qu d autres personnes I POIGN ES DE MAN UVRE EnOption AVERTISSEMENT Si vous avez quelqu un pour vous aider assurez vous que ce fauteu...

Страница 76: ...ge non approuv par Sunrise peut affecter le m can isme de pliage de ce fauteuil 3 Utilisation d un syst me de si ges n est pas fourni par Sunrise Medical est interdit pour lutilisation du transport Si...

Страница 77: ...eum ticas al menos UNA VEZ POR SEMANA Los seguros de las ruedas no tendr n agarre si no mantiene la presi n del aire mostrada en la pared lateral de la rueda 2 Ejes y mangas de los ejes Al controlar l...

Страница 78: ...ompl tement sur le bouton de d tachement rapide A b Retirez la roue en sortant l essieu B compl tement de la douille de cambrure C c R p tez cette proc dure du c t oppos REMARQUE L essieu n est bloqu...

Страница 79: ...sur le bouton de d tachement de la roulette de tube anti basculement G de sorte que les deux goupilles soient ramen es l int rieur Relevez ou abaissez la roulette et choisissez l un des trois trous pr...

Страница 80: ...l s ce couple M ANGLE DU DOSSIER PERFORMANCE Pour r gler l angle du dossier a D bloquez le dossier en tirant d un coup sec sur le cordon de d blocage tension r glable A b Tout en maintenant la tension...

Страница 81: ...sitions de fixation P SANGLE DE SI GE ULTRA L G RE La sangle de si ge ultra l g re peut tre retir e en desserrant d abord la sangle Velcro C l avant et l arri re du garnissage du si ge E Ensuite desse...

Страница 82: ...nt humide non mouill b Essuyez les pi ces mobiles ou soufflez dessus pour liminer toutes les peluches poussi res ou salet s c N UTILISEZ PAS une huile 3 en 1 ni du WD 40 pour la lubrification Utilisez...

Страница 83: ...mm tournez l une des vis A du collier d un quart de tour dans le sens contraire des aiguilles d une mon tre b R p tez le m me processus avec les trois autres vis A c Desserrez les vis l une apr s l au...

Страница 84: ...m Desserrez le boulon suffisamment pour d gager les cannelures sup rieure et inf rieure B La fourche des roulettes doit pivoter librement Posez le fauteuil sur le sol de sorte que les deux roues arri...

Страница 85: ...la hauteur votre repose pieds desserrez la vis H des deux colliers Faites coulisser le repose pied vers le haut ou vers le bas jusqu la hauteur d sir e et serrez les deux vis d arr t Resserrez les bou...

Страница 86: ...sier est plus de 2 5 cm 1 po d placez la bague du piston vers l arri re d un orifice Si la profondeur souhait e est de 5 cm 2 po la bague du piston doit tre d plac e jusqu l orifice situ l arri re Ins...

Страница 87: ...ulon du support de dossier E b Tournez le dossier l angle d sir c aligner le trou du support du dossier comme souhait avec l ouverture de cadre de si ge d r ins rer boulon et serrer ATTENTION Lorsque...

Страница 88: ...3 sur chaque c t sauf si le fauteuil est quip de tubes anti basculement il y en a 4 qui tiennent en place le collier du tube de cambrure Rep rez les aplats l avant et l arri re des douilles de cambrur...

Страница 89: ...rri re Asseyez vous dans le fauteuil et man uvrez le en pr sence d un observateur afin de vous habituer au nouvel ajustement Quickie Q7RS REMARQUE La modification du centre de gravit du fauteuil roula...

Страница 90: ...fauteuil L extr mit du tube de cambrure doit affleurer la partie situ e le plus l ext rieur du collier de serrage dudit tube Serrez les pi ces de fixation A 7 Nm 62 po lb 5 R glage du pincement sur z...

Страница 91: ...DOSSIER Options d ajustement des accoudoirs Le support des accoudoirs a deux positions une vers l avant l autre vers l arri re Changez la position du support en retirant le boulon D et en faisant piv...

Страница 92: ...Relisez les sections portant sur le montage et les v rifications dans le guide d utilisation pour vous assurer que le fauteuil roulant a t correctement pr par 2 Examinez le tableau de d pannage qui f...

Страница 93: ...ation ou au remplacement du produit Les dom mages caus s par le non respect d une garantie ne peuvent en aucun cas inclure des dommages indirects ou exc der la valeur des biens non con formes vendus C...

Страница 94: ...2015 Sunrise Medical US LLC 10 15 MK 100084 Rev A Customer Service 800 333 4000 www SunriseMedical com Sunrise Medical 2842 Business Park Ave Fresno CA 93727 USA In Canada 800 263 3390...

Отзывы: