Quick Attach QUICK POWER SCAPE Mini Скачать руководство пользователя страница 15


15 


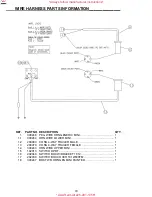
SET UP ASSEMBLY OF THE GENERIC CONTROL HANDLE HARNESS 


Mounting  the  generic  control  handle  wire  harness 
will  vary  from  loader  to  loader.    Use  these 
instructions  as  a  general  guide.    You  may  need  to 
drill  holes  to  mount  pieces  of  this  harness.  
Mounting hardware is not included. 
 
1.  Mount the wire harness receptacle to the loader 

arm near the hydraulic quick couplers.  

 
2.  Route the wiring harness back along the loader 

arms and fasten with cable ties. 
 

3.  Open  the  rear  door  to  access  the  battery 

compartment.    Pull  the  excess  wiring  harness 
into the engine compartment. 

 
4.  Connect  the  red  fused  wire  to  the  positive  (+) 

battery terminal or to a suitable accessory wire 
with a minimum rating of 5 amps.   

 
5.  Connect  the  black  wire  to  the  negative  (-) 

battery terminal or to a frame ground. 


6.  Connect  the  control  handle  wiring  harness 

connector 

to 

the 

main 

wiring 

harness 

connector. 

 
7.  Mount  the  control  handle  in  a  convenient 

location near the operator’s station. 


IMPORTANT:

Secure  the  wiring  harness  in 

place  with  plastic  cable  ties,  making  sure  it  is 
clear of extra hot areas or any moving parts on 
the  engine  or  loader.Pinched,  stretched,  or 
melted  wire  harnesses  are  not  covered  under 
warranty.


8.  Close the rear door. 
 

IMPORTANT:

Be  sure  the  wiring  harness  is 

properly  positioned  to  prevent  pinching  when 
closing the door.


*Always follow manufacturer instructions*

*AAA Rent-All 225-291-1356*

Содержание QUICK POWER SCAPE Mini

Страница 1: ...ai in nt te en na an nc ce eM Ma an nu ua al l Mini QUICK POWER SCAPE Soil Conditioner For Mini Skid Steer Loaders And Mini Track Loaders Read this Manual Before Use Always follow manufacturer instru...

Страница 2: ...the spaces below Always use these numbers when referring to your MINI SOIL CONDITIONER MINI SOIL CONDITIONER Serial Number YOUR ATTACHMENTS DEALER ADDRESS PHONE CONTACT SAFETY 3 4 SERIAL NUMBER DECAL...

Страница 3: ...e machine daily and for having parts repaired or replaced when continued use of the machine would cause damage excessive wear to other parts or make the machine unsafe for continued operation If an op...

Страница 4: ...be sure all operating controls are in neutral before starting the engine Operation continued Keep people away from loader attachment and discharge when in use This attachment sends objects flying and...

Страница 5: ...erial number of the attachment when making repairs or ordering parts Early or later models identification made by serial number may use different parts or it may be necessary to use different procedur...

Страница 6: ...Call Quick Attach Attachments LLC 320 759 1551 for replacement decals Part Number 203234 Location On right top of main frame Quantity 1 B A Part Number 320025 Location On top of main frame Quantity 2...

Страница 7: ...ged in the attachment mounting bracket 4 Stop the engine and engage the park brake 5 Walk to the front of the loader and secure the coupler locking mechanism that locks the attachment to the loader In...

Страница 8: ...attachment wire harness to the loader wire harness receptacle 3 Make sure the hoses are properly routed to fit your specific loader If the hoses are not routed correctly hoses may get pinched or rub o...

Страница 9: ...he attachment IMPORTANT Do not operate in soils with rocks larger than 6 as this can damage the rotor and teeth 3 With the operator at the operator s station the seat belt fastened and the seat bar lo...

Страница 10: ...le adjustment or the optional hydraulic cylinder by utilizing the electric controls Manual angling is accomplished by removing the hitch pinand pushing one side of the rotor frame either forward or ba...

Страница 11: ...should only be done in an area that is rock free If the rotor stops turning due to hydraulic relief the overload could be caused by a rock or root caught between the rotor and frame In order to remov...

Страница 12: ...ntial service or safety problem Preventive maintenance is the easiest and least expensive type of maintenance IMPORTANT Bolts and set screws can loosen after initial usage After first hour of operatio...

Страница 13: ...Grease both lower float arm pivot bushings after every 8 hours of operation Grease the rotor bearing after every 8 hours of operation Grease the wheel bearings after every 4 hours of operation 8 8 4...

Страница 14: ...for backward movement depending on the desired mode of work To switch them from front to back you will need to swap them end for end i e the right front wing will mount on the left rear The side wings...

Страница 15: ...used wire to the positive battery terminal or to a suitable accessory wire with a minimum rating of 5 amps 5 Connect the black wire to the negative battery terminal or to a frame ground 6 Connect the...

Страница 16: ...16 MINI SOIL CONDITIONER PARTS INFORMATION__________ Always follow manufacturer instructions AAA Rent All 225 291 1356...

Страница 17: ...FLOAT ARM TOP W A 25 1 400208 FLOAT ARM W A 26 4 13215 BOLT HEX 1 2 X 3 UNC GR 5 27 17 37214 NUT HEX 1 2 UNC GR 5 REV LOCK 28 2 13061 BOLT HEX 5 16 X 2 UNC GR 5 29 2 37211 NUT HEX 5 16 UNC GR 5 REV L...

Страница 18: ...18 MINI SOIL CONDITIONER PARTS INFORMATION__________ Manual Option Hydraulic Option Always follow manufacturer instructions AAA Rent All 225 291 1356...

Страница 19: ...HOSE 1 2X112 10MB 8FJX 6 1 2 300215 ADPT ELB 12MB 10MJ 90 6 2 2 320086 ADPT ELB 6MB 6MJ 90 6 3 2 400286 HOSE 3 8 X 24 8MB 6FJX 13 1 319104 VALVE ASSEMBLY 15 2 32467 BOLT FLG THRD RLNG 3 8 X 3 4 UNC G...

Страница 20: ...E 1 1 3 200079 CONN 4 WAY TRAILER FEMALE 1 1 4 300243 HRN WIRE UPPER MINI 1 1 5 102913 SWITCH DPDT 1 1 6 202040 SWITCH BOX W BRACKET 1812 1 1 7 202039 SWITCH BOX COVER 1812 600FM 1 1 8 300247 BRKT WR...

Страница 21: ...ully Angled 48 43 5 Overall Height 19 Overall Length 50 Angling 25 right and left Hydraulic Angling Optional Teeth 54 Carbide tipped Recommended Hydraulic Flow 9 15 GPM Operating Weight 470 pounds All...

Страница 22: ...____________________________________________ ____________________________________________________ ____________________________________________________ _________________________________________________...

Страница 23: ...damages or injuries including but not limited to the loss of profit rental or substitute equipment or other commercial loss Purchaser s sole and exclusive remedy being as provided here in above Quick...

Страница 24: ...24 P N 300440 Date Printed 2 4 2020 Quick Attach Attachments LLC Printed in U S A Always follow manufacturer instructions AAA Rent All 225 291 1356...

Отзывы: