Quest Engineering VI-410 Скачать руководство пользователя страница 4

4.  To save, press 

Save As

 key and name the new setting. 


5.  To send to the instrument, ensure the VI-410 is connected via a USB cable to your pc.  Press the 

“Send to Instrument” key. 


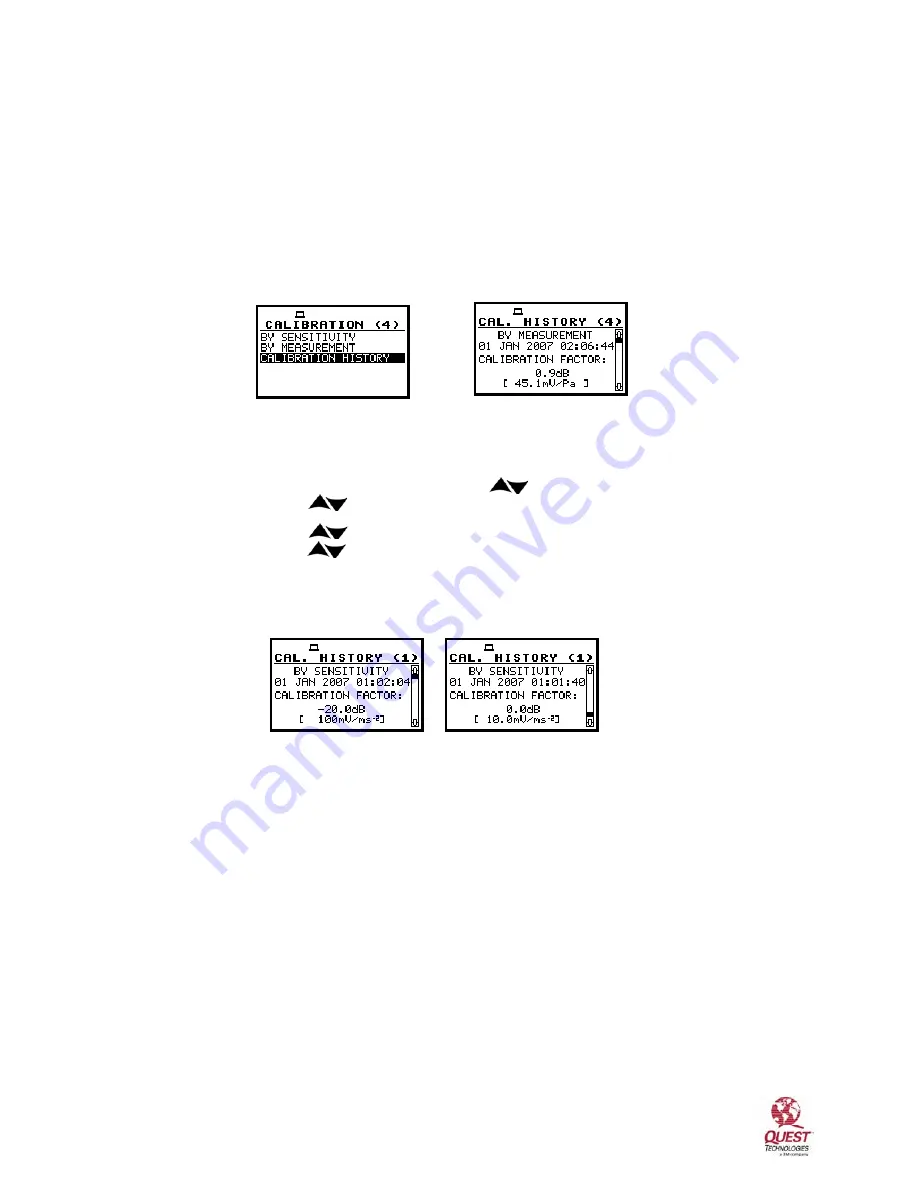
Viewing last calibration  


Calibration History 

In 

calibration history screen, you 

can view up to 10 last calibration records.  


To access the calibration history screen, follow below: 

  Menu path: Function>Calibration> >Channel x >Calibration history 


Technical Tip 

Page  4   04/2009 


            Figure 1-7:  Calibration history screens 


1. Select 

the 

Calibration history 

screen.   


To access the main menu, press 

Altf 

key while pressing 

Menu/Enter 

key. 


Select  

Function

 menu by pressing            and press 

Menu/Enter 

key.  


Press            and select 

Calibration

.  Press 

Menu/Enter

 key. 


Press            to select the appropriate channel and press 

Menu/Enter 

key. 


Press            to select 

By Calibration History

 and press 

Menu/Enter 

key. 


2.  The opened Calibration history screen contains a list of last calibration records. Each calibration is 

described by the method of how it was performed either by sensitivity or by measurement.  It includes 
the date and time of the performed calibration measurement, the obtained calibration factor, and the 
calibration result. 


                                 Figure 1-8:  Calibration history with previous 2 cal. records 


NOTE:  if calibration measurements were not performed the calibration history screen will state “calibration  

              history is empty”


Содержание VI-410

Страница 1: ... the z axis or with a supplied flat mounting plate and supplied bees wax for the x axis and y axis Once connected the shaker is turned on and the adjusted level is selected and stored on the instrument Connecting the shaker and accelerometer 1 For the Z axis please follow these steps Twist the threaded stud into the top of the shaker It will fit tightly Attach the accelerometer to the calibrator T...

Страница 2: ...librator To adjust the cal level press the right arrow To move up by ten increments simultaneously press right arrow and Altf key Technical Tip Page 2 04 2009 Cal Level 4 Indicates you are calibrating for Channel 4 Adjust the Cal Level to 9 89m s 2 Figure 1 4 Example of calibration screen for vibration study 8 Turn on the calibrator 9 Start the VI 410 by pressing Start Stop key The meter will flas...

Страница 3: ...l and enter in certificate cal factor 2 Press to select the appropriate Channel and press Menu Enter key 3 Press to select By Sensitivity and press Menu Enter key 4 In the Calibration sensitivity screen you can manually input a calibration reading Press the left or right arrows to increase or decrease the current measurement setting Press the Menu Enter key to save your new setting A Figure 1 5 Ca...

Страница 4: ...pressing Menu Enter key Select Function menu by pressing and press Menu Enter key Press and select Calibration Press Menu Enter key Press to select the appropriate channel and press Menu Enter key Press to select By Calibration History and press Menu Enter key 2 The opened Calibration history screen contains a list of last calibration records Each calibration is described by the method of how it w...

Отзывы: