background image

Installing the Storage Capacity License

Quantum DXi4700 Capacity Upgrade Guide

46

Installing the Storage Capacity License

Before the newly installed hardware capacity can be used to store data, you must add a license key to 
enable the new usable capacity of the system. The 6TB, 8TB, and 18TB licenses each need to be installed 
separately.

Locate the Storage Capacity License Certificate that was included with the upgrade components, and then 
complete the following procedure:

 1.  Open two Web browser windows on a computer with Internet access.

Note: 

During this procedure, you can copy and paste required numbers between these two 

windows.

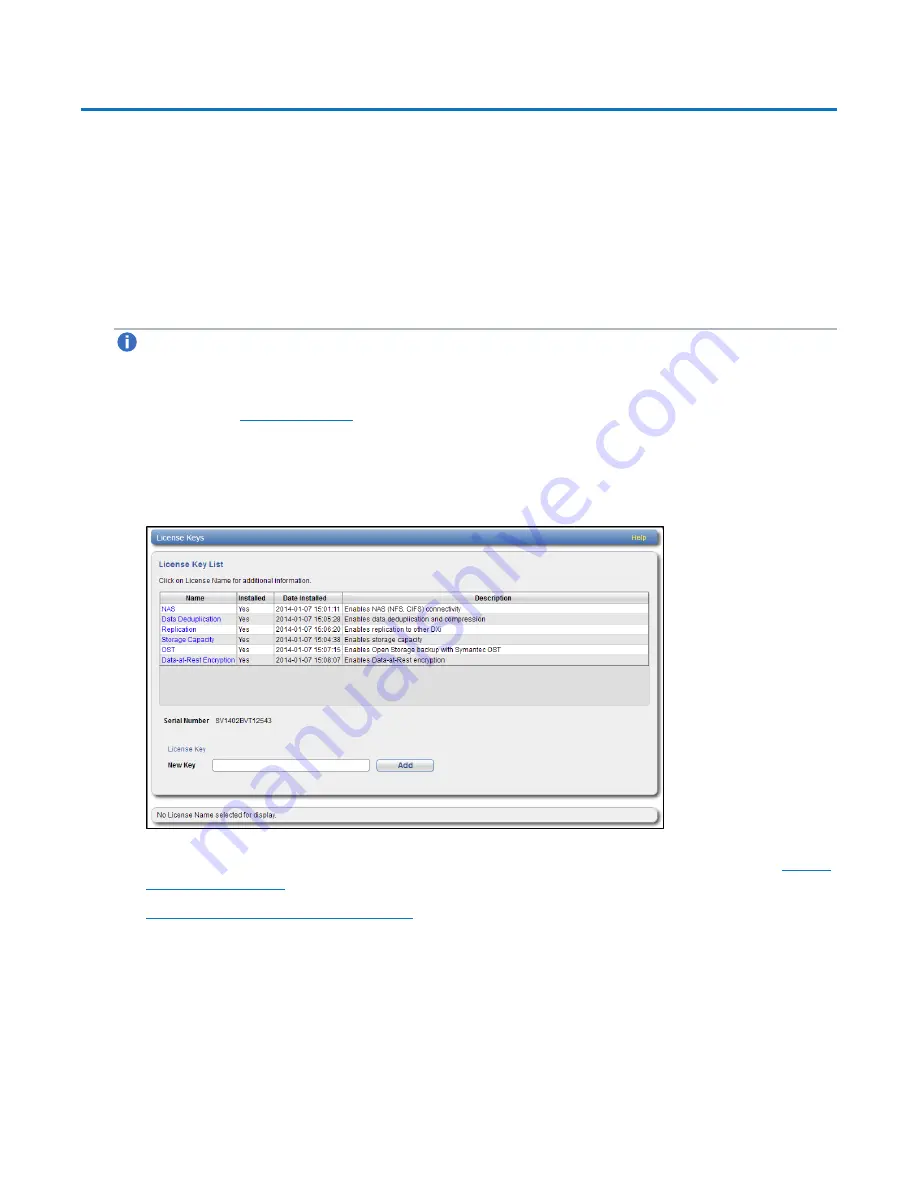
 a.  In one browser, navigate to the 

Utilities > License Keys

 page in the DXi remote management 

console (see 

Figure 39 below

). Note that the system serial number displays directly above the 

New 

Key

 box.

For information about accessing the remote management console, see the 

DXi4700 User’s Guide

.

Figure 39: 

License Keys Page

 b.  In the other browser, enter the address for the 

License Key Management Web site

 (see 

Figure 

40 on the next page

):

http://www.quantum.com/licensekeys

Содержание DXi4700

Страница 1: ...ion of the law Artico Be Certain and the Q brackets design DLT DXi DXi Accent DXi V1000 DXi V2000 DXi V4000 DXiV Series FlexSpace FlexSync FlexTier Lattus the Q logo the Q Quantum logo Q Cloud Quantum...

Страница 2: ...o 11 TB simply by adding a storage capacity license key See Table 1 on the next page for the licensed usable capacities that are available for each hardware configuration l Adding Additional Hardware...

Страница 3: ...m memory 64 GB systems running a Veeam or DAE configuration require 96 GB system memory 96 GB systems running a Veeam or DAE configuration require 128 GB system memory 1 TB 1 000 000 000 000 bytes Usa...

Страница 4: ...135 TB 136 TB 96 GB 3 8U 1 TB 1 000 000 000 000 bytes Usable storage capacity for installed Array or Expansion modules can be upgraded at any time after purchase in increments of 6TB 8TB and 18TB Stor...

Страница 5: ...em memory 64 GB systems running a Veeam or DAE configuration require 96 GB system memory 96 GB systems running a Veeam or DAE configuration require 128 GB system memory 1 TB 1 000 000 000 000 bytes Us...

Страница 6: ...u continue with the capacity upgrade l All backup jobs are completed and there is no pending I O l All replication jobs are completed and replication is paused Replication Actions page l All space rec...

Страница 7: ...e likely to produce static electricity Capacity Upgrade Overview To upgrade the usable capacity of the DXi4700 by enabling hardware capacity that is already installed in the system simply enter the st...

Страница 8: ...to the System Initial Capacity 11 TB 19 27 TB 45 63 TB 81 99 TB 117 135 TB 5 11 TB License Key 6 Node drives License Key 6 Node drives 8 DIMMs 1 RAID Card 1 JBOD License Key 6 Node drives 8 DIMMs 1 R...

Страница 9: ...The DXi4700 G1 information tag does not include G1 in the part number see Figure 3 below Figure 1 DXi4700 Information Tag 1 Information Tag Figure 2 DXi4700 G2 Information Tag Figure 3 DXi4700 G1 Inf...

Страница 10: ...respectively The DXi4700 G2 Node and Expansion module JBOD weigh 49 4 pounds 22 4 kg and 59 2 pounds 26 8 kg respectively A minimum of two people are required to lift either chassis Unpacking the Addi...

Страница 11: ...he box containing each DXi4700 Expansion module contains the following items l Rack mount rails l Cable management straps l Accessory kit which includes the following l C13 to C14 power cord 2 l North...

Страница 12: ...Unpacking the Upgrade Components Quantum DXi4700 Capacity Upgrade Guide 12 Figure 5 Unpacking the Expansion Module Item Description 1 Rack mount rails 2 Foam...

Страница 13: ...lication jobs are finished and that space reclamation activity is complete 1 In the remote management console navigate to the Utilities Reboot Shutdown page see Figure 6 below For information about ac...

Страница 14: ...lling the Memory Modules on page 25 l Installing the H810 H830 RAID Controller on page 30 l Closing the Node Cover on page 33 Installing the Node Hard Drives The Node has a total of 12 hard drive slot...

Страница 15: ...TB 11 TB 6 l Slots 0 5 19 TB 27 TB 45 TB 63 TB 81 TB 99 TB 117 TB 135 TB 12 l Slots 0 5 l Slots 6 11 Figure 8 Node Hard Drive Locations 1 2 3 4 5 6 7 8 9 10 11 12 0 1 2 3 4 5 6 7 8 9 10 11 Item Descri...

Страница 16: ...ions including the use of a grounding strap when performing this procedure 1 Remove the hard drive blank from each hard drive slot slots 6 11 a Grasp the front of the hard drive blank and press the re...

Страница 17: ...on to extend the handle see Figure 10 below Figure 10 Installing a Node Hard Drive 1 2 3 Item Description 1 Hard drive carrier 2 Hard drive handle 3 Release button b Insert the drive carrier into the...

Страница 18: ...ibre Channel cables from the rear of the Node Make sure to label the cables so they can be easily identified when they are re connected to the Node after the upgrade procedure is complete 3 Press the...

Страница 19: ...1 2 3 4 5 Item Description 1 Rear rail standoffs 2 Rear rail J slots 3 Slide release lock button 4 Lock lever 5 Inner slide rails 5 Grasp the sides of the Node firmly and pull it forward until the ra...

Страница 20: ...4 pounds 22 4 kg and 59 2 pounds 26 8 kg respectively A minimum of two people are required to lift either chassis 7 Press and hold the power button on the front of the Node for three seconds to fully...

Страница 21: ...cription 1 Latch release lock 2 Latch 3 Node cover 9 Lift the latch on top of the Node and slide the cover back 10 Grasp the cover on both sides and carefully lift the cover away from the Node 11 a Re...

Страница 22: ...nts in the Node Quantum DXi4700 Capacity Upgrade Guide 22 Figure 14 Removing the Cooling Shroud 1 1 Cooling shroud 12 Remove the cooling fan assembly by lifting the release levers upwards see Figure 1...

Страница 23: ...y 1 2 3 4 5 6 Item Description 1 Cooling fan assembly 2 Cooling fan 3 Release lever 2 4 Guide pin on the system board 2 5 Cooling fan connector 6 6 Guide pin on the chassis 6 13 Lift the cooling fan a...

Страница 24: ...Installing Components in the Node Quantum DXi4700 Capacity Upgrade Guide 24 Figure 16 Inside the DXi4700 Node 1 0 2 3 1 0 2 3 1 2 3 4 5 Item Description 1 Cooling shroud 2 Memory modules...

Страница 25: ...nstall 8 or 16 additional memory modules 4 GB DIMMS in the Node see Table 2 on the next page Memory modules must be installed in the correct sockets in order for the system to function properly see Fi...

Страница 26: ...B1 B4 white sockets l A5 A8 and B5 B8 black sockets l A9 A12 and B9 B12 green sockets Table 3 Memory Configurations Veeam or DAE DXi4700 Configuration Total System Memory Actions to Take 5 27 TB 64 G...

Страница 27: ...installed modules in slots A1 A4 and B1 B4 white sockets 2 Install 8 x 8 GB memory modules in slots A1 A4 and B1 B4 white sockets 3 Install 8 x 4 GB memory modules in slots A5 A8 and B5 B8 black sock...

Страница 28: ...emory blank pops out of the socket see Figure 18 below The plastic memory blanks are recyclable Figure 18 Installing a Memory Module 1 2 3 Item Description 1 Memory module 2 Ejector latch 3 Socket ali...

Страница 29: ...ure 19 below b Slide the cooling fan assembly into the chassis c Lock the cooling fan assembly into the chassis Figure 19 Replacing the Cooling Fan Assembly 6 Replace the cooling shroud a Align the ta...

Страница 30: ...able 4 below If required for the upgrade install the H810 H30 RAID controller card in PCIe slot 6 located in expansion card riser 3 see Figure 21 below for DXi4700 G1 and Figure 22 on the next page fo...

Страница 31: ...he H810 or H830 RAID controller card in the DXi4700 Node Caution Use appropriate ESD precautions including the use of a grounding strap when performing this procedure 1 Lift the blue expansion card la...

Страница 32: ...r 3 1 2 3 4 5 Item Description 1 Expansion card latch blue 2 H810 H830 card 3 Metal slot cover 4 Expansion card connector 5 Expansion card riser 3 2 Remove the metal slot cover from slot 6 by sliding...

Страница 33: ...n place Closing the Node Cover To close the DXi4700 Node cover 1 Lift the latch on the cover see Figure 24 below Figure 24 Replacing the Node Cover 1 2 3 Item Description 1 Latch release lock 2 Latch...

Страница 34: ...ck into place see Figure 25 below Figure 25 Installing the DXi4700 Node in the Rack 1 2 3 4 5 Item Description 1 Rear rail standoffs 2 Rear rail J slots 3 Slide release lock button 4 Lock lever 5 Inne...

Страница 35: ...see Capacity Upgrade Overview on page 7 Tasks Installing the DXi4700 Expansion Modules in a rack consists of the following steps 1 Determining the Order of the Components in the Rack below 2 Locating...

Страница 36: ...mm 15 9 mm and 12 7 mm 0 625 inch 0 625 inch and 0 5 inch for the front and back vertical rails see Figure 27 below Rack cabinets may have round or square holes For more information refer to the DXi47...

Страница 37: ...the bottom and top holes of the desired U spaces 3 Engage the back end of the rail until it fully seats on the vertical rack flange and the latch clicks into place Repeat these actions to position an...

Страница 38: ...they were removed 1 Align the Expansion module with the rails and then slide the module into the rack see Figure 29 below 2 Tighten the thumbscrews on each side of the Expansion module s front panel N...

Страница 39: ...G1 models see Table 1 below and Figure 30 on page 41 l For DXi4700 G2 models see Table 2 below and Figure 31 on page 42 Table 1 Connecting the DXi4700 G1 Expansion Modules JBODs Node JBOD 1 JBOD 2 JB...

Страница 40: ...al 10 GBase T Option Connect up to two CAT6 Ethernet cables to the optional 10GBase T ports 4 and 5 see Figure 34 on page 43 Caution CAT6 Ethernet cables can be easily damaged when tightened with plas...

Страница 41: ...Cabling the System Quantum DXi4700 Capacity Upgrade Guide 41 Figure 30 DXi4700 G1 SAS Cabling...

Страница 42: ...Cabling the System Quantum DXi4700 Capacity Upgrade Guide 42 Figure 31 DXi4700 G2 SAS Cabling Figure 32 DXi4700 G1 Optional 10 GbE Ethernet Cabling...

Страница 43: ...um DXi4700 Capacity Upgrade Guide 43 Figure 33 DXi4700 G2 Optional 10 GbE Ethernet Cabling Figure 34 DXi4700 Optional 10 GBase T Ethernet Cabling Figure 35 DXi4700 Fibre Channel Cabling VTL Multi Prot...

Страница 44: ...Cabling the System Quantum DXi4700 Capacity Upgrade Guide 44 Figure 36 DXi4700 Power Cabling...

Страница 45: ...status indicator on hard drive blinks amber four times per second Figure 37 Expansion Module Power Switches 1 Power Switches b Press the power button on the front of the Node see Figure 38 below Wait...

Страница 46: ...ete the following procedure 1 Open two Web browser windows on a computer with Internet access Note During this procedure you can copy and paste required numbers between these two windows a In one brow...

Страница 47: ...y in the New Key box and click Add The file system is automatically expanded This can take up to 10 minutes 5 Click the Storage Capacity license link on the License Keys page The maximum allowed stora...

Страница 48: ...while installing or configuring the DXi4700 see Table 1 for troubleshooting steps Table 1 DXi4700 Installation Troubleshooting Problem Corrective Action The system does not power on Make sure all powe...

Страница 49: ...display the expected total Disk Capacity 1 Navigate to the Alerts Service Tickets page Click a ticket number to view details about the service ticket Perform any suggested steps listed in the ticket...

Страница 50: ...nities contact the Quantum Customer Support Center Region Support Contact North America 1 800 284 5101 toll free 1 720 249 5700 EMEA 800 7826 8888 toll free 49 6131 324 185 Asia Pacific 800 7826 8887...

Отзывы: