background image

43

Appendix

Appendix

Appendix

Appendix

Appendix

K7S746FX

K7S746FX

K7S746FX

K7S746FX

K7S746FX

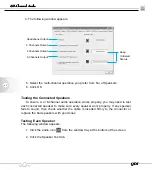
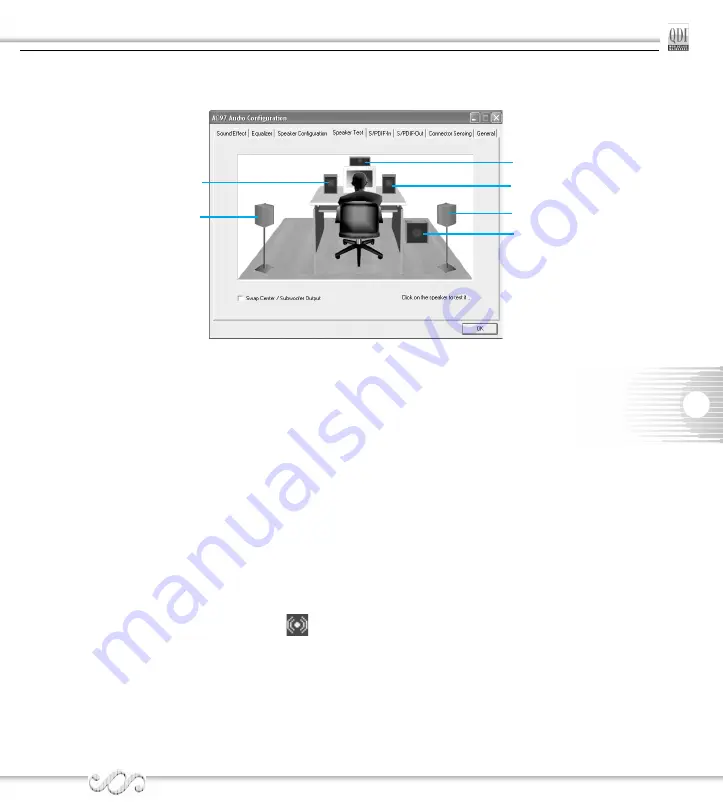
 3. The following window appears.

 4. Select the speaker which you want to test by clicking on it.

Playing KaraOK

      The KaraOK function will automatically remove human voice (lyrics) and leave me-
lody for you to sing the song. 

The function is applied only for 2-channel audio opera-

tion

, so make sure “2-channel mode” is selected in the “No. of Speakers” column before

playing KaraOK.

Playing KaraOK

 1. Click the audio icon  

  from the window tray at the bottom of the screen.

 2. Make sure the Sound Effect tab is selected.

Subwoofer

Front Right

Rear Right

Center

Front Left

Rear Left

Содержание K7S746FX

Страница 1: ...g out of the use or the possibility of such damages All trademarks are the property of their respective owners If you need any further information please visit our web site www qdigrp com Item Checklist This item checklist is only available for retail market Completely check your package If you discover dam aged or missing items contact your retailer K7S746FX mainboard QDI Utility CD User s manual...

Страница 2: ...ts of radio disturbance characteristics of information technology equipment EN 50081 1 Generic emission standard Part 1 Residential commercial and light industry EN 50082 1 Generic immunity standard Part 1 Residential commercial and light industry European Representative QDI COMPUTER UK LTD QDI COMPUTER SCANDINAVIA A S QDI SYSTEM HANDEL GMBH QDI EUROPE B V QDI COMPUTER FRANCE SARL QDICOMPUTERHANDE...

Страница 3: ...t Mainboard Manufacturer Quantum Designs HK Inc Address 20th Floor Devon House Taikoo Place 979 King s Road Quarry Bay HONG KONG Supplementary Information This device complies with Part 15 of the FCC Rules Operation is subject to the following two conditions 1 this device may not cause harmful interference and 2 this device must accept any interference received including interference that may caus...

Страница 4: ...jack Microphone in jack Speaker out jack 8 6 Channel Audio 8 ATX Power Supply Connector Power Switch POWER SW 9 Hard Disk LED Connector HD_LED 9 Reset Switch RESET 9 Power LED Connector PWR_LED 10 Fan Connectors SYSFAN CPUFAN 10 IEEE1394_2port optional 11 USB5 USB6 port 11 Infrared Header IrDA 12 Audio Connectors CD_IN 12 S PDIF output connector 13 Wake Up On LAN WOL1 13 Audio Interface F_Audio 14...

Страница 5: ... BIOS Features Setup 24 Advanced Chipset Features Setup 26 Advance Host Control 27 Advance DRAM Control 27 Power Management Setup 28 PM Wake up Events 30 PNP PCIConfigurationSetup 32 Integrated Peripherals 33 SISOnChipIDEDevice 34 SISOnChipPCIDevice 34 Onboard SuperIO Device 35 Password Setting 36 Boot with BIOS defaults 36 Appendix 37 QDIUtilityCD 37 Norton AntiVirus 37 Using 4 6 Channel Audio 38...

Страница 6: ...the CPU and the heatsink to keep them fully contacted to meet the heat sink require ment Be sure to unplug the AC power supply before adding or re moving expansion cards RAM or other system peripherals other wise your mainboard and RAM might be seriously damaged ...

Страница 7: ... carefully designed for the PC user who wants diverse features 6A with 6 channels onboard Audio 6AL with 6 channels onboard Audio and LAN 6AFL with 6 channels onboard Audio LAN and IEEE 1394 ports 6ALFS with 6 channels onboard Audio LAN IEEE 1394 ports and SATA optional ...

Страница 8: ...T This page is intentionally left blank his ...

Страница 9: ...USB 2 0 ports 2 DRR 400 slots 2 IEEE 1394 ports optional and 2 SATA connectors optional give customers an advanced multimedia solution at reasonable price It provides 200 266 333MHz host bus speed to support AMD socket 462 processors and the largest DDR memory capacity is up to 2GB It also pro vides advanced features such as Wake on LAN AntiVirus function ACPI function and so on The optimal implem...

Страница 10: ... 2GB Onboard IDE Supports Independent timing of up to 4 drives Supports Ultra ATA 133 100 66 33 PIO mode Two fast IDE interfaces supporting four IDE devices including IDE hard disks and CDROM DVDROM drives Onboard LAN Optional 10 100 Mbit sec Ethernet support 10 100M LAN interface built in on board USB Ports USB 2 0 compliant operates at 480Mbps about 40X times faster than USB 1 1 which currently ...

Страница 11: ...allel port supports SPP EPP ECP mode Infrared interface All I O ports can be enabled disabled in the BIOS setup Onboard SATA Raid available on 6ALS mainboard optional Supports hot plug Two SATA devices including SATA HDD and CDROM DVD ROM devices Supports 150Mbps transfer rate Supports Raid 0 or Raid 1 optional BIOS Licensed advanced AWARD Phoenix BIOS supports flash ROM plug and play ready Suppor...

Страница 12: ...s Wake up by keyboard password Supports system monitoring monitors CPU and system temperatures system voltages fan speed available on several models Main Expansion Slots and Connectors Slot Port Quantity Description PCI 5 PCI slots AGP 1 AGP slot IDE 2 IDE Ports FLOPPY 1 Floppy Drive port DDR 2 DDR Sockets USB 6 USB Connectors IEEE 1394 2 optional IEEE 1394 Connector UART 1 UART Connectors PARALLE...

Страница 13: ...gs Refer to the mainboard layout chart for locations of all jumpers external connectors slots and I O ports Furthermore this section lists all necessary connector pin assignments for your reference The particular state of the jumpers connectors and ports are illustrated in the following figures Before setting the jumpers or inserting these connectors please pay attention to the directions ...

Страница 14: ...ouse Parallel Port Serial Port Connector COM1 The parallel port connector can be connected to a parallel device such as a printer The serial port COM1 connector can be connected to a serial port device such as a serial port mouse You can enable disable them and choose the IRQ or I O address in Inte grated Peripherals from AWARD BIOS SETUP PS 2 Mouse PS 2 Keyboard Parallel Port UART1 Serial Port Be...

Страница 15: ...SB1 USB2 USB3 USB4 Connectors Four USB 2 0 ports are for connecting USB devices USB1 USB2 USB3 USB4 LAN Connectors optional The RJ 45 connector is for onboard LAN IEEE 1394 Port IEEE 1394_1 optional IEEE 1394 port is for connecting IEEE 1394 devices LAN optional LINK ACTIVE IEEE 1394_1 Port optional ...

Страница 16: ...oard utilizes ALC655chip providing 6 channel Audio which consists of Front Left Front Right Rear Left Rear Right Center and Woofer for a complete surround sound effect When 6 Channel audio is available the front Left Right jack can be con nected to the Front speakers the Back Left Right jack can be connected to the rear speak ers and the Center Woofer jack can be connected to the center speaker an...

Страница 17: ...l switch just push once the power switch Hard Disk LED Connector HD_LED The connector connects to the case s IDE indicator LED indicating the activity status of IDE hard disk The connector has an orientation If one way doesn t work try the other way Reset Switch RESET The connector connects to the case s reset switch Press the switch once the system resets If you change Power Button Override from ...

Страница 18: ...s blink When the system is in S5 or S1 status the LED is off The connector has an orientation Fan Connectors SYSFAN CPUFAN The fan speed of CPUFAN and SYSFAN can be detected and viewed in PC Health section of the CMOS SETUP HD LED POWER LED Power SW RESET SW Reserved POWER LED HDD LED HDD LED HDD LED G N D P O W E R REVERSE EMPTY G N D P O W E R PWR LED RESET SW PWR LED POWER SW 12V CPUFAN SENSE G...

Страница 19: ... cable optional to provide additional two USB ports Be sure to connect correctly your cable to the connector otherwise your mainboard and USB devices might be seriously damaged 0 0 0 0 0Warning IEEE 1394_2 port optional Besides 1394_1 on the back panel the K7S746FX mainboard also have one 10 pin headers on board to provide additional IEEE 1394 port USB5_6 1 5V D5 D5 GND 5V D6 D6 GND N A JP4 1 TPA ...

Страница 20: ...supports wireless transmitting and receiving device Before using this function configure the settings for IR Address IR Mode and IR IRQ from the INTE GRATED PERIPHERALS section of the CMOS SETUP Audio Connectors CD_IN CD_IN is Sony standard CD audio connectors it can be connected to a CD ROM drive through a CD audio cable IrDA 5V IRTX GND IRRX NC 1 Left Channel Common Right Channel CD_IN ...

Страница 21: ...pable of delivering current at least720mA and a LAN adapter which supports this function is used Then connect this header to the relevant connec tor on the LAN adapter set Ring power up control as Enabled under the sub section PM Wake Up Events in the POWER MANAGEMENT SETUP section of the CMOS SETUP Save and exit then boot the operating system once to make sure this function takes effect S PDIF Ou...

Страница 22: ...onboard amplifier is provided for the earphone When the Front Audio is absent Pin5 and Pin6 Pin9 and Pin10 must be short connected Onboard SATA Optional The mainboard provides two Serial ATA connectors SATA is a storage interface that is compliant with SATA 1 0 Specification With speed of up to 150Mbps you can connect Serial ATA cable to Serial ATA hard disk F_Audio F_Audio Interface 2 4 6 10 1 3 ...

Страница 23: ...CLR_CMOS and BIOS protection jumper JAV Pin 1 for all jumpers are located on the side with a thick white line Pin1 referring to the mainboard s silkscreen Jumpers with three pins will be shown as to represent pin1 pin2 1 2 closed and to represent pin2 pin3 2 3 closed Clear CMOS JCC If you want to clear CMOS unplug the AC power supply first close JCC pin1 pin2 once set JCC back to the normal status...

Страница 24: ...he Flash ROM The DMI Desktop Management Interface system information such as the CPU type speed memory size and expansion cards will be detected by the onboard BIOS and stored in the flash ROM Whenever the system hardware configuration is changed DMI information will be updated automatically However setting jumper JAV as closed makes flashing BIOS and updating DMI information impossible Therefore ...

Страница 25: ...ption The mainboard uses Phoenix AWARD BIOS Setup program that provides a Setup utility for users to modify the basic sys tem configuration The information is stored in a battery backed CMOS RAM so it retains the Setup information when the power is turned off This chapter provides you with the overview of the BIOS Setup ...

Страница 26: ...diskette by typing Format A s from the DOS prompt under DOS6 xx or Windows 9x environment 2 Copy AWDFLASH EXE version 8 24b from the directory Utility located on QDI Mainboard Utility CD onto your new bootable diskette 3 Download the updated BIOS file from the Website http www qdigrp com Please be sure to download the suitable BIOS file for your mainboard 4 Decompress the file downloaded copy the ...

Страница 27: ...llows you to select from eleven setup functions and two exit choices Use the arrow keys to select among the items and press the Enter key to accept or enter the sub menu Figure 1 Main Menu Load Optimized Defaults The Optimized Defaults are common and efficient It is recommended users load the optimized defaults first then modify the needed configuration settings Standard CMOS Features Setup The ba...

Страница 28: ...ave These categories identify the HDD types of 2 IDE channels installed in the computer system There are three choices provided for the Enhanced IDE BIOS None Auto and Manual None means no HDD is installed or set Auto means the system can auto detect the hard disk when booting up by choosing Manual the related information should be entered regarding the following items Enter the information direct...

Страница 29: ...er will transform the logical address described by sector head and cylinder number into its own physical address inside the HDD Large mode Some IDE HDDs contain more than 1024 cylinder without LBA support in some cases users do not want LBA The Award BIOS provides another alternative to support these kinds of HDD BIOS tricks DOS or other OS into divising the number of cylinders is less than 1024 b...

Страница 30: ...m boot will not stop for any errors that may be detected All errors Whenever the BIOS detects a non fatal error the system will stop and you will be prompted All But Keyboard The system boot will not stop for a keyboard error but it will stop for all other errors All But Diskette The system boot will not stop for a disk error but it will stop for all other errors All But Disk Key The system boot w...

Страница 31: ...ncy default Set CPU frequency 100MHz 133MHz 166MHz 200MHz BootLogo Setting Show Bootup Enabled The full screen logo will be shown automatically Logo Disabled when system boots up otherwise no logo appears on the screen BIOS ProtectEasy Setting Writing BIOS Enabled The option is for protecting the system BIOS Flash ROM Disabled when enabled you can write BIOS Be sure your selection is right CPU ove...

Страница 32: ...BIOS will show a warning mes sage on screen and alarm beep Disabled Invalidates this function CPU Internal Enabled Enable CPU Internal cache Cache Disabled Disable CPU Internal cache External Cache Enabled Enable CPU external cache Disabled Disable CPU external cache Quick Power Enabled Allow the system to skip certain tests while booting On Self Test On Self Test This will decrease the time neede...

Страница 33: ...t or only when you enter setup APIC Mode Enabled Enable the APIC mode Advanced Program mable Interrupt Controller Disabled Disabled the APIC mode MPS Version 1 1 1 4 Set the MPS Version Control for OS Control for OS OS Select For Non OS2 Select OS2 only if you are running OS 2 DRAM 64MB OS2 operating system with more than 64MB of RAM HDD S M A R T Enabled Enable hard disk S M A R T support Capabil...

Страница 34: ...bout advance DRAM Control AGP Aperture 4MB 8MB Set the effective size of the Graphics Aperture Size MB 16MB 32MB to be used in the particular GART Configuration 64MB 128MB 256MB 512MB AGP Fast write Enabled Enable AGP fast write support support Disabled Disable AGP fast write support AGP date Auto Set the AGP date transfer rate transfer rate 1x 2x 4x 8x System BIOS Enabled Besides conventional mem...

Страница 35: ...ption Memory hole at Enabled Memory hole at 15 16M is reserved for expanded 15M 16M ISA card Disabled Do not set this memory hole CPU Command 4 8 Set CPU command acknowledge limit ACK limit Advance DRAM Control Item Option Description DRAM Frequency by SPD Set DRAM frequency 100MHz 133MHz 166MHz 200MHz Auto Normal Set DRAM configuration Configuration Performance DDR SDRAM Auto Define the latency b...

Страница 36: ... function ACPI Suspend S1 POS Select the ACPI suspend type Type Power User Define Users can configure their own Power Management Management Timer Min Saving Pre defined timer values are used All timers are in their MAX values Max Saving Pre defined timer values are used All timers are in their MIN values Suspend Mode Disabled The system never enter Suspend mode by timer 1Min 1Hour Define the conti...

Страница 37: ... to Blank Screen BIOS will also turn Blank off the V SYNC H SYNC signals from VGA card to monitor DPMS This function is enabled only for VGA cards sup porting DPMS Note When the green monitor does not de tect the V H SYNC signals the electron gun will be turned off MODEM Use 3 4 5 7 9 Special wake up event for Modem IRQ 10 11 NA HDD Off Disabled HDD s motor will not turn off by timer After 1 15 Mi...

Страница 38: ... the system to be waken up by IRQ 8 Suspend Disabled Does not allow the system to be waken up by IRQ8 Ring power up Enabled Allow the system to be powered on when a Ring control indicator signal comes up to UART1 or UART2 from external modem Disabled Do not allow Ring wake up MACPME Power Enabled Allows the system to be waken up by onboard Up Control LAN Disabled Does not allow the system to be po...

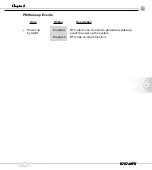
Страница 39: ...pter 3 Chapter 3 K7S746FX K7S746FX K7S746FX K7S746FX K7S746FX PM Wake up Events Item Option Description Power up Enabled RTC alarm can be used to generate a wake up by Alarm event to power up the system Disabled RTC has no alarm function ...

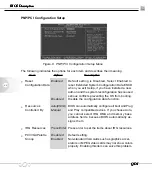
Страница 40: ...d on and the system reconfiguration has caused serious conflicts preventing the OS from booting Disabled Disable the configuration data function Resources Auto ESCD BIOS can automatically configure all boot and Plug Controlled By Manual and Play compatible devices If you choose Auto you cannot select IRQ DMA and memory base address fields because BIOS automatically as signs them IRQ Resources Pres...

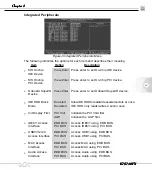
Страница 41: ...ress enter to set Onboard SuperIO device Device IDE HDD Block Enabled Allow IDE HDD to read write several sectors at once Mode Disabled IDE HDD only reads writes a sector once Init Display First PCI Slot Initialize the PCI VGA first AGP Initialize the AGP first IDE0 1 Access EDB BUS Access IDE0 1 using EDB BUS Interface PCI BUS Access IDE0 1 using PCI BUS USB0 1 2 2 0 EDB BUS Access USB1 using EDB...

Страница 42: ...es IDE Burst Mode SIS OnChip PCI Device Item Option Description SIS USB Enabled Enable the on chip USB controller Controller Disabled Disable the on chip USB controller USB Ports 3 6 Select the USB ports number Number USB 2 0 Supports Enabled Enable USB 2 0 to support Disabled Disable USB 2 0 to support USB Keyboard Enabled Support USB Keyboard under legacy OS support Disabled Disable this functio...

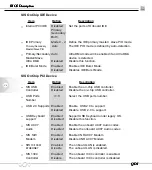
Страница 43: ...8 IRQ3 Auto Onboard serial port address and IRQ are automatically assigned Disabled Onboard serial port is disabled UART Mode Normal Defines Serial Port as standard serial port Select IrDA Supports IRDA mode ASK IR Supports SHARP ASK IR protocol with maximum SCR baud rate up to 57600bps UR2 Duplex Mode Half Full Default is recommended Onboard Parallel 378 IRQ7 Define parallel port address and IRQ ...

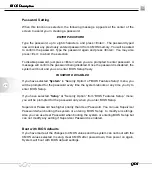
Страница 44: ...nd you can enter BIOS Setup freely PASSWORD DISABLED If you have selected System in Security Option of BIOS Features Setup menu you will be prompted for the password every time the system reboots or any time you try to enter BIOS Setup If you have selected Setup at Security Option from BIOS Features Setup menu you will be prompted for the password only when you enter BIOS Setup Supervisor Password...

Страница 45: ...e Awdflash exe Acrobat Reader Note If you need the updated Awdflash exe file please visit our web site www qdigrp com Norton AntiVirus When you install Norton AntiVirus and accept options your computer is safe Norton AntiVirus automatically checks boot records for viruses at system startup Checks programs for viruses at the time you use them scans all local hard drives for viruses once per week an...

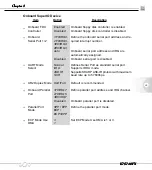
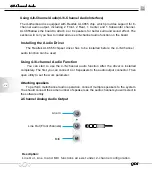
Страница 46: ...io Driver The Realtek ALC655 chipset driver has to be installed before the 4 6 Channel audio function can be used Using 4 6 channel Audio Function You can start to use the 4 6 channel audio function After the driver is installed completely The first you can connect 4 or 6 speakers to the audio output connector Then open utility to set the work parameter Attaching speakers To perform multichannel a...

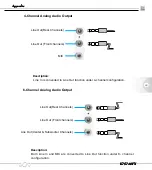
Страница 47: ...Analog Audio Output Description Both Line In and MIC are converted to Line Out function under 6 channel configuration Description Line In is converted to Line Out function under 4 channel configuration Line Out Front channels Line Out Rear Channels Line Out Center Subwoofer Channels Line Out Front channels Line Out Rear Channels MIC ...

Страница 48: ... 6 Channel Audio 4 6 Channel Audio 4 6 Channel Audio 4 6 Channel Audio 4 6 Channel Audio Description Connect the SPDIF speakers to the Coaxial SPDIF jack Coaxial SPDIF Jack Digital Audio Output The figure is only for reference ...

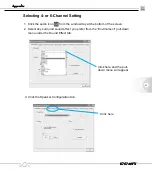
Страница 49: ...ng 4 or 6 Channel Setting 1 Click the audio icon from the window tray at the bottom of the screen 2 Select any surround sound effect you prefer from the Environment pull down menu under the Sound Effect tab 3 Click the Speaker Configuration tab Click here and the pull down menu will appear Click here ...

Страница 50: ...eration works properly you may need to test each connected speaker to make sure every speaker work properly If any speaker fails to sound then check whether the cable is inserted firmly to the connector or replace the bad speakers with good ones Testing Each Speaker The following window appears 1 Click the audio icon from the window tray at the bottom of the screen 2 Click the Speaker Test tab 2 C...

Страница 51: ... automatically remove human voice lyrics and leave me lody for you to sing the song The function is applied only for 2 channel audio opera tion so make sure 2 channel mode is selected in the No of Speakers column before playing KaraOK Playing KaraOK 1 Click the audio icon from the window tray at the bottom of the screen 2 Make sure the Sound Effect tab is selected Subwoofer FrontRight Rear Right C...

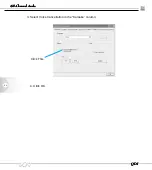
Страница 52: ...QDI QDI QDI QDI QDI 44 4 6 Channel Audio 4 6 Channel Audio 4 6 Channel Audio 4 6 Channel Audio 4 6 Channel Audio 3 Select Voice Cancellation in the Karaoke column 4 Click OK Click This ...

Страница 53: ...Board Layout of K7S746FX Note The layout includes all options It is for your reference only ...

Страница 54: ...et 462 PWR1 IDE2 IDE1 FLOPPY1 CD_IN CPUFAN SYSFAN F_Audio JP38 IRDA CON1 optional CON2 optional JAV USB5_6 JP31 JCC Top LAN optional Bttm USB1 2 Top PS 2 Mouse Bttm PS 2 Keyboard Top 1394 optional Bttm USB3 4 Top Line in Middle Speaker out Bttm Mic in COM1 LPT JP4 optional WOL1 ...

Отзывы: