background image

980 HDMI Protocol Analyzer User Guide 


  Rev. A1 


Page 64 


December 19, 2012 


4.4.2


Searching for Data in the Data Decode Panel 

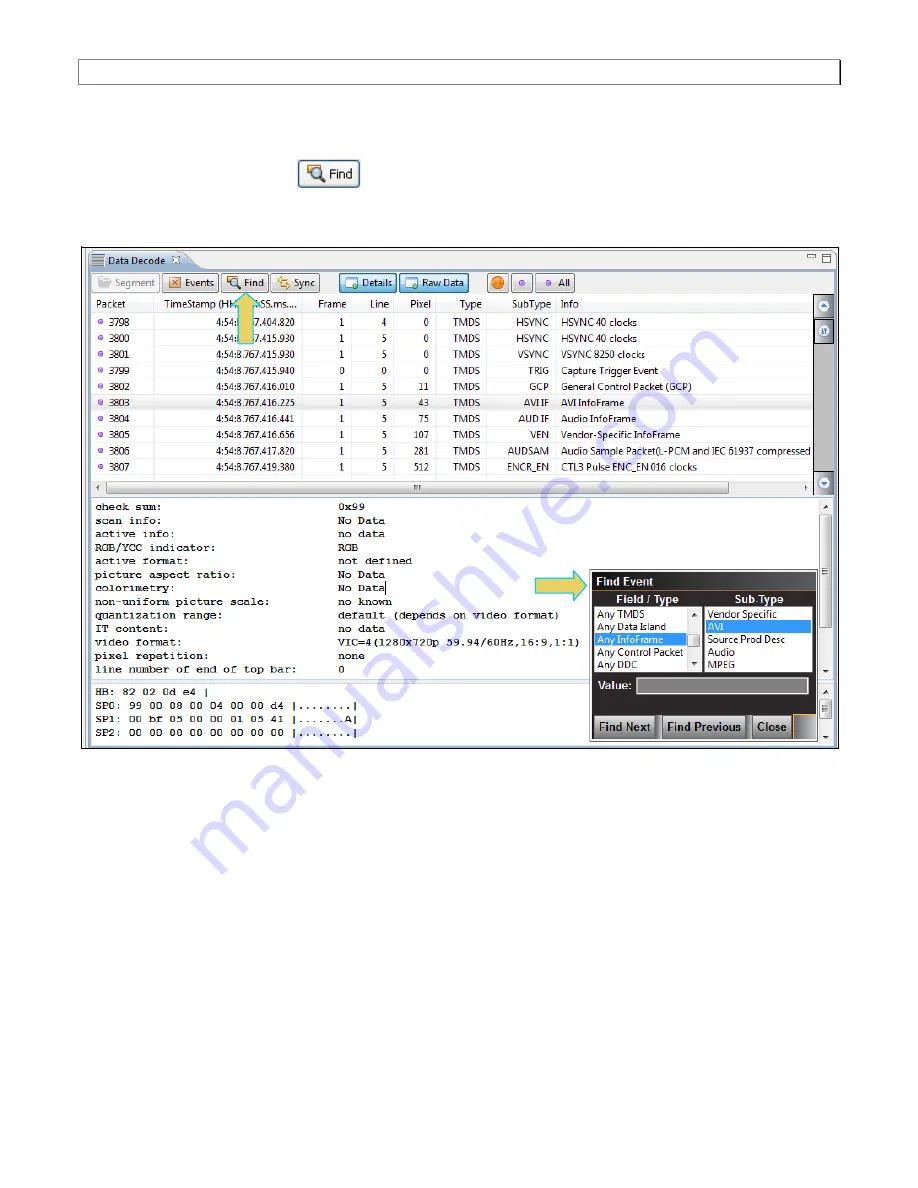
You can search for data in the 

Data Decode

 panel using the search function. The search function is accessible 

using the magnifying glass icon 

  on the upper left of the 

Data Decode

 panel. In the example below, a 

search for the next occurrence of an AVI infoframe is being initiated. You can specify a search forward (

Find Next

or backward (

Find Previous

). 


Содержание Gen 2 980

Страница 1: ...980 HDMI Protocol Analyzer User Guide Rev A1 Page 1 December 19 2012 User Guide 980 HDMI Protocol Analyzer Gen 2 Rev A1 ...

Страница 2: ... 3 Connector Description 10 980 HDMI Protocol Analyzer Gen 2 Operational Modes 12 2 4 980 HDMI Protocol Analyzer Gen 2Analysis Configurations 12 2 5 980 Data Analysis Capture Modes 15 2 6 Getting Started Procedures 15 2 7 Connection for external 980 GUI Manager 20 3 Overview of the 980 GUI Manager External 34 3 1 Overview 34 4 980 GUI Manager External Panel Descriptions 43 4 1 980 Navigation Panel...

Страница 3: ...est 157 7 5 Running the Pseudo Random Noise Test through the command line 163 8 Analyzing HDMI Data with your 980 Protocol Analyzer Gen 2 166 8 1 Overview 166 8 2 Operational workflow for capturing data with your 980 HDMI Protocol Analyzer 166 8 3 Setting the 980 HDMI Protocol Analyzer mode to HDMI 166 8 4 Setting the Configuration of the Link Mode 168 8 5 Setting the RX HDCP mode 170 8 6 Setting ...

Страница 4: ... 13 1 Test ARC on an HDMI source ARC Rx 260 13 2 Test ARC on an HDMI sink ARC Tx 262 14 Viewing Decoded EDIDs 265 14 1 Reading an EDID from an HDMI display or sink device 265 15 HDMI Generator Playback Function 275 15 1 Generator Playback function 276 15 2 Using the Playback Function through the 980 GUI Manager 276 15 2 Using the Playback Function through the Command Line 286 15 3 Custom Playback ...

Страница 5: ...only capture the data islands not the video packets Protocol Analysis The 980 will capture the protocol data such as the preamble and guard band data You will not be able to see the details of the data island video or audio data 1 1 What makes the 980 HDMI Protocol Analyzer Unique The 980 HDMI Protocol Analyzer Gen 3 for HDMI source devices provides full visibility into the HDMI protocol timing co...

Страница 6: ... Analyzer Gen 2 1 3 What options are available with the 980 HDMI Protocol Analyzer There are six 6 options that you can purchase with the 980 HDMI Protocol Analyzer You must have a license to use these options Encrypted Link Analyzer mode for monitoring encrypted data between an HDMI source and sink device HDMI Source Compliance tests in accordance with HDMI 1 4 CTS Sections 7 4 through 7 8 EDID C...

Страница 7: ...er Guide recently This is a new User Guide Note Please be sure to check the Quantum Data website for updates to this User Guide 1 5 980 User Interface The 980 provides a graphical user interface 980 GUI Manager for operation This GUI can run both on the 980 itself through the built in color touch screen display embedded 980 GUI Manager or as a standalone application running on a PC external 980 GU...

Страница 8: ... the menus of the HDMI source device to ensure that it is in the correct mode The built in GUI also enables you to view the HDMI video metadata and DDC in real time as they are being captured using the Real Time mode You can transfer data captures taken from the built in touch display to your PC where they can be viewed through the external 980 GUI Manager and also disseminated to others for analy...

Страница 9: ...80 GUI Manager application A minimum of 512MB of RAM is recommended Note that you do not need a PC because you can use the built in Front Panel display however the external 980 GUI Manager provides you with a larger viewing area 5 Optional not required if using the built in display Determine how you are going to connect to the 980 Protocol Analyzer from the external 980 GUI Manager in order to ope...

Страница 10: ...ion 980 Configurations Information Function Protocol Analyzer board Rev C Auxiliary slot module vertical mount The following is a description of each connector 980 HDMI Protocol Analyzer module Rev C A BNC connector for trigger input Used for special sync to trigger a capture with Protocol Analyzer module B HDMI Rx port for analyzing HDMI sources or for running HDMI compliance tests on sources C H...

Страница 11: ...980 HDMI Protocol Analyzer User Guide Rev A1 Page 11 December 19 2012 980 Configurations Information Function J Various USB ports for transferring files and restoring system ...

Страница 12: ...eo even when the video encrypted with HDCP content protection You can also view the incoming HDMI video audio metadata and HDMI DDC transactions The Real Time mode enables you to collect data in real time and compare incoming data over time to reference data collected earlier The Real Time mode is available only through the built in touch display GUI 2 4 980 HDMI Protocol Analyzer Gen 2Analysis Co...

Страница 13: ...980 HDMI Protocol Analyzer User Guide Rev A1 Page 13 December 19 2012 HDMI Sink Emulation for Source Analysis Configuration ...

Страница 14: ...urce and the sink device 2 4 3 Encrypted Link Analyzer In the Encrypted Link Analyzer configuration the 980 HDMI Protocol Analyzer HDMI Rx port is connected to the source device under test and the 980 HDMI Protocol Analyzer HDMI Tx port is connected to a sink device The Encrypted Link Analyzer configuration enables you to monitor and analyze HDCP encrypted protocol data transmitted between an HDMI...

Страница 15: ... you capture 2 5 3 Protocol Analysis The Protocol Analysis mode will capture the protocol data such as the preamble and guard band data You will not be able to see the details of the data island video or audio data This data is especially useful in debugging failures in the HDMI source compliance tests for the Protocol tests 2 6 Getting Started Procedures The getting started procedures involve the...

Страница 16: ...r Guide Rev A1 Page 16 December 19 2012 1 From the Quantum Data downloads page double click on the External Manager link 2 A dialog box will appear asking you to save the file The file will be saved in the downloads folder on the PC ...

Страница 17: ...ation folder We recommend installation in the default folder 3 After installation completes run the new 980 GUI Manager It should be available in the Start Menu under All Programs Quantum Data and also from an icon on your Desktop 4 Verify that the version number in the title bar matches the version on the website 2 6 2 Powering up the 980 Use the following procedures to power up the 980 Protocol ...

Страница 18: ... Analyzer for a short period of time For extended off periods it is best to power down the 980 HDMI Protocol Analyzer by first using the power button on the front and then the rocker switch on the back 2 Turn the 980 on by pressing and releasing the power button on the lower portion of the front panel The following prompt will occur Select the desired option ...

Страница 19: ...980 HDMI Protocol Analyzer User Guide Rev A1 Page 19 December 19 2012 ...

Страница 20: ...orate network To be compatible the IP address of the 980 must have the same network portion of the IP address as your network but a unique host portion The 980 is provisioned with a default IP address 192 168 1 10 The procedures for changing the IP address of the 980 are provided in the following subsection These procedures also describe how to enable the 980 DHCP client to allow the network to as...

Страница 21: ...o make the physical connections using Ethernet Point to Point connection with the external GUI Manager This procedure is used when using the external 980 GUI Manager and connecting to the 980 directly with an Ethernet cable If you are connecting through your corporate LAN use the previous procedure This procedure is required to establish an IP session between the 980 GUI Manager running on the 980...

Страница 22: ...reen display manually or use the command line You can also allow the network DHCP server to assign an IP address These procedures assume that you have powered up the 980 and that the embedded 980 GUI Manager has been launched and established a physical Ethernet connection between the PC hosting the 980 GUI Manager and the 980 To set the IP address of the 980 through the embedded 980 GUI Manager 1 ...

Страница 23: ...touch select the Instrument pull down menu and select Configure 3 A third option for accessing the Instrument Settings dialog box to set the IP address is from the Main window touch select the pop up menu icon on the lower left corner of the 980 built in display and select Configure Network to access the Instrument Settings dialog box to view the current IP address ...

Страница 24: ...rotocol Analyzer User Guide Rev A1 Page 24 December 19 2012 The following dialog box appears 4 If you are wish to allow the 980 s IP address to be set through DHCP services select the DHCP Checkbox as shown below ...

Страница 25: ... for the IP address change to take effect To set the IP address of the 980 through the command line 1 Open up a DOS window on your PC Note This procedure requires a telnet session Use standards Windows OS utilities or third party utilities 2 Establish a telnet session to the 980 using the default IP address as follows telnet 192 168 1 10 You will be prompted with the Pscope login prompt Enter the ...

Страница 26: ... in display through the Connection Properties dialog box to view the current IP address 2 7 3 Establishing a Management Session between the 980 GUI Manager and the 980 HDMI Protocol Analyzer This procedure describes how to establish a management session between your 980 GUI Manager and the 980 The procedure assumes that you have IP addresses provisioned in the 980 and the PC hosting the 980 GUI Ma...

Страница 27: ...d IP information for the 980 that you are trying to connect to below 2 Enter the name any suitable name and IP address of the 980 that you want to connect to in the Add Instrument dialog box above and click on the Add activation button You will see a series of messages on a dialog boxes describing the progress One example is shown below ...

Страница 28: ...you entered appears on the list in the 980 Navigator panel below The 980 GUI Manager application will automatically connect to the 980 once you add the 980 to the application 3 If not already connected Connect to the 980 using either the Connect icon or the Connect item on the right click menu as shown in the screen below Note that you can also double click on the 980 in the Instrument dialog box ...

Страница 29: ...Rev A1 Page 29 December 19 2012 A dialog box appears indicating that a connection is in progress Once the connection is made the information about the connected 980 HDMI Protocol Analyzer is available via the right click menu as shown below ...

Страница 30: ...980 HDMI Protocol Analyzer User Guide Rev A1 Page 30 December 19 2012 ...

Страница 31: ...then displayed in a separate window The information on the Instrument Information window tells you the firmware and hardware release and version information as well as what options you have This information will be helpful if you call Quantum Data customer support during an upgrade process ...

Страница 32: ... topmost HDMI connector on the back of the 980 HDMI Protocol Analyzer labeled Rx Refer to the picture below HDMI sink emulation for source analysis 2 For Pass Through or Encrypted Link Analyzer modes only You will also connect a second HDMI to HDMI cable provided from an HDMI display device to the lower HDMI connector the Tx connector on the back of the 980 HDMI Protocol Analyzer The procedures fo...

Страница 33: ...980 HDMI Protocol Analyzer User Guide Rev A1 Page 33 December 19 2012 HDMI connection for pass through Encrypted Link Analyzer ...

Страница 34: ...es you to examine the data captured by the 980 HDMI Protocol Analyzer through a user friendly graphical interface 3 1 1 Main Window An example of the main window configuration of the 980 GUI Manager is shown in the figure below The 980 HDMI Protocol Analyzer panel can be rearranged and resized using standard windowing control techniques You can also double click on a panel to enlarge it such that ...

Страница 35: ...980 HDMI Protocol Analyzer User Guide Rev A1 Page 35 December 19 2012 You can specify which panels are open on the main window by selecting them from the View Show pull down menu as shown below ...

Страница 36: ...o double click on a panel to enlarge it such that it consumes the entire area of the application The result of double clicking on the Data Decode panel is shown below Note that the icons for the other windows are positioned on the left and right side panels of the application window ...

Страница 37: ... Rev A1 Page 37 December 19 2012 You can redisplay any of the panels by double clicking on the icons You can revert to the default configuration by invoking the Reset Perspective option available in the Window pull down menu as shown below ...

Страница 38: ... the 980 Manager host into the 980 Manager application This can be a capture ACA data EDID or any compliance result The file must be a zip file Export Enables you to export a file that you have highlighted in the 980 Manager The file is compressed to a zip file This can be a capture ACA data EDID or any compliance result Refresh List Enables you to refreshes the list of captures to remove captures...

Страница 39: ...TATUS HDMI or DVI BCAPS Rx 5 Volts Brings up a dialog box that enables you to define various parameters related to the 5V source Shows the current measured voltage level of the source 5V supply Allows you to set the voltage threshold of the source 5V supply Reducing the threshold will enable you to test sources whose 5V level is too low Allows you to set the current load that the 980 applies to th...

Страница 40: ...ou to edit certain information about the 980 that you have selected You can edit the name and IP address Configure Instrument Network Allows you to view and set the network information such as the 980 IP address netmask and gateway IP address Upgrade GUI Application Upgrade GUI Application Enables you to apply an upgrade of the 980 built in GUI You can download new GUI release from the Quantum Dat...

Страница 41: ...to the previous item Milli Seconds HHMMSS ms Time is shown in milliseconds The baseline time is the time from the time of the last boot of the 980 Memory Monitor This is a toggle function which turns on and off the memory monitor A dialog box appears informing you of the memory monitor status View This menu enables you to display the listed panels as follows Navigator Displays the Navigator Panel ...

Страница 42: ...Decode Panel Event Plot Displays the Event Plot Panel Timing Analysis Displays the Timing Analysis Panel Video Analysis Displays the Video Analysis Panel Data Analysis Displays the Data Analysis Panel which can either be the AVmute test results of the Audio Analysis test results Reset Perspective Resets the panel configuration to the default view Help About the 980 Manager Provides release and ver...

Страница 43: ...cons Captures Provides access to the list of captures Compliance Connect Enables you to connect to the selected 980 if you have not already established a connection to it This item will not be available if you have already connected to the selected device Only appears when the Navigator Instrument tab is selected Disconnect Enables you to disconnect from the selected 980 if you have already establ...

Страница 44: ...d the 980 instrument Available for all Navigator tabs except Instruments tab Create new folder Enables you to create a folder under the highlighted directory Available for all Navigator tabs except Instruments and ACA tab Transfer data Opens up the FTP browser enabling you to transfer data between locations on the host PC Available for all Navigator tabs except Instruments and ACA tab Browse Opens...

Страница 45: ...19 2012 Navigator Tabs Item Associated Icons been configured Images Provides access to bitmap image files that have been saved and image library lists that have been configured Instruments Provides access 980s that have been configured through the 980 GUI Manager ...

Страница 46: ... a dialog box that enables you to define various parameters related to the 5V source o Also shows the current measured voltage level of the source 5V supply o Allows one to set the threshold and current load that the 980 applies to the source 5V supply Connect Disconnect Enables you to connect or disconnect to the selected 980 if you have not already established a connection to it This item will n...

Страница 47: ...Upgrade System Components Enables you to apply an upgrade to the 980 HDMI Source Compliance Test application or any other optional application You can download new releases from the Quantum Data website Set License Key This enables you to activate a license for an optional feature you have purchased When you click on this item you will browse for a license key file Qd lic that you have obtained fr...

Страница 48: ...ation Rename Enables you to rename a capture file A useful practice might be to rename the file to include the device tested Delete a Capture Enables you to delete a capture from the 980 Manager application Rename Rename the capture file Capture Listing Status Capture Valid Indicates that the capture completed successfully and all data was saved Capture Invalid Indicates that the capture did not c...

Страница 49: ...er User Guide Rev A1 Page 49 December 19 2012 4 2 Capture Control panel The Capture Control panel enables you to setup the capture parameters The figure below shows the Capture Control panel and its control and selection items ...

Страница 50: ...tion on the left of the location of the trigger event within the captured data The value is expressed as a percent A value of 0 indicates that the trigger event occurs at the beginning of the resulting captured data and 100 indicates that the trigger event occurs at the end of the resulting captured data A value of 50 indicates that the trigger event is in the middle of the captured data Note The ...

Страница 51: ...ata such as the preamble and guard band data You will not be able to see the details of the data island video or audio data Trigger Tab Capture Tab Enables you to specify the trigger condition that you want to use for the capture This could be Vsync Asserted Capture begins when a vsync control is detected Encryption Enabled Capture begins when an encryption enable pulse is detected Encryption Disa...

Страница 52: ... advanced triggering and pre capture filtering function which enables you to specify the triggering and pre capture filtering with a greater degree of detail These advanced features are configured through the Match functional tab under the Capture tab shown below Use and operation of this feature is described in section Using Precision Trigging and Pre Capture Filtering ...

Страница 53: ...t side of the Data Decode panel Once you synchronize the Data Decode panel to a frame you can view the transactions for that frame in the Data Decode panel You can also perform this action in reverse i e from a particular record in the Data Decode panel you can to that frame in the Video Analysis panel by ALT clicking on the transaction or by activating the synchronization button on the top right ...

Страница 54: ...980 HDMI Protocol Analyzer User Guide Rev A1 Page 54 December 19 2012 ...

Страница 55: ...1 Page 55 December 19 2012 4 3 1 Image Viewer The Video Analysis panel enables you view the video pattern or content for a frame in full size by simply double clicking on a frame The screen below shows the Video Image Viewer for a specific frame ...

Страница 56: ...80 G 16 B 16 If the color space is YCbCr the Video Image Viewer will show these values and indicate the color space Deep color values are also shown in either YCbCr or RGB color space You can advance to an adjacent pixel up down or left right using the thick green arrow buttons on the bottom of the Video Image Viewer panel You can advance to the image of an adjacent frame earlier or later using th...

Страница 57: ...The 3D images appear adjacent to one another in the window either side by side or one on top and the other below it for the left and right eyes depending on the 3D structure used The screen shot below shows an example of a 3D image in the Frame Packing format at 720p60 Note the vertical timing 1470 lines shown in the heading area just above the top image ...

Страница 58: ...ge 58 December 19 2012 4 4 Data Decode Panel The Data Decode panel shown below is the primary panel for examining data at the detail level The example shows data captured in the Data Analysis mode where the audio video and data islands are captured ...

Страница 59: ...80 HDMI Protocol Analyzer User Guide Rev A1 Page 59 December 19 2012 The following example shows data captured in the Protocol Analysis mode where the audio video and data islands are not shown in detail ...

Страница 60: ...cking on these buttons opens up dialog box These dialog boxes are described in detail following the table Data Decode Status Icons Function Icons Navigator Data Segment Large captures are broken into smaller distinct sections called segments to make them more manageable and to improve speed and performance When you click on the Segment activation button a dialog box appears enabling you to select ...

Страница 61: ...es you to toggle the view of the Details subpanel The Details subpanel provides human readable text description of the data of the record that is highlighted Raw Data The Raw Data activation button enables you to toggle the view of the hex data on and off Marker icon The Marker icon enables you to flag certain important records for easy identification You can also flag a record by double clicking ...

Страница 62: ...980 HDMI Protocol Analyzer User Guide Rev A1 Page 62 December 19 2012 ...

Страница 63: ...his dialog box is shown below The Selections section on the left lists the segments in the capture The Details section on the right shows you the packet makeup of the segment as well as the number of packets and the range of packets in the overall capture From the Selections panel you can select and load a different segment by highlight a segment and then clicking on the Load Segment activation bu...

Страница 64: ...ch for data in the Data Decode panel using the search function The search function is accessible using the magnifying glass icon on the upper left of the Data Decode panel In the example below a search for the next occurrence of an AVI infoframe is being initiated You can specify a search forward Find Next or backward Find Previous ...

Страница 65: ...ata type or on the tab for each category The screens below show the Post Capture Decode Event Selection panel and its control and selection items In this example all items are checked meaning that the Data Decode panel will show all the data captured Note that you can select or deselect all items on a page with the Select All on Page or Clear All on Page buttons or you can individually select an i...

Страница 66: ...980 HDMI Protocol Analyzer User Guide Rev A1 Page 66 December 19 2012 ...

Страница 67: ...ield Function Packet Lists the packet numbers in sequential order beginning from the first packet captured Timestamp Timestamp Provides the timestamp in nanoseconds for each transaction since the beginning of the captured data Frame Lists the frame number of the record The frame count begins when the capture begins and they are counted sequentially Line Lists the line number of the particular fram...

Страница 68: ...e baseline time is the time from the time of the last boot of the 980 Micro Seconds HHMMSSmsusns Time is shown in microseconds The baseline time is the time from the time of the last boot of the 980 HH MM SS ms us ns Time is shown in relative time meaning the time from the previous event listed Absolute Base Time Time for each item is shown from the time of the beginning of the capture Relative Ti...

Страница 69: ...de panel The vertical axis is the data types The Event Plot panel provides a set of data types labeled on the left of the panel that inform you of the type of data for that layer You can change this configuration The horizontal axis is time The scale along the bottom of the Event Panel shows the timestamp for each point in time The example shows data captured in the Data Analysis mode where the au...

Страница 70: ...searching for specific data types panning scrolling and zooming using various techniques You can filter the data by type to limit the amount of data to sift through You can synchronize the Data Decode and Timing panels to the Event Plot or you can synchronize the Event Plot to the Data Decode panel A scroll bar is provided to enable you to quickly browse through the data The scroll bar is under th...

Страница 71: ...d to the horizontal range that you selected The midpoint of the selection will become the new center of the data displayed Zoom The Zoom function enables you to enter a specific zoom amount in the associated field provided Zoom In Out icons The Zoom In Out function buttons enables you to zoom in and zoom out by clicking on the activation button The centered point will remain the same Panning The p...

Страница 72: ...cates the location of the scroll bar When you scroll or pan through the data the timestamps are shown in the status panel If you use the pointer tool to select a particular point the timestamp and data element will be shown in the center of the dark status panel In the example below a selection has been made on an AVI infoframe either with the pointer tool or in the Data Decode panel ...

Страница 73: ... Plot by clicking and dragging across When you do this the new view will be limited to the horizontal range that you selected The midpoint of the selection will become the new center of the data displayed The two screens below show an example of surrounding a segment of data The dotted indicates the resultant section that is surrounded The second view shows the resulting view ...

Страница 74: ...select data types individually or a page at a time This dialog box is described further below Rows The Rows activation button enables you to configure the data types that appears in the Event Plot window When you click on this icon a dialog box appears enabling you to configure the rows This dialog box is described further below Find The Find activation button enables you to locate captured data b...

Страница 75: ...012 The Event Plot legend panel is shown in the screen shot below The Event Plot Row configuration dialog panel is shown in the screen shot below The default configuration is shown below Simply check the time items that you wish to show in the Event Plot Then click OK ...

Страница 76: ...ng you to select and load another segment This dialog box is shown below The Selections section on the left lists the segments in the capture The Details section on the right shows you the packet makeup of the segment as well as the number of packets and the range of packets in the overall capture From the Selections panel you can select and load a different segment by highlight a segment and then...

Страница 77: ... and right arrows associated with each marker The center icon allows you to center the particular marker on the Event Plot window The screens below show the markers being set and the resulting markers placed in the Event Plot panel Note that you can also set the markers using the right click menu also shown below and this is the preferred method because the markers will appear exactly where you ri...

Страница 78: ...980 HDMI Protocol Analyzer User Guide Rev A1 Page 78 December 19 2012 ...

Страница 79: ...ckets in the audio sample Audio Clock Regeneration The CTS and N values in the ACR packet and the sampling frequency or rate that is calculated using those CTS and N values Channel Status Block Audio type The audio format read from the channel status bits Channel Status Block Sampling Freq Fs The audio format provided in the audio sample packet headers Channel Status Block Original Sampling Freq F...

Страница 80: ... panels such as the Event Plot panel and Data Decode panel by activating the synchronization button on the top left portion of the Frame and Line Statistics panels of the Timing Analysis panel There are several quick navigation buttons on the right side of the panel These enable you to 1 Move up one line 2 Move down one line 3 Move up one page 4 Move down one page 5 Move to the top of the capture ...

Страница 81: ...col Analyzer User Guide Rev A1 Page 81 December 19 2012 The following screen shows and HDMI 4K by 2K format timing Note Support for 4K by 2K is only available on the 980 297MHz Gen 3 version of the Protocol Analyzer ...

Страница 82: ...ines in the active region Vfront The number of lines in the vertical front porch i e the number of lines that occur before the vertical sync pulse Vsync Width The number of pixels within the vertical sync pulse Hsync Polarity The polarity of the horizontal sync pulse Negative Positive Vsync Polarity The polarity of the vertical sync pulse Negative Positive HToVPulse Delay The number of lines after...

Страница 83: ...gins on Encryp Pulse Line The line that the encryption enable pulse occurs on Encryp Length The length of the encryption enable pulse in pixels Line Statistics Frame The frame number in the captured data Line The number of a particular line in the frame Time Stamp Timestamp for the beginning of the frame Provided in nanoseconds in HH MM SS ms us ns Example 2 0 29 807 126 843 2 Hours 0 Minutes 29 s...

Страница 84: ...980 HDMI Protocol Analyzer Rx port In this way you can emulate any EDID in the 980 HDMI Protocol Analyzer to ensure that your source responds correctly to it 4 9 Opening up the EDID Editor You may have many EDIDs stored in the EDID directory of the external GUI Manager suite of directories You can open any one of these EDIDs modify it and resave it under a different name To open an EDID stored on ...

Страница 85: ...980 HDMI Protocol Analyzer User Guide Rev A1 Page 85 December 19 2012 The EDID Editor will then appear in the set of tabs in the GUI as shown below ...

Страница 86: ...980 HDMI Protocol Analyzer User Guide Rev A1 Page 86 December 19 2012 ...

Страница 87: ...In the later case you may have many EDIDs stored in the EDID directory of the external GUI Manager suite of directories You can open any one of these EDIDs modify it and resave it under a different name To open a new EDID 1 Select New EDID from the EDID pull down Edit menu To open an EDID stored on your host PC 2 Access the EDID tab under the Navigator tab as shown below ...

Страница 88: ... Data EDID Library to obtain these EDIDs The EDID Library which uses a naming convention for all its EDIDs these are represented in the screen shot above Also note that there is a 980 EDID Library Application Note available on the EDID Library website which describes how to use the EDID Library with the 980 HDMI Protocol Analyzer Once you load an EDID the name appears on the status strip on the to...

Страница 89: ...dd data blocks delete data blocks add or delete timings or audio formats supported etc You can enable or disable parameters using radio buttons or check boxes and you can change values through pull down menus or text field boxes To make a change to an EDID loaded into the EDID Editor 1 To add a block into an EDID use the pull down menus as shown below adding a Video Data Block into the CEA Extensi...

Страница 90: ...MI Protocol Analyzer User Guide Rev A1 Page 90 December 19 2012 2 Select the block of EDID data that you wish to view or modify using the EDID Elements list on the left of the EDID Editor panel Examples below ...

Страница 91: ...980 HDMI Protocol Analyzer User Guide Rev A1 Page 91 December 19 2012 ...

Страница 92: ...980 HDMI Protocol Analyzer User Guide Rev A1 Page 92 December 19 2012 3 Once you make a change on a particular EDID block you use the Apply button to invoke the change ...

Страница 93: ...dd CEA Audio Data Block Enables you to add a new Audio Data Block to the CEA extension block Add CEA Video Data Block Enables you to add a new Video Data Block to the CEA extension block Add CEA Vendor Specific Data Block General Enables you to add a new Vendor Specific Data Block to the CEA extension block Add CEA Vendor Specific Data Block HDMI Enables you to add HDMI information to new Vendor S...

Страница 94: ...aded an EDID and made your changes it to it you can assign it to the980 HDMI Protocol Analyzer Rx port for emulation and testing your source device This subsection describes how you can do that To assign an EDID to the Rx port 1 Use the EDID pull down menu and select Set 980 Rx EDID The dialog box shown below opens up ...

Страница 95: ...ns on the dialog box The following is a description of each Permanently set the 980 HDMI Protocol Analyzer s EDID This means that the EDID that you provision will persist through a reboot of the 980 Otherwise the default 980 EDID will be reprovisioned when a reboot occurs Issue Hot Plug This means that the 980 HDMI Protocol Analyzer will issue a hot plug when you click the OK activation button on ...

Страница 96: ... View the format resolution color depth video type and specific pixel values DDC Data View the DDC transactions such as the EDID and HDCP transactions and CEC messaging 5 1 Accessing the Real Time mode When you boot up the 980 the 980 HDMI Protocol Analyzer Real Time mode will be displayed by default However once you have selected to view the Capture mode you can navigate back to the Real Time usi...

Страница 97: ...980 HDMI Protocol Analyzer User Guide Rev A1 Page 97 December 19 2012 ...

Страница 98: ...f the Real Time mode The Real Time mode interface is shown in the two example screens below The first screen image shows the Real Time mode without any of the viewing windows open This screen shows you the Real Time mode with only the main control panel on the right and the dashboard on the left and the incoming video image The second screen example shows the Real Time mode with several data panel...

Страница 99: ...980 HDMI Protocol Analyzer User Guide Rev A1 Page 99 December 19 2012 ...

Страница 100: ... This will vary depending on the mode sink emulation pass through encrypted link analyzer In the example here HDCP is active on the Rx port and not active on the Tx port This is what you would expect when the 980 HDMI Protocol Analyzer is in the Sink Emulation mode with an HDMI HDCP protected stream coming into the analyzer port If the module were in the Encrypted Link Analyzer mode both the Rx an...

Страница 101: ...bout the incoming video Scale The Scale button and associated pulldown menu not shown enables you to control how the video image is displayed in the Real Time mode window AVI IF The AVI IF button and associated pulldown menu not shown enables you to show or hide the AVI info panel and pause and resume updates to the panel It also enables you to control which set of data serves as a Reference Frame...

Страница 102: ... the panel and control which set of data serves as a Reference Frame of data that can be used for comparisons with subsequent frames of that type that are collected Back The arrow button enables you to toggle between the current view and the previous view Mode The Mode button opens up dialog boxes that enable you to select the operating mode of the 980 You can control the pass through modes and HD...

Страница 103: ...foframe panel a change in any data that is part of the infoframe such as the video type RGB YCbCr will result in a new distinct view of the data By default the Real Time mode establishes the initial data set as the Reference Frame The initial view is the view of data that occurs when you open up a panel or when you initiate a Clear operation You can change the Reference Frame at any time using a p...

Страница 104: ...he checkbox adjacent to each item to select The 1 1 selection will show the image in its true size because the Real Time window on the built in front panel display does not support higher resolutions much of the content will not be viewable in the window when 1 1 is selected The Full mode enables you to view the entire image When Full is selected you can also select which Aspect Ratio setting to u...

Страница 105: ... and vertical resolution is shown In this example the resolution is 720 by 480 Scanning mode The scanning mode is indicated either progressive or interlaced In the example the scanning mode is progressive Aspect Ratio The aspect ratio is provided on the top line In this example the aspect ratio is 16 9 Color depth The color depth is provided in bits per pixel In this example the color depth is 24 ...

Страница 106: ...xel x y coordinates and the color values for any selected pixel are shown in their format RGB or YCbCr There are a series of arrows on the bottom of the Video Info dialog box These arrows are described below Up Arrow The up arrow enables you to move up to an adjacent pixel to view its color components Down Arrow The down arrow enables you to move down to an adjacent pixel to view its color compone...

Страница 107: ...erscanning applied to the video Active info Indicates whether the Active Format Descriptor is information is valid RGB YCC indicator Indicates whether the incoming video is in the RGB mode or the YCC mode and what sampling mode is used with YCC YCbCr 4 4 4 or 4 2 2 Active format Active format aspect ratio Picture aspect ratio The aspect ratio of the video format transmitted Colorimetry The colorim...

Страница 108: ... Status Bar Pause mode Resume active mode The upper status bar shows the following information from left to right The pause resume active status The type of data panel e g AVI The number of changes defined since you set the reference frame The number of distinct data views in parentheses The total number of frames captured since the panel was opened or since the last clear Lower Control Panel Paus...

Страница 109: ...he integrity of the infoframe Registration ID IEEE Registration ID HDMI Video Format Provides additional information such as 4K by 2K or 3D format structure 3D Structure This is the 3D format structure used This could be one of Frame Packing Field Alternative Line Alternative Side by Side Full L depth L depth Graphics Depth Side by Side half 3D Extra Data Applies when the 3D structure is Side by S...

Страница 110: ...erence frame The number of distinct data views in parentheses The total number of frames captured since the panel was opened or since the last clear Lower Control Panel Pause mode Pause mode after going to the reference frame Resume active mode The lower control panel enables you to control and view the following Set the pause resume active status Go to the Reference Frame must be in paused mode N...

Страница 111: ...s whether the AVmute is set or cleared Color depth Indicates the color depth in bits per pixel Pixel packing phase Indicates the pixel packing phase of the last pixel character sent prior to the GCP when the source is transmitting deep color GCP Pulldown Menu There is a pulldown menu associated with the GCP Info panel You can access either from the main control panel or from the GCP panel via the ...

Страница 112: ... describes these panels Real Time User Type Selection Information Function User Type Selection The following information is provided in a pop up menu when you select User Show Hide Enable or disable the appearance of the panel that you have selected from the Type Selection dialog box Type Opens up the Type Selection panel Pause Halt the updates of the data to the GCP panel Clear Clear the currentl...

Страница 113: ...ion panel Infoframes SPD Infoframe Selects to Source Product Descriptor SPD InfoFrame Audio Infoframe Selects the Audio Infoframe panel MPEG Infoframe Selects the MPEG Infoframe panel User Defined Match Custom This check box activates the associated Edit dialog box Edit Opens up the Data Island Match Editor which enables you to define specific match criteria for viewing ...

Страница 114: ...mation is carried in the audio stream Channel Count Indicates the number of audio channels Sampling frequency Indicates the sampling frequency which can be 32 44 1 48 88 2 96 176 4 or 192kHz Refer to Stream Header indicates that this information is carried in the audio stream Sample size Indicates the sampling size which is 16 20 or 24 bit Refer to Stream Header indicates that this information is ...

Страница 115: ...tatus bar shows the following information from left to right The pause resume active status The type of data panel e g AUD IF The number of changes defined since you set the reference frame The number of distinct data views in parentheses The total number of frames captured since the panel was opened or since the last clear Lower Control Panel Pause mode Pause mode after going to the reference fra...

Страница 116: ...ided in the Source Product Descriptor Infoframe data dialog box Vendor Name The vendor s name Product Description The vendor supplied description of the product Source information This is the product type of the source sink or repeater In this example it is a digital STB SPD Pulldown Menu There is a pulldown menu associated with the SPD Info panel You can access either from the main control panel ...

Страница 117: ...ber of frames captured since the panel was opened or since the last clear Lower Control Panel Pause mode Pause mode after going to the reference frame Resume active mode The lower control panel enables you to control and view the following Set the pause resume active status Go to the Reference Frame must be in paused mode Navigate left or right through the distinct data views must be in paused mod...

Страница 118: ... Descriptor Infoframe data dialog box Vendor Name The vendor s name Product Description The vendor supplied description of the product Source information This is the product type of the source sink or repeater In this example it is a digital STB ACR Pulldown Menu There is a pull down menu associated with the ACR Info panel You can access either from the main control panel or from the ACR panel via...

Страница 119: ...was opened or since the last clear Lower Control Panel Pause mode Resume active mode The lower control panel enables you to control and view the following Set the pause resume active status Go to the Reference Frame must be in paused mode Navigate left or right through the distinct data views must be in paused mode The data view currently displayed The number of distinct data views ...

Страница 120: ...h a custom match trigger and a custom match data you must use different Match Edit dialog boxes For example you might use Match 1 for setting a custom trigger and Match 2 for setting a custom match Advanced Triggering using Match Definition You can trigger on a single condition or multiple conditions in the same data island type using one of the Match definitions Match 1 2 or 3 When you trigger on...

Страница 121: ...ecify that type in the Match definition from the pull down selection menu The example in the figure below shows that the user is defining a trigger condition or pre capture filter based on the value of the video type of the AVI infoframe Note that you will have to know the binary values of the data island field in order to specify the criteria This may require that you refer to the HDMI specificat...

Страница 122: ...the Data Bytes table on the left side of the Data Island Match Editor For example if you want to capture only infoframes you would set the first byte of the header value under Data Bytes to a value that satisfies all infoframes Since all infoframes have an 8 as the first value in the header you would set that value to 80 You would set the corresponding value in the Masks table 7F such that only th...

Страница 123: ... They are described below Link Mode This field shows the current Link Mode which is one of o MHL Not applicable for Gen 2 The 980 HDMI Protocol Analyzer Rx port is enabled for parsing MHL incoming streams o HDMI The 980 HDMI Protocol Analyzer Rx port is enabled for parsing HDMI incoming streams Link field e g Sink Emulation This field shows the current Link Mode which is one of o Sink Emulation Th...

Страница 124: ...CP is active on the 980 HDMI Protocol Analyzer Tx port Ri This field shows the current Ri count since collection began Refresh This button refreshes the Link Mode to ensure that it is current with the setting on the 980 HDCP Mode Setting The upper status bar shows the following information from left to right HDCP Enabled In the Enabled mode the 980 sink emulator Rx port will respond to HDCP authen...

Страница 125: ...980 HDMI Protocol Analyzer User Guide Rev A1 Page 125 December 19 2012 Real Time Link and HDCP Mode Settings Information Function ...

Страница 126: ... traffic for HDMI streams The Real Time viewing of DDC and CBUS traces is only available through the embedded GUI However you can save these ACA traces and then view them with the ACA application off line from a PC 6 1 Accessing the ACA Panel The ACA Real Time viewer can be accessed through the View pulldown menu as shown below The ACA window appears as shown below ...

Страница 127: ...980 HDMI Protocol Analyzer User Guide Rev A1 Page 127 December 19 2012 ...

Страница 128: ...tion The ACA Events panel enables you to view the transaction data in real time There is a details panel associated with the ACA panel that provides additional information about a selected transaction in the ACA Events panel A populated ACA panel with the details panel shown is provided below ...

Страница 129: ...ype of DDC transaction either EDID HDCP or CBUS Transaction Description A description of the transaction ACA Control Menu There is a menu associated with the ACA Info panel It is location on the right side of the panel The ACA pull down menu provides the following functions Home Navigates you back to the Home menu screen of the embedded 980 GUI Manager Back Navigates back to the previous screen in...

Страница 130: ...imum I2C Rate The rate that the DDC channel clock is operating Details text The contents of the transaction in human readable text Details hex The contents of the transaction in hex data There are some control arrows and a status panel on the bottom of the ACA Event Details panel These are as follows Left arrow The left arrow allows you to see the details of the next transaction Right arrow The ri...

Страница 131: ...ubsection 6 3 1 Setting the 980 HDMI Protocol Analyzer mode to HDMI Use the following procedures to set the 980 HDMI Protocol Analyzer to the HDMI mode To set the 980 HDMI Protocol Analyzer mode to HDMI 1 From the Instrument menu select the Link Mode The following menu appears 1 Select the pull down menu as shown below and select the HDMI Monitor checkbox The default mode is HDMI ...

Страница 132: ...eal time The procedures assume that the HDMI source device is powered up and connected to the 980 HDMI Protocol Analyzer Rx port The procedure also assumes that the 980 HDMI Protocol Analyzer is in the HDMI mode The following diagrams depict the test setups There are two configurations 1 you can monitor the DDC transactions with the 980 HDMI Protocol Analyzer emulating an HDMI sink device or 2 you...

Страница 133: ...980 HDMI Protocol Analyzer User Guide Rev A1 Page 133 December 19 2012 Connection for HDMI sink emulation Connection for HDMI Pass through or Encrypted Link Analyzer To monitor the HDMI DDC transactions ...

Страница 134: ...ide Rev A1 Page 134 December 19 2012 1 Touch select the Real Time mode on the built in front panel by touch selecting the GoTo pull down menu and selecting the ACA item You can also access the ACA panel from the Home menu as shown below ...

Страница 135: ...980 HDMI Protocol Analyzer User Guide Rev A1 Page 135 December 19 2012 The ACA panel appears as shown below ...

Страница 136: ...ure by touch selecting the Events button on the ACA panel menu at the right Refer to the screen example above The ACA Event Selection dialog box is shown below with all HDMI events selected for monitoring If you wish to view only a subset of the events deselect the All Events option and then select the specific event ...

Страница 137: ...will see the DDC transactions in the ACA panel as shown below 4 Touch select the Start button on the ACA Menu panel on the right to initiate the viewing of the HDMI HDCP and EDID transactions An example showing monitored data is shown below You can stop or pause the collection at any time using the buttons on the ACA menu panel on the right These are indicated in the screen example below ...

Страница 138: ...ick Previous or Next to locate the item in the transactions 6 4 Viewing HDMI auxiliary channel traces on a PC with the ACA This subsection describes how you can view ACA traces using the ACA viewer off line on your PC In order to view the ACA files on your PC with the 980 GUI Manager application you will first have to transfer them to the PC using the Data Transfer utility The ability to save ACA ...

Страница 139: ...ess the Data Transfer utility by double clicking on the Transfer Data icon The Data Transfer ACA Data dialog box appears below enabling you to select the 980 that you want to transfer data from Select the desired 980 and click OK The Data Transfer ACA Data panel will appear 4 Access the Data Transfer panel by double clicking on the Transfer Data icon 5 The Data Transfer panel appears in context wi...

Страница 140: ...HDMI Protocol Analyzer User Guide Rev A1 Page 140 December 19 2012 6 Highlight a directory on the Local Files side host PC and then initiate a Copy or Move The file appears on the PC host Local Files below ...

Страница 141: ...1 December 19 2012 The data appears in the Navigator panel under the ACA data as shown below 7 Open up the ACA panel to view the transferred file You can access the ACA panel from the View pull down menu below or with the ACA button on the top status bar ...

Страница 142: ...980 HDMI Protocol Analyzer User Guide Rev A1 Page 142 December 19 2012 The Aux Channel Analyzer panel appears 8 Select the Open button to open the ACA file as shown below ...

Страница 143: ...ion is to test distribution network components such as splitters switches and extenders then you would use a known good source device and known good HDMI cables For testing a source you would use the Pixel Error test with a short known good HDMI cable You can also use the Pixel Error test to test an HDMI cable if the two cable ends are not and cannot be collocated The PRN test Cable Test uses a sp...

Страница 144: ...age 144 December 19 2012 The Receiver Real Time panel appears as shown below 2 From the embedded 980 GUI manager if you are currently in the Home screen you can access the Pixel Error test by touch selecting Receiver activation icon as shown below ...

Страница 145: ...work Components with the Pixel Error Test Use the following procedures to setup and test HDMI Distribution Network components This procedure assumes that you are in the Real Time mode through the Receiver application panel To Run the Pixel Error test 1 Connect the source and HDMI distribution network to the 980 HDMI Protocol Analyzer Rx port as shown below ...

Страница 146: ...ecember 19 2012 Connection for running pixel error test on HDMI distribution network Note If you are testing the source or cable the test setup is shown below Connection for HDMI source analysis From the Real Time window select the Tools menu as shown below ...

Страница 147: ...980 HDMI Protocol Analyzer User Guide Rev A1 Page 147 December 19 2012 The Pixel Error test dialog box appears as shown below ...

Страница 148: ...ce frame video image generated from the source as the test in initiated ON or if the test will use a reference frame video image stored on the PC OFF Path This field is used only if Reference Frame Auto is disabled The field indicates the file name and path where the reference frame is obtained from Capture Used only when using a video reference frame stored on the 980 Auto OFF Enables you to capt...

Страница 149: ...pleted Report Enables you to view an HTML report of the test results 2 Use the Continuous checkbox to specify whether you wish to run the test manually for an arbitrary number of frames or for a specific number of frames a For testing with a specific number of frames deselect the Continuous checkbox and enter the number of frames b For testing in the continuous mode select the Continuous checkbox ...

Страница 150: ...m the source under test or use a reference golden frame stored on your 980 a For testing with a reference frame generated from the source during the test select the Auto ON radio button b For testing with a reference frame obtained from the file stored on your 980 select the Auto OFF radio button and then activate the Select button to browse for a file on the 980 ...

Страница 151: ...eference Frame dialog button will appear enabling you to select a reference frame that you have previously captured Select the file and OK or Cancel to start over 4 Activate the Start Analysis button to initiate the test The Frames Analyzed and the Total Errors fields will indicate the progress and status of the test ...

Страница 152: ...mode halt the test using the Stop Analysis button If you are running the test non continuously then the test will stop automatically when the number of frames specified in the Number of Frames field is reached The Frames Analyzed and the Total Errors fields will indicate the progress and status of the test ...

Страница 153: ... Analyzer User Guide Rev A1 Page 153 December 19 2012 6 Touch select the Report button to obtain a report of the results In the example shown below there are no errors The second example shows a report with many errors ...

Страница 154: ...e for pixel data analysis test PDAX CAPF To capture a reference frame for pixel data analysis test PDAX CAPF PDAX GFCA Saves a captured frame to a file This is used as a reference frame golden frame for comparison with subsequent captured frames PDAX GFCA path Where path is the directory path and file name of the stored reference frame If the path is omitted the default path is used To save a capt...

Страница 155: ... 0xb4b4b4 0xebebeb 013 1450 0000 0012 0xb4b4b4 0xebebeb PDAX NERR Get number of errors during a pixel data analysis test PDAX NERR To obtain the number of errors during a pixel data analysis test PDAX NERR 21879466 PDAX PDAU Initiates the pixel data analysis test PDAX PDAU To initiate the pixel data analysis test PDAX PDAU PDAX STOP Stops the pixel data analysis test PDAX STOP To stop a pixel data...

Страница 156: ...pdax gfcl myrefrm2 pdax_gfcl Loading Reference frame myrefrm2 5 Run the pixel error test will run for 255 frames p scope pdax pdau pdax pdau 6 Get statistics for the test p scope pdax stat pdax stat pdax stopped frames 255 threshold 255 errors 0 threshold 255 To Run the Pixel Error test continuously from the command line 1 Set the pixel error test to run continuously p scope pdax nfrs 0 pdax nfrs ...

Страница 157: ...Networks with the PRN Test Use the following procedures to setup and test HDMI cables and Distribution Network components using the Pseudo Random Noise PRN test The PRN test is run in a loop back configuration from the 980 HDMI Protocol Analyzer Tx to the Rx ports This procedures assumes that the 980 GUI Manager is in the Real Time mode in the Receiver application panel To Run the Pseudo Random No...

Страница 158: ...980 HDMI Protocol Analyzer User Guide Rev A1 Page 158 December 19 2012 Pseudo random noise cable or link test 3 From the Real Time window select the Tools menu as shown below ...

Страница 159: ...980 HDMI Protocol Analyzer User Guide Rev A1 Page 159 December 19 2012 The PRN test dialog box appears as shown below ...

Страница 160: ... errors that can be recorded and presented in the Report Enter in the range of 1 top 256 default 100 Continuous A checkbox indicating whether the test runs continuously and requires manual intervention to stop or unchecked with the test stopping after the number specified in Number of Frames Format Pull down menu to selects the format to be used for the test Start Analysis Activation button to ini...

Страница 161: ... Error Rate Indicates the pixel error rate calculation once the test is complete Report Enables you to view an HTML report of the test results 4 Use the Continuous checkbox to specify whether you wish to run the test manually for an arbitrary number of frames or for a specific number of frames a For testing with a specific number of frames deselect the Continuous checkbox and enter the number of f...

Страница 162: ...g in continuous mode halt the test using the Stop Analysis button If you are running the test non continuously then the test will stop automatically when the number of frames specified in the Number of Frames field is reached The Frames Analyzed and the Total Errors fields will indicate the progress and status of the test 6 Touch select the Report button to obtain a report of the results ...

Страница 163: ...a for information on how to establish a command line session with the 980 Commands for Pseudo Random Noise Test Note Commands are not case sensitive Command Description Syntax Command Example PRNG NFRS Set number of frames to analyze in pseudo random noise test PRNG NFRS frames Where frames is the number of frames to capture and compare during the test Enter 0 to run the test in continuous mode wh...

Страница 164: ...rovide a detailed report for up to 1000 errors To set maximum number of detailed errors to record in pseudo random noise test to 100 PDAX MXER 100 PRNG ERRQ Get one or more recorded detailed error records Returns the following Frame number that an error occurred X Y coordinate that the error occurred The measured red component value The measured green component value The measured blue component va...

Страница 165: ...case sensitive To Run the Pseudo Random Noise PRN test from the command line 1 Set the resolution using the following command e g 720p60 at 24 bit deep color prng pnst 720p60c24 2 Specify the number of errors you wish to see detailed information on p scope prng mxer 100 prng mxer 100 3 Initiate the pseudo random noise test p scope prng pnau prng pnau 4 Stop the pseudo random noise test p scope prn...

Страница 166: ...rational configuration you are using 1 Sink Emulation 2 Pass Through 3 Encrypted Link Analyzer If you are using the Pass Through or Encrypted Link Analyzer configuration connect an HDMI display device to the HDMI Tx port If using the Sink Emulation mode you do not need to connect any device to the HDMI Tx port 3 Setting the desired HDCP mode enabled or disabled 4 Set the 5V threshold level 5 Confi...

Страница 167: ...980 HDMI Protocol Analyzer User Guide Rev A1 Page 167 December 19 2012 The following menu appears 2 Select the pull down menu as shown below and select the HDMI Monitor checkbox The default mode is HDMI ...

Страница 168: ...vice to the HDMI Tx port If using the Sink Emulation mode you do not need to connect any device to the HDMI Tx port Use the following procedures to select the configuration mode Note The procedures in this subsection assume that you are capturing data in the Sink Emulation Mode The procedures for capturing data in the Pass Through and Encrypted Link Analyzer mode are provided later in this User Gu...

Страница 169: ... User Guide Rev A1 Page 169 December 19 2012 The following menu appears 1 Select the pull down menu as shown below and select the HDMI Monitor checkbox The default mode is HDMI The Link Mode menu will show HDMI as the Link Mode ...

Страница 170: ...ypted Link Analyzer Optional In the Encrypted Link Analyzer configuration the 980 HDMI Protocol Analyzer HDMI Rx port is connected to the source device under test and the 980 HDMI Protocol Analyzer HDMI Tx port is connected to a sink device The Encrypted Link Analyzer configuration enables you to monitor and analyze HDCP encrypted protocol data transmitted between an HDMI source device and sink de...

Страница 171: ...n HDCP authentication request BSTATUS This check box enables you to toggle between the 980 HDMI Protocol Analyzer sink emulator responding to a source HDCP authentication by indicating in its BSTATUS register that it is or is not in HDMI mode Set BCAPS This check box opens up a dialog box enabling you to configure the bits of the BCAPS register The Edit dialog box is shown below You can set the bi...

Страница 172: ...s The 980 enables you to view the 5V levels from the source device under test and to set the current load on the 5V lead 1 Select the RX 5 Volts item from the Instrument pull down menu on the built in front panel as shown below The RX 5V Status Configuration dialog box is displayed as shown below ...

Страница 173: ...en hit Refresh to view the new value You may wish to lower the threshold to enable testing of a source whose 5V level is too low If you specify a threshold higher than the voltage detected there will be no effect on the ability to test 3 Select the current Load using the lower slidebar provided Increasing the current load will cause the detected voltage to fall Be sure to select the Apply button T...

Страница 174: ...Data website on the downloads page http www quantumdata com support 980readme asp edid You can download these EDIDs to the host PC where the 980 GUI Manager is running Select an EDID file by activating the Set 980 Rx EDID shown on the screen below The dialog box shown below opens up 2 Select an EDID to assign to the 980 HDMI Protocol Analyzer s Rx port Click Ok after selecting the EDID Note that t...

Страница 175: ... read of the EDID on the Tx port the following dialog box will appear 4 Assign a name to the EDID and then click Ok to save the EDID for use on the 980 Rx port 8 8 Viewing Incoming Video Built Embedded GUI only Prior to a capture you may wish to view the incoming video from the source device under test This subsection describes how to use the 980 HDMI Protocol Analyzer to view live video Please no...

Страница 176: ...xternal 980 GUI Manager however once you power cycle the 980 HDMI Protocol Analyzer it will be removed To view incoming video on the 980 use the following procedure examples use HDMI 1 Ensure that you are sending video from your source device under test 2 Select the Real Time mode on the built in front panel by touch selecting the Receiver Mode item on the top banner ...

Страница 177: ... Rev A1 Page 177 December 19 2012 A video image appears in the Real Time panel An example is shown below You can adjust the image viewing area using the Image Scale dialog box which is accessible from the Video pop out menu as shown below ...

Страница 178: ...ate used to show the incoming video Selecting Low reduces the frame rate The High selection will display the video in its native frame rate Aspect Ratio The Aspect Ratio options can be set only if the Mode is set to Full The Fit option will cause the image to be scaled such that it occupies the entire window The H V option will display the image at its native aspect ratio with letter boxing used t...

Страница 179: ...riggering 1 optional If you are going to be taking some action on the device under test that will halt video such as unseating and reseating the HDMI cable you will need to check the Video Check box in the Capture Configuration section of the Capture Control dialog box 2 Check the Generate Hot Plug on Capture Start button if you want the 980 to issue a hot plug to initiate HDCP authentication You ...

Страница 180: ...The manual trigger is particularly useful when you are observing the behavior of a connected sink and then manually initiating the trigger when a particular symptom exhibits itself Typically you should move the trigger position to the right nearer the 100 mark This way you ensure that there is data prior to the trigger event by accounting for reaction time between the time the symptom occurs and y...

Страница 181: ... Page 181 December 19 2012 7 Select the trigger Condition 8 optional Specify the Data Island Match for advanced triggering and pre capture filtering Refer to Using Precision Trigging and Pre Capture Filtering 9 Click on the Execute Capture button ...

Страница 182: ...ata A series of dialog boxes will appear showing the capturing in progress one example shown below Note If there is some action that needs to be taken by a user in order to cause the trigger condition occur the capture dialog box will stating Waiting for capture trigger to occur This is shown in the following screen shot ...

Страница 183: ...ber 19 2012 When the 980 HDMI Protocol Analyzer is done capturing data a decode file is shown in the Event Plot panel and the Data Decode panel The screen example below shows data captured using the Data Analysis mode with video and audio data captured as well ...

Страница 184: ...low The minimum voltage required to activate the external trigger is 2 1 volts The pulse duration of the External Trigger must be greater than 1 TMDS pulse clock period The Trigger Input is on the rear of the 980 It is the top most BNC connector There are a few 980 configurations the most common are shown below 8 11 Using Manual Triggering In addition to the triggers provided in the pull down menu...

Страница 185: ...are used in the Pass through or Encrypted Link Analyzer mode In these modes there is a display connected to the 980 HDMI Protocol Analyzer Tx port A common application would be to observe the connected display and when it exhibits the behavior you are looking for you can initiate the manual trigger ...

Страница 186: ...ere you define the advance triggering and pre capture filtering Note If you are going to set both a custom match trigger and a custom match data you must use different Match Edit dialog boxes 8 12 1 Advanced Triggering using Match Definition You can trigger on a single condition or multiple conditions in the same data island type using one of the Match definitions Match 1 2 or 3 When you trigger o...

Страница 187: ... based on the value of the video type of the AVI infoframe Note that you will have to know the binary values of the data island field in order to specify the criteria This may require that you refer to the HDMI specification and CEA 861 D There are two tables on the left side of the panel Data Bytes and Masks You do not have to set the Masks they will be set for you when you select an item under t...

Страница 188: ...ing the Data Bytes table on the left side of the Data Island Match Editor For example if you want to capture only infoframes you would set the first byte of the header value under Data Bytes to a value that satisfies all infoframes Since all infoframes have an 8 as the first value in the header you would set that value to 80 You would set the corresponding value in the Masks table 7F such that onl...

Страница 189: ...pened up a previously captured data file 8 13 1 Viewing Data Analysis captures through the Data Decode panel This subsection provides procedures for viewing the captured data taken using one of the Data Analysis capture modes through the Data Decode panel in the 980 GUI Manager To view captured data through the Data Decode panel 1 To view the protocol data transactions on the Data Decode panel act...

Страница 190: ... AVI infoframe record to view its contents as shown below The Data Decode window above shows the AVI Infoframe data record selected The AVI infoframe contents are parsed out in human readable text on the upper panel The hex representation of the contents is presented in the lower panel ...

Страница 191: ...User Guide Rev A1 Page 191 December 19 2012 3 Highlight a Vendor Specific infoframe record to view its contents The example below shows a Vendor Specific infoframe where the HDM source is transmitting 3D content in Frame Packing ...

Страница 192: ...otocol Analyzer User Guide Rev A1 Page 192 December 19 2012 4 Highlight a General Control Packet record to view its contents as shown below 5 Highlight an audio infoframe record to view its contents as shown below ...

Страница 193: ... Highlight an Audio Clock Regeneration packet record to view its contents as shown below 7 Highlight an audio sample packet record to view its contents as shown below The number of channels and samples are provided and the content of the samples is shown in the lower panel ...

Страница 194: ...shown in the detailed data window when it is fully acquired i e after the 192 frames are all captured There are two blocks one for each subframe A and B The first subframe A corresponds to the Left channel and the second subframe B corresponds to the Right channel You can determine when the channel status bits begin to be acquired by looking at the top section of the Details panel not shown below ...

Страница 195: ...980 HDMI Protocol Analyzer User Guide Rev A1 Page 195 December 19 2012 9 Highlight a DDC transaction to view its contents as shown below The example below shows a BCAPS register read ...

Страница 196: ...n the Data Decode and Event Plot panels activate the Data Decode and Event Plot tabs The screen example below shows data captured using the Protocol Analysis mode The preamble data is shown as a distinct data type in both the Event Plot and the Data Decode The guard band data is shown as part of the Video data period in the example 8 13 3 Filtering the data in the Data Decode panel The procedures ...

Страница 197: ... 197 December 19 2012 1 From the Data Decode panel select the Events activation button to access the Decode Event Selection dialog box The Decode Event Selection dialog box is shown below In the example below only some of the data islands are selected ...

Страница 198: ...lies to the Event Plot panel 3 Click the OK button on the bottom right to set your selections or click on the Cancel button to exit without saving the changes Note that you can clear all the selections on all pages with the Clear All activation button on the top left Alternatively you can select all items on all pages with the Select All activation button You can also apply the same Select and Cle...

Страница 199: ... can also search for a variety of control events such as the occurrence of Avmute in an ACR packet or a Vsync Hsync The default is to search Forward which is a search for events that occur later in time You can change that to search backward by selecting associated radio button A dialog box appears that enables you can enter search criteria In this example we will search for an Audio Clock Regener...

Страница 200: ...Field Type and then select Capture Trigger under Sub Type as shown below 8 13 5 Viewing data through the Event Plot panel The Event Plot panel provides you with a graphical view of the data It enables you to see relationships between the various data types on a time line A sample screen of the Event Plot is shown below The operation of the Event Plot is described at Event Plot Panel ...

Страница 201: ...ber 19 2012 The screen example below shows data captured using the Protocol Analysis mode The preamble data is shown as a distinct data type in both the Event Plot and the Data Decode The guard band data is shown as part of the Video data period in the example ...

Страница 202: ...80 HDMI Tx port is connected to a sink device The Encrypted Link Analyzer configuration enables you to monitor and analyze HDCP encrypted protocol data transmitted between an HDMI source device and sink device Note that you will not be able to view the HDCP transactions between the source and the sink With the Encrypted Link Analyzer you can investigate HDMI interoperability while the content is e...

Страница 203: ... device to the bottom HDMI connector on the back of the 980 HDMI Protocol Analyzer Refer to the connection diagrams above above 3 Power up the 980 HDMI Protocol Analyzer using the power rocker switch on the back Then press the power on button on the front panel 9 2 1 Configuring the 980 with an EDID When in Pass Through mode the EDID of the far end display is passed through to the source device un...

Страница 204: ...ding video from your source device under test 2 Select the Mode item from the Instrument pull down menu on the built in front panel as shown below The mode dialog box appears as shown below 2 Select the Pass Through Link Mode item from the pull down menu on the built in front panel as shown below ...

Страница 205: ... HPD checkbox will replicate the hot plug signal from the TX side an attached sink device on the RX side like a hot plug repeater 9 2 3 Setting the 980 HDMI Protocol Analyzer mode to HDMI Use the following procedures to set the 980 HDMI Protocol Analyzer to the HDMI mode To set the 980 HDMI Protocol Analyzer mode to HDMI 2 From the Instrument menu select the Link Mode ...

Страница 206: ... User Guide Rev A1 Page 206 December 19 2012 The following menu appears 3 Select the pull down menu as shown below and select the HDMI Monitor checkbox The default mode is HDMI The Link Mode menu will show HDMI as the Link Mode ...

Страница 207: ... 2GB of data which is about 1150 frames at 576p 480p and about 204 frames at 1080p which includes the video If you do not want to capture the video and only capture the metadata you can store well over 100 000 frames of data 4 Set the Trigger Position within the Buffer slidebar to a percent value to meet your requirements This slide bar enables you to set the position of the trigger event within t...

Страница 208: ...option does 7 Select the Trigger selection Condition Note If you wish to define a precise trigger using the Match feature refer to section Defining Precision Triggering and Pre Capture Filtering 8 optional Specify the Data Island Match for advanced triggering and pre capture filtering Refer to the Panel Descriptions section in Chapter 2 Overview of the 980 Manager GUI 9 Click on the Execute Captur...

Страница 209: ...progress one example shown below Note If there is some action that needs to be taken by a user in order to cause the trigger condition occur the capture dialog box will stating Waiting for capture trigger to occur This is shown in the following screen shot When the 980 HDMI Protocol Analyzer is done capturing data a decode file is shown in the Event Plot panel and the Data Decode panel ...

Страница 210: ...yze HDCP encrypted protocol data transmitted between an HDMI source device and sink device With the Encrypted Link Analyzer you can investigate HDMI interoperability while the content is encrypted by viewing the protocol data data islands infoframes control and timing data in real time and observing the behavior of the downstream sink device You can also capture the encrypted metadata and store it...

Страница 211: ...e EDID 1 optional Load the EDID to use in the 980 HDMI Protocol Analyzer This is the EDID that the 980 will be emulating The default EDID in the 980 HDMI Protocol Analyzer has a preferred timing of 1080p60 with a maximum TMDS rate of 165MHz You can provision the 980 with a different EDID Sample EDIDs are available from the Quantum Data website on the downloads page http www quantumdata com support...

Страница 212: ...s Through mode or the Encrypted Link Analyzer mode you can use the EDID of the downstream HDTV If you wish to use the EDID of the downstream HDTV or a different EDID from some other HDTV that you have available you can quickly provision the 980 HDMI Protocol Analyzer with that EDID by connecting the HDTV to the 980 HDMI Protocol Analyzer s Tx port and then initiating a Read 980 Tx EDID from the ED...

Страница 213: ...ink Analyzer When using the Encrypted Link Analyzer configuration you will connect an HDMI display device to the HDMI Tx port 1 Ensure that you are sending video from your source device under test 2 Select the Link Mode item from the Instrument pull down menu on the built in front panel as shown below 3 The mode dialog box appears as shown below 4 Use the pull down menu on the Link Mode dialog box...

Страница 214: ...12 9 3 3 Setting the 980 HDMI Protocol Analyzer mode to HDMI Use the following procedures to set the 980 HDMI Protocol Analyzer to the HDMI mode To set the 980 HDMI Protocol Analyzer mode to HDMI 1 From the Instrument menu select the Link Mode The following menu appears ...

Страница 215: ...or checkbox The default mode is HDMI The Link Mode menu will show HDMI as the Link Mode 9 3 4 Setting the 5V levels The 980 enables you to view the 5V levels from the source device under test and to set the current load on the 5V lead 1 Select the RX 5 Volts item from the Instrument pull down menu on the built in front panel as shown below ...

Страница 216: ... box is displayed as shown below 2 Note the current Measured 5V level 4 98 in the example above 3 Select the Threshold Level using the upper slidebar 0 0 to 5 3V Be sure to select the Apply button Then hit Refresh to view the new value You may wish to lower the threshold to enable testing of a source whose 5V ...

Страница 217: ...fresh to view the new value 9 3 5 Setting the HDCP mode The 980 HDMI Protocol Analyzer enables you to enable and disable HDCP on the Rx sink emulation port This enables you to test how your source device under test responds to a sink that does not support HDCP You can also configure certain HDCP configuration registers such as the BSTATUS and BCAPS Use the following procedures to set the HDCP mode...

Страница 218: ...the bits of the BCAPS register The dialog box is shown below You can set the bits by clicking on that bit Clicking on any one bit will toggle the binary value The hex value of the BCAPS register is shown in the field above the bit values 80 in the example below 9 3 6 Initiating a Capture Typically in the Capture mode you will want to specify a manual capture when using the Encrypted Link Analyzer ...

Страница 219: ...t provides an indication on the left of the location within the captured data expressed as a percent with 0 indicating that the trigger event occurs at the beginning of the captured data and 100 indicating that the trigger event occurs at the end of the captured data Note When using a Manual trigger it is important to set the Trigger Position to ensure that there is some captured data prior to the...

Страница 220: ...ng and pre capture filtering Refer to the Panel Descriptions section in Chapter 2 Overview of the 980 Manager GUI 9 Click on the Execute Capture button The 980 Protocol Analyzer will capture the data A series of dialog boxes will appear showing the capturing in progress one example shown below Note If there is some action that needs to be taken by a user in order to cause the trigger condition occ...

Страница 221: ...980 HDMI Protocol Analyzer User Guide Rev A1 Page 221 December 19 2012 When the 980 Protocol Analyzer is done capturing data a decode file is shown in the Event Plot panel and the Data Decode panel ...

Страница 222: ...ce The setup procedures described above in the section Analyzing HDMI Data with your 980 Protocol Analyzer should be followed for the timing tests These setup procedures are listed below 1 Configure the 980 HDMI Protocol Analyzer in the proper mode HDMI 2 Set the threshold of the 5V 3 Configure the 980 HDMI Protocol Analyzer Rx port with the proper EDID 4 View the incoming video in real time to ch...

Страница 223: ...4 Select the Capture tab under the Options section of the Capture Control panel 5 Select Data Analysis Audio Video Data Islands in the Data Selection Type pull down menu provided as shown below Then make sure you check the Timing check box 6 Select Vsync Asserted for the Trigger Selection condition 7 Click on the Execute Capture button to initiate the test The 980 Protocol Analyzer will capture th...

Страница 224: ...ates the standard format timing that the timing parameters detected from the source match If there is not a precise match between the timing parameters of a format in the 980 HDMI Protocol Analyzer format library and the measured values the 980 will select the format nearest to the values measured and indicate any parameters that deviate from that standard timing The Frame Statistics panel shows t...

Страница 225: ...980 HDMI Protocol Analyzer User Guide Rev A1 Page 225 December 19 2012 ...

Страница 226: ...de Rev A1 Page 226 December 19 2012 You can view captured 3D timing in the Timing Analysis panel The screen shot below shows an example of a 3D timing data for the Frame Packing format at 720p60 Note the vertical active timing 1470 lines ...

Страница 227: ...e HDMI 2 Set the threshold of the 5V 3 Configure the 980 Rx port with the proper EDID 4 View the incoming video in real time to check the status of the device under test To run the video analysis test 1 Select the 980 HDMI Protocol Analyzer that you are using to capture the data from your HDMI source device under test from the pull down menu 2 Set the Capture Buffer Size slidebar to a percent valu...

Страница 228: ...rted for the Trigger Selection condition 7 Click on the Execute Capture button to initiate the test The 980 Protocol Analyzer will capture the data including the video data A series of dialog boxes will appear showing the capturing in progress one example shown below Note If there is some action that needs to be taken by a user in order to cause the trigger condition occur the capture dialog box w...

Страница 229: ...ails in the Video Analysis panel The Video Analysis panel enables you to view the captured video images It provides thumbnails of each captured frame Note You cannot view video frames of video that is encrypted with HDCP The Video Analysis will show blue thumbnails and the word Encrypted will be shown in the upper left corner of the panel as shown below ...

Страница 230: ...980 HDMI Protocol Analyzer User Guide Rev A1 Page 230 December 19 2012 ...

Страница 231: ...the pixel values for any pixel by moving your mouse over the pattern In the example below pixel x 537 y 184 is selected Its RGB color values are R 180 G 16 B 16 If the color space is YCbCr the Video Image Viewer will show these values and indicate the color space Deep color values are also shown in either YCbCr or RGB color space You can advance to an adjacent pixel up down or left right using the...

Страница 232: ...980 HDMI Protocol Analyzer User Guide Rev A1 Page 232 December 19 2012 These are shown in the screen image below ...

Страница 233: ...3D image in the Frame Packing format at 720p60 Note the vertical timing 1470 lines shown in the heading area just above the top image 9 Navigate to the Data Decode panel by first synchronizing the Data Decode Panel to the Video Analysis panel and then activating the Data Decode panel The Video Analysis panel is shown in the screen image below The Video Analysis panel can synchronize with the Data ...

Страница 234: ...dio analysis tests These setup procedures are listed below 1 Configure the 980 HDMI Protocol Analyzer in the proper mode HDMI 2 Set the threshold of the 5V 3 Configure the 980 HDMI Protocol Analyzer Rx port with the proper EDID 4 View the incoming video in real time to check the status of the device under test To run the audio analysis test 1 Select the 980 that you are using to capture the data f...

Страница 235: ...lyzer User Guide Rev A1 Page 235 December 19 2012 4 Click on the Audio Test to initiate the Audio Analysis test The results are shown in the Data Analysis panel in the main window of the 980 Manager A sample is shown below ...

Страница 236: ...elow 1 Configure the 980 HDMI Protocol Analyzer in the proper mode HDMI 2 Set the threshold of the 5V 3 Configure the 980 HDMI Protocol Analyzer Rx port with the proper EDID 4 View the incoming video in real time to check the status of the device under test To run the AVmute test 1 Select the 980 that you are using to capture the data from your HDMI source device under test 2 Set the Capture Buffe...

Страница 237: ...he AVmute test when you initiate it 4 Select the Std Tests tab under the Options section of the Capture Control panel below 5 Click on the AVmute Test to initiate the AVmute test The 980 Protocol Analyzer will capture the data including the timing data A series of dialog boxes will appear showing the capturing in progress one example shown below Note If there is some action that needs to be taken ...

Страница 238: ...980 HDMI Protocol Analyzer User Guide Rev A1 Page 238 December 19 2012 The results are shown in the Data Analysis panel in the main window of the 980 Manager A sample is shown below ...

Страница 239: ...980 HDMI Protocol Analyzer User Guide Rev A1 Page 239 December 19 2012 ...

Страница 240: ...ysis 11 1 1 Loading an existing capture Use the following procedures to load a capture that you have listed in the 980 GUI Manager for the 980 HDMI Protocol Analyzer You can load a file in one of three ways Double clicking on the captured file in the Captures panel Accessing the Open option from the right click menu of a selected capture in the Data pull down menu Clicking on the Open icon in the ...

Страница 241: ...n that case the colleague can simply download the 980 GUI Manager from the Quantum Data website to view the captured files that you sent them Of course it may be the case that your colleague is sending you a set of captured files as well Typically the file would be posted on an FTP site as a zip file You would then need to download the file unzip it and then access it by browsing utilities provide...

Страница 242: ...available in the Start Menu under All Programs Quantum Data and also from an icon on your Desktop 5 Verify that the version number in the title bar matches the version on the website Importing capture files 1 Download the captures zip file from your FTP site save it and unzip it on your PC that now has the 980 GUI Manager installed 2 Import a previous capture using the Import utility available fro...

Страница 243: ...ide Rev A1 Page 243 December 19 2012 3 Select Import A dialog box will appear enabling you to select which data type EDID Capture etc you want to import In this example you want to import a capture Select Capture and click Ok see below ...

Страница 244: ... Protocol Analyzer User Guide Rev A1 Page 244 December 19 2012 You will be asked to browse for a file through a standard Windows dialog Once you select the file you will see a progress dialog box as shown below ...

Страница 245: ...ure is the one that is loaded Relocating capture files to the 980 GUI Manager directory If you receive a capture file from a colleague for analysis you will need to be able to access it on your 980 GUI Manager To do this you will need to place the file in a directory that the 980 GUI Manager will be able to access it Use the following procedures 1 Download the captured zip file from your FTP site ...

Страница 246: ... Navigator Data panel and then selecting Browse below A Windows Explorer window will appear at the captured file From there you can determine the location of the captures directory 4 Transfer the capture directory from the file you unzipped to the 980 GUI Manager captures directory using standard Windows methods The screen example below shows the resulting files stored in the captures directory ...

Страница 247: ...980 HDMI Protocol Analyzer User Guide Rev A1 Page 247 December 19 2012 When you relaunch the 980 GUI Manager you will see all the capture files that you transferred to the captures directory ...

Страница 248: ... drive 3 command line FTP 12 1 Transferring Capture Files using the Data Transfer Utility You can transfer files easily using the 980 GUI Manager s Data Transfer utility Follow the procedures below To transfer ACA files from the 980 to your PC using the Data Transfer utility 1 Through the external 980 GUI Manager access the Generator Port Control panel either through the View pull down menu or the...

Страница 249: ...he Data Transfer panel appears in context with the ACA files on the 980 Instrument under the Instrument Files available as shown below 3 Highlight a directory on the Local Files side host PC and then initiate a Copy or Move The file appears on the PC host Local Files below ...

Страница 250: ... through the View pull down menu or the Generator button located on the top of the interface Refer to the screen shots below Note This procedures shows examples of transferring ACA traces capture files and Playback files but you can transfer EDIDs ImageLists or any other type of data type under the Navigator tab 2 Access the Data Transfer utility by double clicking on the Transfer Data icon on one...

Страница 251: ...abling you to select the 980 HDMI Protocol Analyzer that you want to transfer data from Select the desired 980 HDMI Protocol Analyzer and click OK The Data Transfer Playback panel will appear The Data Transfer panel appears in context with the ACA files on the 980 Instrument under the Instrument Files available as shown below ...

Страница 252: ...ransfer Capture files from the 980 to your PC using the Data Transfer utility 1 Through the external 980 GUI Manager access the Generator Port Control panel either through the View pull down menu or the Generator button located on the top of the interface Refer to the screen shots below 2 Access the Data Transfer utility by double clicking on the Transfer Data icon on one of the data sets in the N...

Страница 253: ...ling you to select the 980 HDMI Protocol Analyzer that you want to transfer data from Select the desired 980 HDMI Protocol Analyzer and click OK The Data Transfer Capture Data panel will appear The Data Transfer panel appears in context with the Capture files on the 980 Instrument under the Instrument Files available as shown below ...

Страница 254: ...ou can transfer files from the 980 to the PC 1 using an FTP utility 2 using the FTP command or 3 saving the files to a USB drive connected to the 980 Instructions for transferring files using the command line FTP and saving to a USB are provided Procedures for transferring the captured files using an FTP utility such as FileZilla are not provided Please refer to the user documentation provided wit...

Страница 255: ...er You will want to transfer the log files at a minimum You may also want to transfer the img files for the video thumbnails 7 Exit the FTP command line with the following command ftp bye 8 Recreate the directory with an appropriate name in the 980 GUI Manager s working directories quantumdata 980Manager 980mgr workspace captures 9 Move the pdecode log file and other files that you transferred to ...

Страница 256: ...evel Edit pull down menu and select Copy 7 Touch select the lower left button just above the Start button to change the left panel view You should see qd Desktop USB flash disk and 2 GB Volume if you touched the correct button on lower left 8 Touch select the USB flash disk to change the right panel view to show the USB thumb drive s contents 9 Touch any white space on the right panel to focus it ...

Страница 257: ...ed tests Test ARC on an HDMI A V receiver ARC Rx The 980 can emulate an ARC Tx device in order to test an ARC capable HDMI source device s ARC Rx response to an ARC stream Test ARC on an HDMI sink ARC Tx The 980 can analyze the audio from an ARC Tx device by emulating an ARC Rx device The 980 s HEAC control panel is shown in the screen example below You may first have to enable viewing of the HEAC...

Страница 258: ... configuring the HEAC functions you click on the activation buttons within the panel The status of each selection is indicated on the simulated LED indicators to the left of the activation button Green indicates that the function associated with the activation button is active ...

Страница 259: ...l is from an external source connected to the SPDIF In port on the 980 HDMI Protocol Analyzer Specifies that the source of the audio for the ARC channel is from the internal audio source on the 980 main board MB Audio Turns off the audio from the main board that is used as the ARC source Turns on the audio from the main board that is used as the ARC source CDC HPD Specifies that the hot plug indic...

Страница 260: ...determine if your HDMI source device typically an A V receiver can properly handle an audio return channel stream Refer to the diagram below for a depiction of the general test setup To test the ARC handling by an HDMI source ARC Rx 1 Connect an HDMI 1 4a cable from the HDMI 1 4a A V receiver to the 980 HDMI Protocol Analyzer Rx port 2 Determine the HEAC mode for ARC that you wish to test with and...

Страница 261: ...zer s internal SPDIF source select the appropriate button in the RX HEAC Control ARC Source subpanel as shown below You will also have to enable audio on the 980 Main Board as shown below 5 When using an external SPDIF source select the appropriate button in the RX HEAC Control ARC Source subpanel as shown below ...

Страница 262: ... on an HDMI sink ARC Tx The procedures below describe how to use the 980 HDMI Protocol Analyzer to emulate an ARC Rx device HDMI A V Receiver in order to test an HDMI sink ARC Tx The 980 can parse SPDIF audio from an incoming ARC stream The 980 HDMI Protocol Analyzer displays basic information about the SPDIF audio is provided in the SPDIF Analysis tab Refer to the diagram below for a depiction of...

Страница 263: ... the HEAC mode for ARC that you wish to test with and then activate that mode by clicking on the appropriate activation button For example if you wish to test ARC in the Single Mode you would select the appropriate button in the TX HEAC Control HEAC Mode subpanel as shown below 3 View the audio parameters from the SPDIF Analysis Panel as shown below The detected sampling rate is shown and the Chan...

Страница 264: ...Analyzer User Guide Rev A1 Page 264 December 19 2012 4 Optional Connect a SPDIF audio analyzer to the SPDIF Out RCA connector on the rear of the 980 as indicated in the image below Protocol Analyzer module configuration ...

Страница 265: ...ce The procedures below describe how to read the EDID of an HDMI sink device To make the physical connections for an HDMI display 1 Connect the HDMI to HDMI cable provided from your HDMI sink device under test to the bottommost HDMI connector on the back of the 980 HDMI Protocol Analyzer Refer to the picture below Connection for HDMI sink testing To read an EDID from a connected HDMI display or si...

Страница 266: ...980 HDMI Protocol Analyzer User Guide Rev A1 Page 266 December 19 2012 ...

Страница 267: ...Protocol Analyzer User Guide Rev A1 Page 267 December 19 2012 The Generator panel appears as shown below 2 Establish a connection between the 980 GUI Manager and the 980 using the Connect button identified above ...

Страница 268: ...Page 268 December 19 2012 3 Click on the EDID Decode button on the left to access the EDID utility Refer to the screen example below 4 Click on the Read button to display the EDID of the connected display or sink Refer to the screen example below ...

Страница 269: ... EDID by Block or Page using the arrow elements at the bottom of the panel Resize the panel if desired by the square area on the lower right Refer to the screen example below 6 If necessary refresh the EDID display with the Refresh button This is useful if you have connected a different display ...

Страница 270: ...ge 270 December 19 2012 7 Optional Save the EDID to a file on your host PC using the Save button on the top of the panel The Save dialog box will appear enabling you to assign a name and directory to store the file Refer to the screen example below ...

Страница 271: ...mber 19 2012 To load an EDID from a file stored on your host PC 1 Through the external 980 GUI Manager access the Generator panel either through the View pull down menu or the Generator button located on the top of the interface Refer to the screen shots below ...

Страница 272: ...r User Guide Rev A1 Page 272 December 19 2012 The Generator panel appears as shown below 2 Optional Establish a connection between the 980 GUI Manager and the 980 HDMI Protocol Analyzer using the Connect button identified above ...

Страница 273: ...of the panel The Load EDID dialog box appears as shown below 4 Select the EDID you wish to view and then select OK 5 Navigate through the EDID by Block or Page using the arrow elements at the bottom of the panel Resize the panel if desired by the square area on the lower right Refer to the screen example below ...

Страница 274: ...980 HDMI Protocol Analyzer User Guide Rev A1 Page 274 December 19 2012 ...

Страница 275: ... enables you to reuse captures from source devices in a consistent way In some cases you might encounter a source device that you have limited access to that behaves in a peculiar or interesting way and you wish to re test your sink device against this behavior You can use the playback function either through the 980 GUI Manager external or embedded or you can use the Playback function through the...

Страница 276: ...rt 15 2 Using the Playback Function through the 980 GUI Manager The procedures below describe how to use the 980 HDMI Protocol Analyzer to playback a stored capture file You first need to make a capture and store the file You then can play that back to a sink device 15 2 1 Workflow for the Playback Function The high level workflow for the playback function is provided below Use a source device who...

Страница 277: ...k testing 2 Set the HDMI source device into the proper mode To capture a file for playback 1 Access the Playback panel You access the HDMI Generator Playback function through the main screen Generator icon as indicated below You can also access the Generator Playback function through the View pull down menu ...

Страница 278: ...wn below 2 Connect to the 980 HDMI Protocol Analyzer using the Connect icon and button as indicated above The 980 HDMI Protocol Analyzer will read its directories and present the list of captured files in the window under the Playback tab as shown below If there are no files the area will be blank ...

Страница 279: ...980 HDMI Protocol Analyzer User Guide Rev A1 Page 279 December 19 2012 ...

Страница 280: ...o assign a name to the capture file This is depicted on the screen shot below 4 Enter a name for the capture file in the Name entry field Ensure that the path where the file is stored is correct If not click on the path icon to change it A dialog box will appear as shown below 5 Set the Buffer Size and Field Count in the fields provided as shown in the screen shot below ...

Страница 281: ...example if the LPCM audio sampling rate is 48kHz and you set the Field Count to 8 there would be no glitch because 48 000 divided by 8 is an integer 6000 Set the Buffer Size to a value that will enable you to capture and save the number of fields frames that you specified in the Field Count entry field The recommended minimum Buffer Size settings necessary can be determined from the following tabl...

Страница 282: ... Minimum Buffer Size setting 32 10 64 20 96kHz 16 5 32 10 64 20 1080i30 32kHz 16 7 32 10 64 20 48kHz 16 7 32 10 64 20 96kHz 16 7 32 10 64 20 1080p60 32kHz 8 7 16 15 32 25 48kHz 8 7 16 15 32 25 96kHz 8 7 16 15 32 25 6 Click OK on the Playback Capture Name and Settings dialog box to initiate the capture A progress window appears indicating the status of the capture as shown below ...

Страница 283: ...ion of the capture in the Playback Description Editor window You access this window using the Edit icon on the lower right of the Generator dialog box indicated above A dialog box appears enabling you to enter a description of the capture Refer to the screen example below You can import a description from a file stored on your PC using the Import button ...

Страница 284: ...zer Refer to the illustration below Connection for HDMI Capture Playback testing To playback a captured file to an HDMI display 1 Power up the 980 HDMI Protocol Analyzer using the power rocker switch on the back Then press the power on button on the front panel 2 Access the Playback panel You access the Generator Playback function through the main screen Generator icon as indicated below You can a...

Страница 285: ...panel is shown below 3 Connect to the 980 HDMI Protocol Analyzer using the Connect icon and button as indicated above The 980 will read its directories and present the list of captured files in the window under the Playback tab as shown below If there are no files the area will be blank ...

Страница 286: ... button 15 2 Using the Playback Function through the Command Line The procedures below describe how to use the 980 HDMI Protocol Playback function through the command line The table below lists the commands related to the playback function List of Commands Related to Playback Note Commands are lower case Command Description Syntax Command Example pcap size Defines the capture buffer size in percen...

Страница 287: ... the captured file Play file where file is the name of the playback file you wish to play back To play a playback file play mycap pb play stop Stops the playing of a playback file play stop To stop the playing of a playback file play stop play pause Pauses the playing back of a playback file play pause To pause the playing of a playback file play pause play resume Resumes the playing back of a pla...

Страница 288: ...hown below Note that the IP address of the device is shown on the left 3 You will first have to connect to the 980 HDMI Protocol Analyzer that you are using You do this through the Connect button on the top right of the Console panel as shown below Note that the IP address of the device is shown on the left When you click on the Connect button you will see an indication that you are connected alon...

Страница 289: ...ode In this case you will be using the tmds mode which captures all raw TMDS characters Note You enter commands in the Command field near the top of the Console panel p scope pcap mode tmds 2 From the pscope prompt enter the command to set the capture buffer size in percent Typically 20 to 40 percent is plenty large enough p scope pcap size 20 3 From the pscope prompt enter the command to start th...

Страница 290: ... playback file through the command line To replay a playback file through the command line 1 From the pscope prompt in the 980 GUI Manager Console enter the following command to replay the playback file Note You enter commands in the Command field near the top of the Console panel p scope play MyCap1 pb 2 To pause the playback of a file use the following command p scope play pause 3 To resume the ...

Страница 291: ...980 HDMI Protocol Analyzer User Guide Rev A1 Page 291 December 19 2012 2 Select the Playback List Editor The Playback List Editor appears as shown below ...

Страница 292: ...particular 980 if there are more than one on the network However in order to select a 980 you will have to deselect the Local Files checkbox Local Files when using the external 980 GUI Manager means that you are using the files stored locally on your host PC If you deselect Local Files on the dialog box below you are viewing files on the 980 file system 4 Click OK to continue The left side window ...

Страница 293: ...ess to the files For example if you are working through the external GUI Manager but not able to connect to a 980 and wanted to create a playback list from files that you knew existed on a 980 you could use the Add button to create a record under the Data List and specify a name and path for the location of the playback file Edit Opens up a dialog box enabling you to change the name and storage lo...

Страница 294: ...stom Playback List This subsection describes how you can apply a custom playback list that you have created Often you will have created the pattern list on your host PC but you may wish to apply it on the 980 instrument itself In order to do this you will have to transfer the playback list from your host PC to the 980 prior to using it The procedure below describes these steps ...

Страница 295: ...yzer User Guide Rev A1 Page 295 December 19 2012 To apply an existing Playback List 1 Navigate to the Navigate Images tab 2 Transfer the Pattern List from your Host PC to the 980 by invoking the transfer icon indicated below ...

Страница 296: ...980 HDMI Protocol Analyzer User Guide Rev A1 Page 296 December 19 2012 The Data Transfer panel appears as shown below ...

Страница 297: ... side to the Instrument files using the Copy or Move button Note that you will have to highlight a directory on the Instrument Files panel in order to enable the Copy or Move button In this case since you are using the external 980 GUI Manager the Local Files are the files stored on the Host PC The following screen shows the result ...

Страница 298: ...ab on the Generator panel and select your list using the Playback List icon on the bottom status panel as shown below The result is that there will be a list of Playback files available and displayed in the Playback tab window below The Path icon on the bottom status panel will display that new list ...

Страница 299: ...980 HDMI Protocol Analyzer User Guide Rev A1 Page 299 December 19 2012 ...

Страница 300: ...k list that you have created To view and modify an existing Playback List 1 View the new Image List through the Navigator panel Select the Playback List folder 2 The Playback Lists will appear under User directory as shown above 3 Right click on the desired pattern list and select the Open icon to open up the viewing window The Playback List will appear in the panel as shown below ...

Страница 301: ...list if you do not have access to the files For example if you are working through the external GUI Manager but not able to connect to a 980 and wanted to create a playback list from files that you knew existed on a 980 you could use the Add button to create a record under the Data List and specify a name and path for the location of the playback file Edit Opens up a dialog box enabling you to cha...

Страница 302: ...980 HDMI Protocol Analyzer User Guide Rev A1 Page 302 December 19 2012 ...

Страница 303: ... downloads page of the Quantum Data website http www quantumdata com downloads index asp Two software packages are available for upgrading the 980 1 Embedded firmware and gateware package for the 980 instrument This is a Debian software package for installation in the Linux based instrument The file extension is deb This package also includes the embedded Graphical User Interface that will be inst...

Страница 304: ... to first upgrade to the most current version and then to the new version 16 1 Workflow for Upgrading 980 Firmware Gateware This section describes the workflow of the upgrade process It is not intended to be a detailed procedure Please refer to the Release Notes for detailed upgrade procedures Please note that you have to upgrade the 980 GUI Manager before using the GUI Manager to upgrade the 980 ...

Страница 305: ...Page 305 December 19 2012 3 Connect to the 980 that you wish to upgrade Access the Upgrade Firmware Gateware option from the Instrument pull down 4 Update the 980 Firmware Gateware Browse to the Deb file and select it Follow the on screen prompts ...

Страница 306: ...980 HDMI Protocol Analyzer User Guide Rev A1 Page 306 December 19 2012 ...

Страница 307: ...980 HDMI Protocol Analyzer User Guide Rev A1 Page 307 December 19 2012 5 Reconnect the 980 GUI Manager to the 980 ...

Страница 308: ...the captured data to your host PC using an FTP utility This procedure is described in the section Transferring Capture Files from the 980 to a PC The 980 HDMI Protocol Analyzer is based on the Linux operating system therefore to conduct searches directly on the 980 you use the Linux search and filter utilities such as grep You can access the Linux prompt from the pscope prompt available from the C...

Страница 309: ...980 login prompt will then appear as shown below The 980 login and password are qd Pscope login qd Password qd you will not be able to see the entry 3 The p scope prompt will appear allowing you to enter commands The primary commands for setting up and initiating the capture data is the PCAP command not case sensitive There are several arguments of the PCAP command and these are explained in the t...

Страница 310: ...list of the video format timing statistics pcap stat To obtain a list of the video format timing information pcap stat Note The commands are not case sensitive 17 2 Command Line Examples The following is an example of how to use the command line You use the capture control commands at the pscope prompt Once you have captured data you can transfer into the Linux shell and run typical Unix commands ...

Страница 311: ...you enter linux command 5 Here you can navigate to the proper directory or use the full directory path and enter any Linux shell command to search through the data qd spcope cd home qd workspace captures 2010_05_27_17_15_28 Where 2010_05_27_17_15_28 is the name of a capture directory qd spcope grep CTS 74250 pdecode log The command above will return all lines in the captured data where CTS is equa...

Страница 312: ...g captured files to PC 254 Channel status blocks 194 Compliance test options 6 Connecting the 980 via HDMI to the HDMI device under test 32 Data match custom 188 DDC traffic viewing DDC traffic through ACA 125 DDC transaction examining DDC transactions in captured data 195 DDC transactions monitoring the HDMI DDC transactions 131 viewing the HDMI DDC transactions 137 viewing the HDMI DDC transacti...

Страница 313: ...ptional features 31 Pass Through mode 202 Pass Through Monitor 14 202 Powering up the 980 17 Pre capture filtering precise selection of captured data 119 Protocol Analysis mode 15 196 Real Time mode viewing metadata in real time 95 Real Time Monitoring mode 12 Reference Frames in Real Time mode 102 Release and version information release information of 980 H W S W 31 Search for data in Data Decode...

Страница 314: ...uide Rev A1 Page 314 December 19 2012 3D video metadata 108 Video viewing full motion video 103 viewing live video 175 Video Analysis 231 Video Analysis mode 231 View incoming video 176 Zooming in on the Event Plot 71 END OF USER GUIDE ...

Страница 315: ...980 HDMI Protocol Analyzer User Guide Rev A1 Page 315 December 19 2012 ...

Отзывы: