background image

Chapter 3 

25 

KPC-1200 User’s Manual 

„


Main Menu 

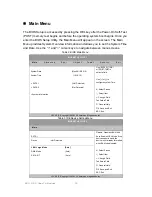
The BIOS Setup is accessed by pressing the DEL key after the Power-On Self-Test 
(POST) memory test begins and before the operating system boot begins. Once you 
enter the BIOS Setup Utility, the Main Menu will appear on the screen. The Main 
Menu provides System Overview information and allows you to set the System Time 
and Date. Use the “<” and “>” cursor keys to navigate between menu screens. 

Table 2 BIOS Main Menu 

BIOS SETUP UTILITY 

M a i n  

        A d v a n c e d           B o o t           C h i p s e t         P o w e r           S e c u r i t y           E x i t 


System Date


[Mon 08/18/2010]


System Time                                                                    [10:18:15] 


> SATA 1                                                                      :[Not Detected] 

> SATA 2                                                                      :[Not Detected] 


> System Information 

Use [ENTER], [TAB]   
or [SHIFT-TAB] to   
select a field. 


Use [+] or [-] to 
configure system Time. 


Å

 Select Screen 

↑↓

 Select Item 

+- Change Field 

Tab Select Field 

F1 General Help 

F10 Save and Exit 

ESC Exit 

V02.68 (C)Copyright 1985-2009, American Megatrends, Inc. 

Table 3 IDE Device Setting Menu


BIOS SETUP UTILITY 

M a i n  


A d v a n c e d           B o o t           C h i p s e t         P o w e r           S e c u r i t y           E x i t


SATA 1 

Device                            :Not Detected 


LBA/ Large Mode                                        [Auto] 

DMA Mode                          [Auto] 

S.M.A.R.T                                                      [Auto] 


Disable: Disables LBA Mode. 

Auto: Enables LBA Mode if the 
device supports it and the 
device is not already formatted 
with LBA Mode disabled. 


Å

 Select Screen 

↑↓

 Select Item 

+- Change Field 

Tab Select Field 

F1 General Help 

F10 Save and Exit 

ESC Exit 

V02.68 (C)Copyright 1985-2009, American Megatrends, Inc. 

Содержание KPC-1200

Страница 1: ...I KPC 1200 User s Manual KPC 1200 12 1 Home Automation Panel PC with Intel Atom N450 User s Guide...

Страница 2: ...ax is a registered trademark of Quanmax All trademarks registered trademarks and trade names used in this user s guide are the property of their respective owners All rights reserved This user s guide...

Страница 3: ...Unpacking 8 Regulatory Compliance Statements 8 Warranty Policy 9 Maintaining Your Computer 10 Chapter 1 Introduction 13 Overview 13 System tour 15 Mechanical Dimensions 19 Chapter 2 Getting Started 1...

Страница 4: ...nt Cut Out Hole and Maximum Panel Thickness 22 Figure 10 Panel Mounting 23 Tables Table 1 KPC 1200 product specifications 14 Table 2 BIOS Main Menu 25 Table 3 IDE Device Setting Menu 25 Table 4 System...

Страница 5: ...ution when installing or removing components Refer to the installation instructions in this user s guide for precautions and procedures If you have any questions please contact Quanmax Post Sales Tech...

Страница 6: ...le itself Some cables have a connector with locking tabs If you are disconnecting this type of cable press in on the locking tabs before disconnecting the cable As you pull connectors apart keep them...

Страница 7: ...d Hold a board by its edges or by its metal mounting bracket Do not handle or store system boards near strong electrostatic electromagnetic magnetic or radioactive fields Instructions for Lithium Batt...

Страница 8: ...If there is damage notify Quanmax customer service immediately Refer to Warranty Policy for the return procedure Regulatory Compliance Statements This section provides the FCC compliance statement fo...

Страница 9: ...ranty Quanmax Inc s detailed Limited Warranty policy can be found under Support at www quanmax com Please consult your distributor for warranty verification The limited warranty is void if the product...

Страница 10: ...ompliance with this Limited Warranty Return Policy will not be accepted by Quanmax Limitation of Liability In no event shall Quanmax be liable for any defect in hardware software loss or inadequacy of...

Страница 11: ...pressure reduces the efficiency of the cooling fans to cool the system This can cause electrical problems related to arcing and corona effects This condition can also cause sealed components with inte...

Страница 12: ...when AC power is lost The battery is charged by the AC power while it is available so when AC power is lost the battery can provide power to the system for a limited amount of time depending on the U...

Страница 13: ...out To meet current trends towards wireless communications the KPC 1200 is WiFi ready with mPCIe slot and WLAN antenna opening in the chassis The KPC 1200 s fanless low power design compact size and...

Страница 14: ...one Jack for Line Out 1x Phone Jack for MIC In 2x USB 2 0 1x D SUB 15 VGA connector 1x DC JACK for power input Side IO 1x USB 2 0 Expansion 1 x Mini PCI Express Socket for optional WiFi or 3G module 1...

Страница 15: ...32 connection Ethernet The eight pin RJ 45 LAN port supports a standard Ethernet cable for connection to a local network S PDIF S PDIF output for carrying digital audio signals out to the device Phone...

Страница 16: ...ard disk drives USB allows many devices to run simultaneously on a single computer with some peripheral acting as additional plug in sites or hubs VGA D Sub 15 pin VGA connector for display output Pow...

Страница 17: ...SB devices such as keyboards mouse devices cameras and hard disk drives USB allows many devices to run simultaneously on a single computer with some peripheral acting as additional plug in sites or hu...

Страница 18: ...eyboard Connecting the monitor Connect the VGA cable from your display to the VGA port Figure 4 Connecting the VGA cable NOTE When the system reboots without connecting the VGA there might be no image...

Страница 19: ...ur computer Figure 5 Connecting USB mouse keyboard NOTE Using a third party USB mouse or keyboard may require software drivers Check the manufacturer s website for the latest software drivers Connecti...

Страница 20: ...1 Connect the power adapter cable to the DC jack DC IN of the KPC 1200 2 Connect the power cable to the power adapter 3 Connect the power cable to a power outlet 4 Press the power switch on the front...

Страница 21: ...1200 User s Manual VESA Mounting The product comes with VESA FDMI 75 100 standard mounting holes as shown below Use 4 screws with the appropriate length for your mounting bracket Figure 8 VESA Mountin...

Страница 22: ...l Mounting The Panel PC can be panel mounted and comes with brackets and screws for this purpose The required cutout for panel mounting and maximum panel thickness is shown below Figure 9 Panel Mount...

Страница 23: ...23 KPC 1200 User s Manual Below are the demonstrations of how to do panel mounting Step1 Tightening the screws as shown right Step2 Side view of the screws on the KPC 1200 Step3 Done Figure 10 Panel...

Страница 24: ...se contact Quanmax AMI s ROM BIOS provides a built in Setup program which allows the user to modify the basic system configuration and hardware parameters The modified data will be stored in a battery...

Страница 25: ...18 15 SATA 1 Not Detected SATA 2 Not Detected System Information Use ENTER TAB or SHIFT TAB to select a field Use or to configure system Time Select Screen Select Item Change Field Tab Select Field F...

Страница 26: ...ring Analysis and Reporting Technology It allows AMIBIOS to use the SMART protocol to report server system information over a network Options Auto Disabled Enabled Table 4 System Information BIOS SETU...

Страница 27: ...ican Megatrends Inc Press Enter to select a sub menu for detailed options Table 6 OnBoard Peripherals Configuration Settings BIOS SETUP UTILITY M a i n A d v a n c e d B o o t C h i p s e t P o w e r...

Страница 28: ...ed Onboard LAN Controller Options Enabled Disabled Onboard LAN OPTROM Options Enabled Disabled Table 7 OnBoard ATA Configuration BIOS SETUP UTILITY M a i n A d v a n c e d B o o t C h i p s e t P o w...

Страница 29: ...i t Hardware Health Configuration CPU Shutdown Temperature Disabled CPU Temperature 42 C 105 F System Temperature 44 C 111 F VCORE 1 176 V 3 3V 3 408 V 5V 5 130 V Input 11 868 V Disabled 80 C 176 F 8...

Страница 30: ...t V02 68 C Copyright 1985 2009 American Megatrends Inc Quick Boot Enabling this item allows BIOS to skip some Power On Self Tests POST while booting to decrease the time needed to boot the system When...

Страница 31: ...age 2 5 Select which graphics controller to use as the primary boot device Select Screen Select Item Change Option F1 General Help F10 Save and Exit ESC Exit V02 68 C Copyright 1985 2009 American Mega...

Страница 32: ...DVMT FIXED memory 256MB Boot Display Device VGA LVDS Flat Panel Type 1024x768 18Bit 1C Options Fixed Mode DVMT Mode Select Screen Select Item Change Option F1 General Help F10 Save and Exit ESC Exit V...

Страница 33: ...supports ACPI DISABLE If OS does not support ACPI Select Screen Select Item Change Option F1 General Help F10 Save and Exit ESC Exit V02 68 C Copyright 1985 2009 American Megatrends Inc ACPI Function...

Страница 34: ...tem Enter Change F1 General Help F10 Save and Exit ESC Exit V02 68 C Copyright 1985 2009 American Megatrends Inc Change Supervisor Password Select this item to set or change the supervisor password Th...

Страница 35: ...d to the CMOS RAM The CMOS RAM is sustained by an onboard backup battery and stays on even when the PC is turned off When you select this option a confirmation window appears Select Yes to save change...

Страница 36: ...e settings for your system The F9 key can be used for this operation Load Failsafe Defaults Load Optimal Default values for all the setup values This option allows you to load failsafe default values...

Страница 37: ...and the necessary drivers to operate it After you have finished assembling your system and connected the appropriate power source power it up using the power supply and install the desired operating s...

Отзывы: