QualityCraft MM906-42FBK Скачать руководство пользователя страница 4

4

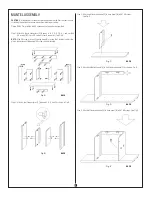
Step 6:  Attach left outer side panel [C] and right outer side panel [D] to base panel [B] 

with 4 KD screws. See Fig. F.


Fig. F


BAcK

Step 7:  Attach bottom support panel [I] to base panel [B] with 2 KD screws. See Fig. G. 


Fig. G


BAcK

Step 8:  Attach lower back panels [G] to panels C, D, E and F with 8 KD screws. 

See Fig. H. 


Fig. H


BAcK

Step 9:  Attach middle panel [K] to left inner side panel [E], right inner side panel [F] and 

middle front panel [H] with 4 KD screws. See Fig. I. 


Fig. I


BAcK

Step 10:  Attach upper back panel [L] to middle panel [K] with 3 KD screws. See Fig. J.


Fig. J


BAcK

Step 11:  Attach top panel [A] to upper back panel [L] with 3 KD screws. See Fig. K. 


Fig. K


BAcK

Содержание MM906-42FBK

Страница 1: ...ange cord away from traffic area and where it will not be tripped over 9 To disconnect electric fireplace heater turn controls to off then remove plug from outlet 10 Connect to properly grounded outle...

Страница 2: ...1 P Shelves 2 Rr Door hinges 4 Rs Door handles 2 Rt Handle screws 4 Ru Door mounting screws 16 S Shelf support pins 8 T L mounting bracket 2 U Short KD screws 3 V Medium KD screws 2 W KD screws 102 X...

Страница 3: ...for each connector See Fig A NOTE If the KD screw s do not fit during assembly loosen the 2 screws to adjust the plastic connector until the panels KD screws can be installed Fig A back Step 2 Attach...

Страница 4: ...Step 8 Attach lower back panels G to panels C D E and F with 8 KD screws See Fig H Fig H back Step 9 Attach middle panel K to left inner side panel E right inner side panel F and middle front panel H...

Страница 5: ...Fig M Fig M front Step 14 Attach shelves P to the unit as shown in Fig N Fig N front Step 15 Attach 4 door hinges Rr to left and right doors M and N with 8 door mounting screws Ru Attach 2 door handl...

Страница 6: ...nded near any heater Step 1 Drill a 5 16 in 8 mm hole in the wall Insert the plastic wall anchor into the hole and gently tap until the flange on the anchor is against the wall surface Step 2 Position...

Страница 7: ...d 10 smaller screws Step 2 You will find 1 x 40W type B 10 bulb under log set bed Step 3 Loosen and remove the burnt out bulb and replace with new bulb Step 4 Close the rear cover Secure the larger sc...

Страница 8: ...cleaned with damp cloth Do not use abrasive cleaners or spray liquids on these surfaces WARRANTY Every electric fireplace heater is tested before it leaves the factory and it is guaranteed for one ye...

Отзывы: