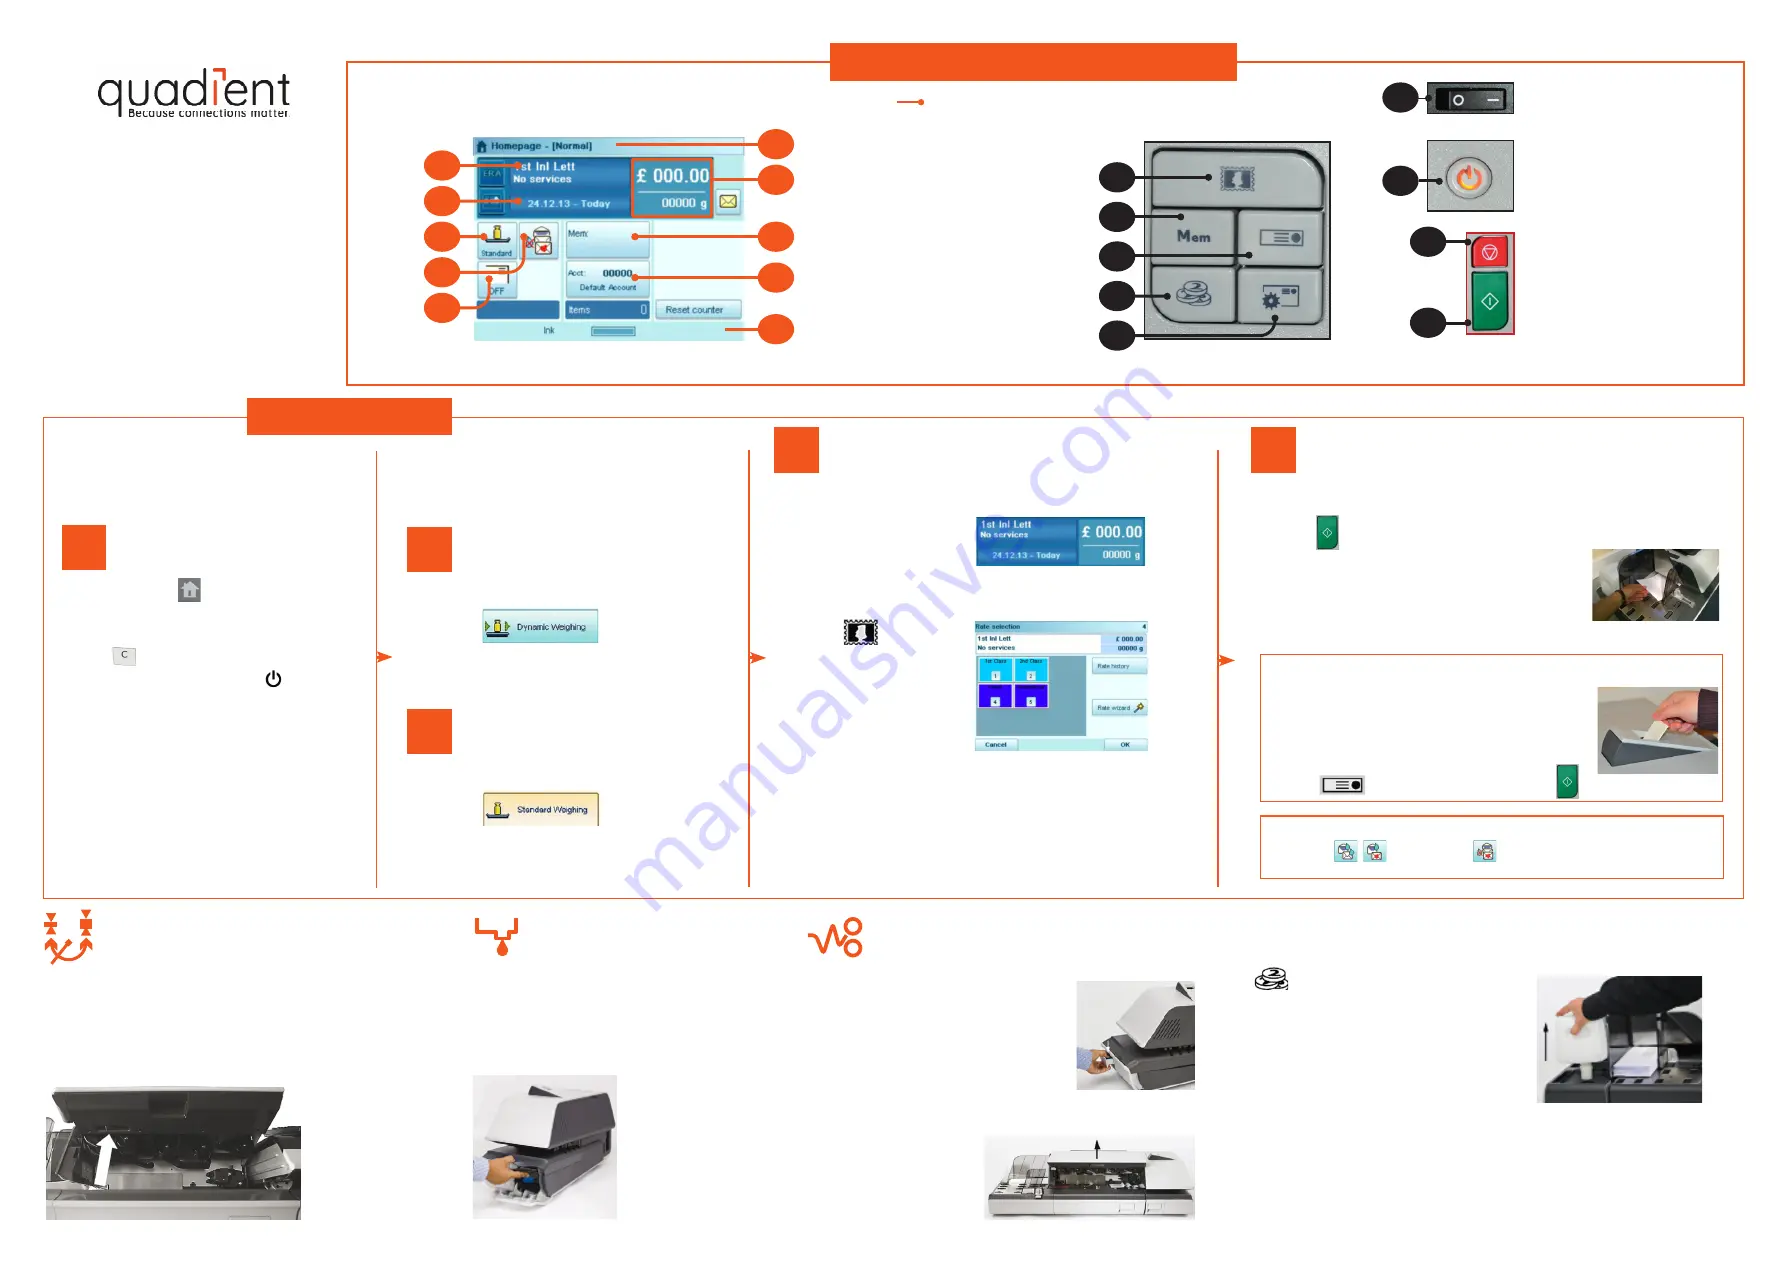
IS-5000
TO RESET PREVIOUS SETTINGS...
PRESS CLEAR OR WAKE
• For more specific information about your
mailing system, see the User Guide.
•
For your installation Pin Code please visit
www.quadient.co.uk/is5K_ug
Getting to know your mailing system
DO
•
Rate and services
D1
•
Date printed
D2
•
Weighing type
D3
•
Envelope sealing
D4
•
Imprint position offset
D5
•
Type of imprint
(to change: K5)
D6
•
Postage and weight
D7
•
Job memories
(can contain rate,
imprint settings and account)
D8
•
Current account
D9
•
Ink level
K1
•
Rate selection
K2
•
Job memories
K3
•
Print labels
K4
•
Credit
K5
•
Imprint configuration
K6
•
ON/OFF Switch
K7
•
Sleep / wake
K8
•
Stops printing
K9
•
Starts printing
Applying postage
•
If needed, press
to get back
to the home screen.
•
To get back to default rate settings,
press
on the keyboard.
•
If the system is asleep, press
to wake it up with default settings.
TO WEIGH YOUR MAIL...
USE THE DYNAMIC SCALE
•
Tap the D2 area on the screen
and select
PUT YOUR MAIL ON THE SCALE
•
Tap the D2 area on the screen
and select
CHOOSE RATE AND SERVICES
Current rate and selected
services are displayed in
this area of the screen.
To change the rate and/or add services:
1-
Press
.
The rate selection
screen is displayed.
2-
Use rate buttons
1
to
9
to select an available
Class and/or Services,
or select
Rate wizard
.
3-
Press
OK
to validate your selection and return
to the home screen.
• Touchscreen main areas
• Shortcut keys
DO
D1
D2
D3
D4
D9
D8
D7
D6
D5
K1
K2
K3
K4
K5
K9
K8
K7
(tactile areas: )
OR
IMPRINT PRINTING
To print on labels:
1-
Insert labels into the dispenser until you hear a
click,
printing side facing the right.
2-
Press
to enter the number of labels
.
To seal the envelopes:
Tap the D3 area on the screen
to activate
or deactivate
the sealer.
K6
Changing the ink tank
1-
On the new ink tank, remove the protective
strips.
2-
Open the ink tank drawer by pulling it towards
you.
3-
Press on the blue release lever to disengage
the ink tank.
4-
Pull out the old ink tank.
5-
Insert the new ink tank,
then push it until you
hear the click.
6-
Close the drawer. The
alignment process
of the printing heads
starts automatically.
If jamming occurs...
Adding credit
Press
, type 2 and
follow instructions on
screen.
Note:
to complete this
operation successfully,
your postal services
account must have a
positive credit balance
of the corresponding
amount.
Filling the sealer bottle
1-
Remove the bottle
from its base and
turn it over.
2-
Unscrew the cap
and fill the bottle
with water up to the
limit marks.
3-
Screw on the cap
and put the bottle
back into place.
In the base:
1-
Pull the release handle on the lower
assembly of the print Base.
2-
Using your other hand, remove the
jammed envelopes.
If the jammed envelopes can not be
removed, perform the following.
3-
Press on the blue release lever to
disengage the lower conveyor.
In the feeder:
1-
Open the cover.
2-
Gently remove jammed
envelopes.
3-
Close the cover.
Thickness setting
There is a thin/thick mail latch under the top cover of the fee-
der. For normal operation, the lever will be to the left. However,
for processing a batch of thick mail, move the lever to the right,
especially if the thicker envelopes won’t feed into the mail path.
1-
Open the feeder
cover.
2-
Change the lever
position:
- left for normal;
- right for thicker
3-
Close feeder
cover
If you want to print on a label or automatically seal the envelope, check
additional options below.
1-
Press
to start the motors of your Mailing Machine.
2-
Insert the mail piece in the feeder loader,
the imprint printing position on the upper right
side.
4
3
2a
2b
1


