quadient IS-240 Скачать руководство пользователя страница 16

Once installation process is finished, you will be asked to reboot your PC. PC Meter
Link will start automatically on your next PC startup.

A PC Meter Link icon will appear in your system tray, indicating the
connection status (see User Guide for details).

b) Configuring installation with PC Meter Link

The installation wizard is going to help you to configure the connection to the server. The
machine automatically detects the connected devices.

Note that the installation process restarts from the beginning if power is turned off before
the process is completed.

Check connectivity on PC Meter Link software before installing your
system. Both links to your system and to the Internet must be active,
otherwise installation process cannot be completed.

Active link is shown by a green and solid line

.

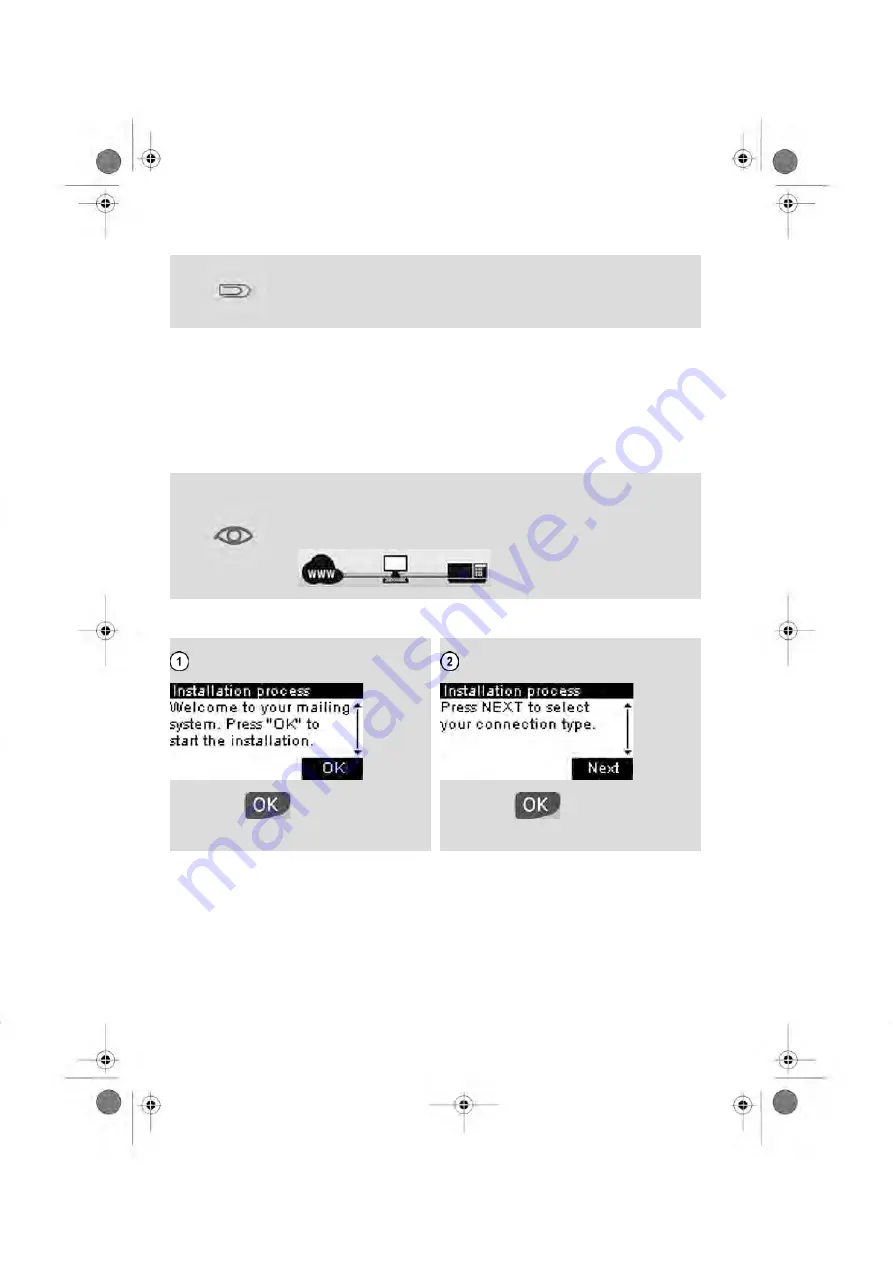
A moment after powering-up, the control panel of the machine displays the first screen.

Press

to continue.

Press

to start the installation

process.

15

| Page 15 | nov-12-2012 06:11 |

Содержание IS-240

Страница 1: ...Franking machine Installation Guide IS 240 280...

Страница 2: ...ions 1 1 Safety Requirements 3 How to Disconnect your Mailing System 5 1 2 Opening the box 7 1 3 Step A Preparing the Mailing System 9 1 4 Step B Setting up connections 12 1 5 Step C Installing Mailin...

Страница 3: ......

Страница 4: ...disconnect the external power supply from the wall plug and proceed to cleaning Use an outlet located near the equipment and easily accessible As the power supply cord is the equipment disconnecting d...

Страница 5: ...fingers long hairs neck ties loose clothing away from the mail path at all times Follow the additional safety precautions below Do not place lit candles cigarettes cigars etc on the Mailing System Wh...

Страница 6: ...ing the power supply cord only when the mailing machine is in Sleep mode avoids keeping the ink cartridge in a unprotected position where the ink may dry out and become unusable How to Disconnect your...

Страница 7: ...additional precautions below Avoid using equipment during an electrical storm there may be a risk of electrical shock from lightning Do not install telephone jacks or LAN connectors in a wet location...

Страница 8: ...the box 1 2 Your system is delivered in one box Check the content of this box Main components Ink cartridge Meter Mailing System Weighing Platform User documentation Power Supply 7 Page 7 nov 12 2012...

Страница 9: ...Connection components USB cable for PC Meter Link Analog modem and phone cable LAN cable 8 Page 8 nov 12 2012 06 11...

Страница 10: ...Supply to the System before instructed You may damage equipment A1 Installing Postage Meter PSD The Meter contains accounting and credit information Open the PSD cover located under the Mailing Syste...

Страница 11: ...Write down PSD No N33xxxxxx You will need it at step C A2 Removing the cardboard wedge Inside the Mailing System a cardboard wedge blocks the printing head carriage Remove the foam block Remove the w...

Страница 12: ...Weighing Platform on the Mailing System Connect the Weighing Platform cable to the Mailing System To avoid weighing errors make sure the Weighing Platform is clear when waking up the system If g is d...

Страница 13: ...This method allows for fast seamless postage rate updates and funds downloads and software updates to be performed remotely and automatically Using this method prevents connection errors when connect...

Страница 14: ...d below Setting up connection with PC Meter Link Please do not connect your Mailing System to a USB port on your PC before installing PC Meter Link software The installation software will notify you w...

Страница 15: ...computer Plug to the USB cable square end to your system Connecting your Mailing System to Power Supply Only use the Power Supply Cord delivered with the Mailing System Connecting the power supply st...

Страница 16: ...The machine automatically detects the connected devices Note that the installation process restarts from the beginning if power is turned off before the process is completed Check connectivity on PC...

Страница 17: ...ove the LAN cable from the packaging If you encounter any difficulties in configuring settings of your LAN connection please refer to Connection settings section of the LAN installation guide supplied...

Страница 18: ...ling System is now connected to LAN Connect the other end of the LAN cable into the LAN port Connecting the Power Only use the Power Supply Cord delivered with the Mailing System Connecting the power...

Страница 19: ...h LAN The installation wizard is going to help you to configure the connection to the server The Mailing System automatically detects the connecting devices Note that the installation process restarts...

Страница 20: ...Press to select LAN Press to continue Press Resume with step C 19 Page 19 nov 12 2012 06 11...

Страница 21: ...lines fax lines lines used by modems or credit card readers residential phone lines Remove the analogue modem cable and adaptor from the packaging Connecting your Mailing System to network with the an...

Страница 22: ...the Power Supply cord into the bottom back connector of your system The machine starts and launches the installation wizard automatically b Configuring installation with an Analog Modem The installat...

Страница 23: ...Press to continue Press to start the installation process Press to select Modem Press to continue 22 Page 22 nov 12 2012 06 11...

Страница 24: ...a number to reach an outside line for example if you have to dial 9 first Select Yes by pressing On the next screen type the prefix and press If a prefix is not needed Press Resume with step C 23 Pag...

Страница 25: ...stallation A registration PIN code has to be entered into the system This PIN code can only be generated by visiting the Neopost Web Site www neopost co uk In the myneopost column of the Web page clic...

Страница 26: ...Enter the PIN to activate your machine with the keypad Press to continue Press to continue Press to continue Press to continue 25 Page 25 nov 12 2012 06 11...

Страница 27: ...ss to add postage Otherwise press to fund your system later C4 Connecting to the Online Services Press to continue Press to continue Various steps will be displayed during this process Do not interrup...

Страница 28: ...ng head Remove the ink cartridge carefully from its packaging Ink cartridge installation The following screen appears Note Do not press until ink cartridge is installed Press to continue The ink cartr...

Страница 29: ...ip from the ink cartridge printing head Open the machine front cover by pulling it by the upper left corner Open the ink cartridge slot by pulling the blue lever towards you and turning it to the righ...

Страница 30: ...er back to the left until the cartridge is secured Close the cover Insert the ink cartridge into its slot The ink cartridge connector must match the set of connecting pins of the carriage You can now...

Страница 31: ...t the alignment process Press To skip the alignment process and go to step 6 Press The above pattern is printed Check for what letter vertical lines horizontally match the best In this example it is F...

Страница 32: ...Press Select the letter previously resolved by using the up and down arrow buttons Press Congratulations Your mailing machine is now installed 31 Page 31 nov 12 2012 06 11...

Страница 33: ...Loading funds into the Postage Meter 1 6 You need to load credits into the machine to be allowed to print postage Follow the steps below 32 Page 32 nov 12 2012 06 11...

Страница 34: ...nt to add using the al phanumeric keypad Note Press C twice to clear the field then enter your amount Preparing for call Dialing the call Transaction in progress Press Transaction completed The loadin...

Страница 35: ...r Guide CD ROM E for a complete description Control panel To start or restart the Mailing System use the following buttons of the control panel Press to wake system up with default settings Press to d...

Страница 36: ...eighing platform I or enter the weight manually Follow the steps below To weigh the mail piece 1 Lay the mail piece on the weighing platform To enter the weigh manually 1 Press and select the option M...

Страница 37: ...ion format services 3 At the end of the wizard press OK to confirm your selection To print the stamp 1 Insert the mail piece into the mail path stamp printing position on the upper right side 2 Push t...

Страница 38: ...6 18 20 21 Installation 24 K keypad 24 32 L LAN 6 8 12 16 18 M mail path 4 menu 13 Meter 7 9 13 24 N normal 4 10 P PC Meter Link 8 12 13 15 PIN code 24 Platform 11 power 3 4 5 13 16 20 Power 7 9 13 16...

Страница 39: ...Index Page 38 nov 12 2012 06 11 A0006695 C 05 06 2020...

Страница 40: ...A0006695 C 05 06 2020...

Отзывы: