quadient AS-650 Скачать руководство пользователя страница 53

SECTION 3 

OPERATING PRINTER 


53 

Printing from FlexMail 4.3 

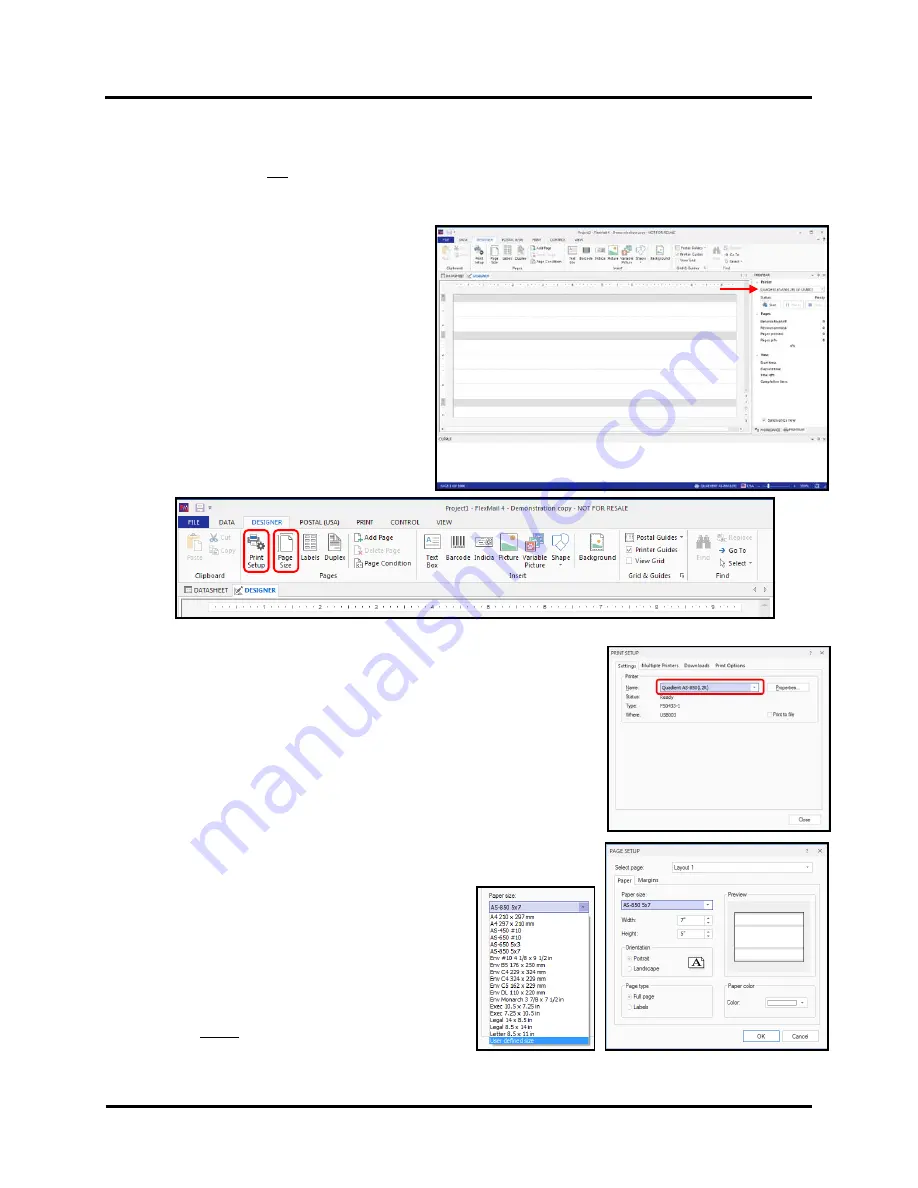
This section describes the process of designing a Template (Layout) and printing to the AS-850/850R printer 

models. This section does not provide information on using other FlexMail functions, such as Importing a Mailing 

List, Validating/Cleaning records or other FlexMail features. Please contact FlexSystems (www.flex-systems.com) 

for help with FlexMail features/functions that are not outlined in the following procedure. 

1.


Open FlexMail  

A new “

Project

” window will open in the 

Designer

” view, displaying a Layout 

representing the current “default” Printer and 

“default” page size.  


TIP

: If you want FlexMail to open with a 

Layout representing the AS-850 printer and a 

specific page size; right-click on the AS-850, in 

the “Devices and Printers” folder, and choose 

“Set as default printer”. Also be sure to select 

and apply your desired Printing Preferences in 

the driver.  


2.


If the AS-850 is not the selected model, click on “

Print Setup

” button and 

select the appropriate Printer 

AS-850(L2R)

 or 

AS-850(R2L)

 from the list. 


NOTE:

 Brand may be shown as Neopost, Quadient or RENA. You can use 

any of these Brand choices. 


3.


Click on “

Page Size

” button, to change the page size.  

If your desired page size is not available in the pull-down list,  

select “

User defined size

” from the list. Then type the “

Width

” (length in 

direction of feed) and “

Height

” of the page size you want to use for this 

Project and Layout.  


TIP:

  As an alternative to creating a  

User defined size

”, please see section titled “

Adding 

New Form Size (Paper Size)”.  

For this example a New Form Size (Paper Size)  

“AS-850 5x7” was added and selected. 


IMPORTANT:

 The page “

Width

” value must match 

the media length (in direction of feed) that you plan 

to feed and print onto. 


Содержание AS-650

Страница 1: ...1 Inkjet Printer AS 850 User Guide AS 850R ...

Страница 2: ...ord caused by jamming it between equipment walls or furniture DO NOT remove covers Covers enclose hazardous parts that should only be accessed by a qualified service representative Report any cover damage to your service representative This machine requires periodic maintenance Contact your authorized service representative for required service schedules To prevent overheating do not cover vent op...

Страница 3: ...de Guide and Transport Belt Adjustment 16 Media Thickness Adjustment 18 POSITION PRINT UNITS 19 PRINT RANGE AS 850 L2R 19 PRINT RANGE AS 850R R2L 20 MEDIA CONTROL GUIDE EXIT PRESSURE ROLLER ASSEMBLY USE 21 FEEDER SETUP AS FDR14 EASYFEED 140 OPTIONAL 22 USING THE TOUCHSCREEN 23 BASIC TOUCHSCREEN INFORMATION 23 TOUCHSCREEN KEYBOARDS 23 MAIN MENU 24 PRINT DATA Screen 24 INFO Screen 25 PRINT IMAGE Men...

Страница 4: ...nverted 44 Resolution 45 Belt Speed Beltspeed 45 Feed Delay 45 ADDING NEW FORM SIZE PAPER SIZE 46 PRINTING FROM BULK MAILER 47 PRINTING FROM FLEXMAIL 4 3 53 PRINTING FROM MS OFFICE APPLICATIONS 59 SECTION 4 MAINTENANCE 60 INKJET CARTRIDGE PRINTHEAD 60 Replace Inkjet Cartridge Printhead 61 Ink Cartridge Printhead Disposal 62 Ink Cartridge Printhead Care 62 Water Based Ink Cartridge Care 62 Cleaning...

Страница 5: ...ding Rollers 70 Cleaning Touchscreen 70 Cleaning Media Sensor 71 SECTION 5 TROUBLESHOOTING GUIDE 72 INKJET CARTRIDGE PRINTHEAD 72 PRINTER 73 TOUCHSCREEN MESSAGES 75 APPENDIX A PRINTER SPECIFICATIONS 77 APPENDIX B SUPPLIES AND OPTIONAL HARDWARE 78 SUPPLIES COMPATIBLE INKJET CARTRIDGES PRINTHEADS 78 OPTIONAL HARDWARE 79 INDEX 80 ...

Страница 6: ...ead Carriage to compensate for different media thicknesses 5 EXIT PRESSURE ROLLER ASSEMBLY Can be used to help media exit Printer Assembly is repositionable Position so it provides media drive but is out of the print area 6 PRINT UNITS Contains three repositionable Print Units Two of the Print Units can accommodate two Printheads ink cartridges and one can accommodate four Printheads A continuous ...

Страница 7: ...election Switch turns Main Power ON OFF Fuses provides over current protection IMPORTANT To safely power down Printer press the Shutdown Restart Key located on the control panel Then select Shutdown Wait for cursor to stop blinking or disappear before turning OFF Main Power Switch CAUTION Double pole neutral fusing For continued protection against risk of fire replace only with same type and ratin...

Страница 8: ...Main Power Switch 3 PASS THROUGH KEY Press to access Transport Control screen Use to run the Transport to clear media from under the Printheads 4 PAUSE RESUME KEY Provides a quick way to pause and resume a job at the Printer without using the Touchscreen or computer Press to start printing Press to pause a running job Press key again to resume printing 5 CONTROL PANEL TOUCHSCREEN Use the Control P...

Страница 9: ...oid placing it in direct sunlight Contents of Packaging 1 AS 850 Printer 2 Power Cord 3 WiFi Antenna 4 USB Flash Drive Includes Printer Driver User Guide 5 USB 3 0 Cable 6 Network Cable 7 Media Control Guide installed in printer 8 Exit Pressure Roller Assembly installed in printer 9 Feeder Interface Cable 97E 500 193 For use with AS 850 or AS 980 Envelope Imager XT3 0 printer and FDR12 14 EasyFeed...

Страница 10: ...he slot at the top of the faceplate on the Power Receptacle to release the tab A and gently pry the faceplate open 3 Insert the screwdriver blade into the slot B at the top of the Fuse Pack Voltage Selector and gently pry it out of the Power Receptacle housing 4 Verify Fuses C two 1 6A 250V slow blow 5x20mm are properly inserted one on each side into the Fuse Pack Voltage Selector as shown 5 Inver...

Страница 11: ...ble into Ethernet connector 2 WiFi Port Connect WiFi antenna included to this port 3 for wireless Printer monitoring or operation through your network How to Identify USB 3 0 Cables and Connections To take advantage of the higher communication speeds that a USB 3 0 connection provides you must Use a USB 3 0 Cable one was included with printer USB 3 0 Cable must be connected to a USB 3 0 Port on th...

Страница 12: ...ximately one inch or more should be present between each piece of media as it feeds under the print units If the speed of the feeder is set too fast media will over lap as it feeds and cause jams in the printer Please use the appropriate cable listed below to connect the printer to your feeder FEEDER INTERFACE CABLES PART DESCRIPTION 97E 500 193 AS FDR14 EasyFeed 140 Feeder to AS 850 Printer 35E 5...

Страница 13: ...e Printer window opens Click Add New Printer Click Next 3 The Connect Printer window opens Make sure the Printer is plugged in powered up and the desired communications cable USB wired Network Ethernet LAN or WiFi connection has been established Click Yes to continue 4 The Driver installer should auto recognize established connections and present a Setup window asking Do you want to install AS 850...

Страница 14: ... Next 6 Click Finish to complete the installation 7 In Devices and Printers check that Printer is available and active TIP If you plan to Print Test Page from the driver please be sure to select the appropriate paper size If the paper size length in direction of feed does not match the physical length of the media you are using the printer may feed one or two pieces then stop and display Double Fe...

Страница 15: ...d to move Print Unit away from sidewall of printer to allow room for Latch Lever to open fully 5 With Cartridge Nozzle Plate pointing down gently place Cartridge into Pen Stall with cartridge as up right as possible 6 Push down gently on Cartridge until it bottoms out in Pen Stall Do NOT push Cartridge towards Latch 7 Carefully Close Latch Lever to secure Cartridge The Latch Lever is designed to s...

Страница 16: ...on the Outer Transport Belts so they accommodate the width of your media The Outer Transport Belts can be moved by running the printer putting the printer in Paper Feed mode then sliding the belt guide adjusters located under the entrance end of the printer as shown below 3 Slide one piece of media centered in the entrance end of the printer as shown below Adjust the Media Side Guides to the width...

Страница 17: ...lts should be adjusted so they ride over the bottom lip of the Media Side Guides and are positioned very close the Media Side Guides but not rubbing against them as shown below 4 Position the Media Hold Down Strap 2 so that it helps hold the media down as shown below 2 ...

Страница 18: ...iage until the bottom of the Print Unit just touches the Media Then remove the Media Tip If the Media cannot be pulled out easily from under the Print Unit Turn Media Thickness Knob in the proper direction to raise the Printhead Carriage until Media B can be pulled from under Print Unit with only a slight drag NOTE These are initial settings It may be necessary to adjust the Media Thickness Contro...

Страница 19: ...Units movement on the AS 850 left to right feed printer It also indicates the No Print Zones unreachable print areas when feeding Media that measures the maximum Media width 15 W The example below represents a Media size of 15 Width x 17 Length in direction of feed When feeding Media measuring 12 75 wide or narrower it is possible to position Print Unit 3 Heads 7 8 to print anywhere within the wid...

Страница 20: ...ge of each Print Units movement on the AS 850R right to left feed printer The example below represents a Media size of 15 Width x 17 Length in direction of feed It also indicates the No Print Zones unreachable print areas when feeding Media that measures the maximum Media width 15 W When feeding Media measuring 12 75 wide or narrower it is possible to position Print Unit 3 Heads 7 8 to print anywh...

Страница 21: ... down the Media if any of the following issues are occurring Media is lifting and touching smearing the wet image printed by the first Print Unit Heads 1 2 Media is catching and or skewing as it travels under the middle Print Unit Heads 3 4 5 6 Media is catching or skewing as it enters under the last Print Unit Heads 7 8 TIP The additional pressure from the Media Control Guide can also help to imp...

Страница 22: ...er transport 5 Set desired Printer Belt Speed 6 Press RUN on Printer to start Printer transport 7 Slowly increase the Feeder Speed using the Feeder s Speed Control Dial Adjust Feeder speed to desired setting Make sure you have at least a 1 2 gap between pieces of Media 8 Feeder start stop can now be controlled by Printer For example pressing PAUSE on Printer will stop Feeder Pressing RUN on Printe...

Страница 23: ...return to the previous screen Help Icon Life Preserver Tap the icon to open a short description of the features found on that screen Cleaning See Cleaning the Touchscreen in the Maintenance section TOUCHSCREEN KEYBOARDS Use the Touchscreen Keyboards when entering or editing information in entry boxes in features such as Network Settings The appropriate keyboard opens when you tap on an Edit Box an...

Страница 24: ... Image Indicates Merge Image status OFF No Merge Image selected loaded Green Merge Image selected loaded When Job is sent each record in the Job will be printed along with the selected Merge Image See Print Image for details on loading and selecting a Merge Image Merge Clear Button Press to clear the Merge Image stop image merge process and continue printing without having to cancel the job Printi...

Страница 25: ...on the Printer since last power up or Restart Does NOT include internal Images or Test Prints except for Purge First Piece Pieces Lifetime non resettable Total number of pieces that have been printed by the Printer Includes internal Images Test Prints and Test Feeds Session Total number of pieces printed by the Printer since last power up or Restart Does NOT include internal Images or Test Prints ...

Страница 26: ...s Print Opens the Print Image Set Up screen See Print Image Set Up for details Delete Deletes the selected stored image from the printer and Printer Image Library See Print Image Delete for details PRINT IMAGE FULL SCREEN PREVIEW Tap the Image on the Print Image Print Data or Reprint screens A Image will fill the Touchscreen for easier viewing B Tap Image again to return to normal screen view PRIN...

Страница 27: ...d Image that was selected 150D Speed 1 2 3 4 200D Speed 1 2 3 300D Speed 1 2 600D Speed 1 Print Press to print the selected stored Image Merge Press to Merge selected stored Image with the next Job that is sent to the printer TIP If the Merge button is grayed out the stored image you selected was not sent saved at 600 DPI The printer will only Merge stored images that were sent saved at 600 DPI Th...

Страница 28: ...ristics within a particular ink cartridge may change If a particular ink cartridge isn t firing well such as faded or fuzzy print you can try to increase the Boost voltage to improve print performance Once entered the Printer memory will recall this information even if the individual cartridge is removed and reinstalled in this Printer at a later time or in a different HEAD position Pressing Ink T...

Страница 29: ... Pause Resume Key on Control Panel to start feeding and printing Select Auto Feed Start ON Deselect Auto Feed Start OFF Keep Nozzles Alive Since the nozzles used to print ascender and descender sections of characters are not fired as frequently as other areas this may result in missing sections of some characters examples g j p q y This feature can be used to help reduce dehydration of nozzles tha...

Страница 30: ... drying time before next piece drops onto previous piece NOTE This feature applies only to internal Test Prints and Print Images within the Printer such as Test Print Purge Print and Print Image stored in the Printer Image Library When printing a Job from your software application use the Printer Drivers Feed Delay feature Unchecked No Feeder Delay Checked Feeder Delay activated Edit Box Set the a...

Страница 31: ...Supplies Compatible Inkjet Cartridges Printheads for list of compatible cartridges NOTE Use the Previous button located at the bottom of the PRINTER PREFERENCES screen to access additional Printer Preferences features SELECT LANGUAGE Screen Select the language that the Printer Touchscreen will display FACTORY DEFAULT Screen Restores most adjustments and settings to factory settings Press BACK to r...

Страница 32: ...ge using current adjustments and print parameters to check printing quality and Printhead alignment NOTICE The Horizontal Alignment feature is not accessible when there is job data present in the printer VERTICAL ALIGNMENT Screen By design the Printhead ink cartridges within a Print Unit are purposely overlapping by a few nozzles This feature allows the operator to control how many of the top nozz...

Страница 33: ...timer INK ESTIMATOR Screen This tool estimates the total ink cost of a job using a sampling of the print job without feeding or printing NOTICE This feature is provided for estimation purposes only No guarantee of accuracy is expressed or implied Actual values are likely to be different than Estimated values Ink Cartridge Cost Tap the entry box to enter the cost of a single ink cartridge Number of...

Страница 34: ... on the last page printed or Missing or Unauthorized Cartridge See section titled Supplies Compatible Inkjet Cartridge for a list of authorized Inkjet Cartridges TIP If an authorized Cartridge is installed try opening and closing the Latch Lever If issue continues remove clean and dry cartridge contacts Then re install Ink Cartridge If issue continues replace Ink Cartridge Report Ink Cartridge pro...

Страница 35: ...ce length was measured accurately 0 1 Press STOP to end Test If the piece length measured longer than the actual piece length the media is probably slipping or hesitating as it feeds In this case check adjust the Media Thickness setting If the media feeds through but no piece length is displayed check the Media Sensor and the Encoder TIP An accurate Piece Length value also indicates that the Media...

Страница 36: ...check DHCP and enter a static IP Address to avoid unwanted changes to the printers IP address and loss of Printer Driver communication WIFI SET UP Press the Network icon on the Tools screen to open the Network Settings screen Make sure the WiFi antenna included is connected to the Printer s WiFi port 1 Select WIFI 2 Select the desired Network from the list of WiFi Networks 3 Enter User ID and Pass...

Страница 37: ... port If this information is not present or you want to verify that the information on the decal is correct please contact your Service Representative Wired and Wireless MAC addresses can be obtained from the Service Menu Ports Enabled feature TIME SERVER DATE AND TIME Displays the IP address of the Time Server being used and or the Time Server s network name TOUCHSCREEN CALIBRATION Adjust the tou...

Страница 38: ...E KEY Provides a quick way to pause and resume a job at the Printer without using the Touchscreen or computer Press to start printing Press to pause a running job Press key again to resume printing Quick Menu Key Allows quick access to often used Printer functions without having to scroll through a number of screens Open by pressing the Quick Menu key on the Control Panel Press Quick Menu key agai...

Страница 39: ... back to zero See VERTICAL ALIGNMENT in section titled Using the Touchscreen for more details NOTICE This feature is not accessible when there is job data in the printer Printer Preferences Select and set various Printer features including Purge First Piece Automatic Feed Start Keep Nozzle Alive Tray Break Continuous Batch Counter and Feeder Delay See PRINTER PREFERENCES in section titled Using th...

Страница 40: ...settings and data corruption which can make the printer inoperable USB Disconnect Disconnects and reconnects Printer communication with the USB Port Sometimes this can help to re establish a USB connection that has been lost Port Reset Clears any jobs data being sent to the Printer Example After a job is cancelled at the Printer the remainder of the job may continue to be sent by the computer This...

Страница 41: ...screen Print Data screen Pass Through Key Pressing the Pass Through Key on the Control Panel opens the Transport Control screen which allows the Printers transport to operate without feeding additional media from the feeder feed section This can be used to eject any media under the Printheads Transport Speed can be adjusted using buttons 1 2 3 4 Press RUN to start the printer transport system Pres...

Страница 42: ... printer and select Printing Preferences to access and change default printing preferences TIP Preferences that you change by accessing them from the Devices and Printers folder will become default settings This can be useful if you want specific settings to be automatically selected when you select the AS 850 Driver from your software application For example you commonly use the Env 10 Paper Size...

Страница 43: ...ment Options to set up change and adjust Printer Paper Output Paper Size Lets you select the size of media to be used TIP If your paper size is not available in the pull down list see section titled Adding New Form Size Paper Size for details on adding a new paper size IMPORTANT The Paper Size length in direction of feed selected in the Driver must match the physical length of the media you plan t...

Страница 44: ...hich will likely make printing slower Printer Features Set print Resolution print quality and Printer speed Beltspeed Add a Feed Delay to provide more dry time between printed pieces Print inverted No normal Yes rotate 180 AS 850 left to right feed model with AS 850 L2R Printer Driver Print inverted No normal print up side down to operator Print inverted Yes inverted print right side up to operato...

Страница 45: ...he printer Feed Delay Use to add a pause between printed pieces Adding a Feed Delay to provide more dry time may help to reduce offset ink transfer image smudging between pieces Adjustment is made in 1 10 of a second 0 1 second increments 10 1 second Print Quality Resolution Compatible Belt Speeds Print Speed 150 DPI 150 x 600 Low 1 Medium 2 Medium High 3 High 4 200 DPI 200 x 600 Low 1 Medium 2 Me...

Страница 46: ... logged into the computer with full administrative rights 5 Type a name for your new form into the box labeled Form name 6 Enter the Page size Width length in direction of feed and Height Leave all margins at zero TIP When creating a new form it is best to set the page Height to a value that does not exceed the printer s maximum print height Max Print Height AS 450 2 AS 650 3 AS 850 4 This will pr...

Страница 47: ...loped by FlexSystems and the Bulk Mailer Software Therefore you must access Advanced Settings in the Print Dialog box to make changes to these features This process will be explained in the following steps 1 Open Bulk Mailer 2 From the Home tab select and open double click on the mailing list of your choice 3 From the Print Mail tab select and open the Print Mail Wizard which will guide you throug...

Страница 48: ...ype desired name for new media choice Page width Enter length inches of media in direction of travel Press OK to Save and close this window Click NEXT to continue d From the Address Block Options window select the desired Address Block elements that you would like the wizard to automatically add to the Template Layout e From the Summary window Select Preview labels based on settings Select Save se...

Страница 49: ...int location in the Layout b Click on an element such as the Address Block to access and change Font Options for this element Font Options and other features for the selected element can be accessed at the right side of the designer screen c The numbers along the left side of the Layout accurately represent the Head cartridge numbers when using either of the following choices Device AS 850 L2R AS ...

Страница 50: ...inverted print up side down to operator d The Solid Line in the layout represents the separation point between Print Units e The Dashed Lines in the Layout represent the approximate separation points between Heads cartridges TIP For best print results try to position elements so text and graphics are not split between Heads or Print Units If you split text graphics between Heads or Print Units som...

Страница 51: ...cument Properties window will open a Make sure Portrait is selected for the Orientation Orientation Portrait Landscape Provides 90 degree image rotation 8 Click on the Advanced button The Advanced Options window will open a Select your desired Paper Output settings Paper Size Select size from pull down list IMPORTANT Select a Page Size length that matches the Page Width specified in your Template ...

Страница 52: ...ution selection Do NOT select choices marked with CAUTION symbol Resolution Compatible Belt Sped Selections 150 Low Medium and Medium High High 200 Low Medium and Medium High 300 Low Medium 600 Low TIP Compatible Belt Speeds can also be selected at the printer after sending the job Pause printer before selecting a new Belt Speed Feed Delay Feeder pause time 1 10 of a second 10 1 second Printer wil...

Страница 53: ...e Devices and Printers folder and choose Set as default printer Also be sure to select and apply your desired Printing Preferences in the driver 2 If the AS 850 is not the selected model click on Print Setup button and select the appropriate Printer AS 850 L2R or AS 850 R2L from the list NOTE Brand may be shown as Neopost Quadient or RENA You can use any of these Brand choices 3 Click on Page Size...

Страница 54: ...n Indicia element positioned at the top right On the middle Print Unit middle four Heads there is a Text Box Immediate Attention Requested element and a Text Box Address Block element On the bottom Print Unit bottom two Heads there is a Barcode Box Intelligent Mail Barcode element a The Dashed Lines in the Layout represent the approximate separation points between Heads cartridges TIP For best pri...

Страница 55: ...buttons arrows located at the bottom right side of the Layout to toggle through the records in the linked data file to see how they will be displayed printed 8 Click on Test Print button to immediately send the current record in the Layout to the Printer This provides a quick test to verify that the Project and Layout were setup properly and will print as you expect 9 Click on To Printer button to...

Страница 56: ...ughput print speed 11 Click on the Settings Tab and make sure the appropriate AS 850 printer model is selected You can also select the following features from this window Print Range The range of records you would like to print Number of Copies How many copies of each record you would like printed Reverse print order When selected the last record will print first Properties Click button to access ...

Страница 57: ...wn to operator Print inverted Yes inverted print right side up to operator AS 850R right to left feed model with AS 850 R2L Printer Driver Print inverted No normal print right side up to operator Print inverted Yes inverted print up side down to operator Resolution 150 200 300 600 DPI print quality Belt Speed Low Medium Medium High High NOTE Belt Speed selections are limited by the current Resolut...

Страница 58: ...b records to printer TIP If you want to test print a single record or a few records using the current Printer Preferences select Pages as the Range choice Then you can type 1 to print a single page or type the Range of Pages that you would like to print such as 1 30 Please contact FlexSystems support flex systems com or visit their web site www flex systems com for additional help on using FlexMai...

Страница 59: ...ntation automatically Because of this you will find that the page size and or orientation that MS Word automatically selects will not match the page size and orientation in the Printer Driver and the physical page size length that you are feeding This causes print orientation issues print positioning issues media feeding blank no print and Double Feed messages NOTE We have also attempted to use to...

Страница 60: ...can vary greatly depending on font selected and size of addresses CAUTION For continued protection against possible fire use only authorized Ink Cartridges 40mL max ink for each cartridge Flashpoint shall be 93 3C per Material Safety Data Sheet Ink in Cartridge may be harmful if swallowed Keep new and used Cartridges out of reach of children Discard empty Cartridges immediately CAUTION Never shake...

Страница 61: ...own gently place Cartridge into Pen Stall with cartridge as up right as possible 6 Push down on Cartridge until it bottoms out in Pen Stall Do NOT push Cartridge towards Latch 7 Carefully Close Latch Lever to secure Cartridge The Latch Lever is designed to swing the cartridge into proper alignment with the pogo pins contacts as it is closed DO NOT force Latch Lever closed TIP Opening and Closing L...

Страница 62: ...ased and Solvent inks mark Water Based Storage Clips with W and Solvent Storage Clips with S 2 Clean Pad in the Storage Clip as described on next page 3 Clean Ink Cartridge nozzles as described on next page 4 Install Ink Cartridge into printer as described in section titled Install Ink Cartridges Printheads During Printing as Needed If you experience clogged nozzles during printing 1 PAUSE printer...

Страница 63: ... and fuzzy print 3 Repeat as needed WARNING Do NOT use liquids other than Distilled Water to clean Water Based Ink Cartridge nozzles Never shake or bang Inkjet Cartridges This can cause air bubbles and or foam to form within cartridge bladder which can result in poor print quality and or Ink Cartridge damage Purging Nozzles Water Based Inks If the Printheads ink cartridges sit inactive in the prin...

Страница 64: ... than 8 hours or more than 2 hours in hot dry environments Use a lint free cloth dampened with distilled water to clean the cartridge nozzles Snap the cartridge into a Cartridge Storage Clip IMPORTANT If pad was not cleaned when cartridge was removed from clip then it must be cleaned before inserting cartridge into storage clip Place sealed Cartridge with contacts facing down into a tightly sealed...

Страница 65: ...nks CAUTION Solvent Inks EASYInk UltraUV EASYInk UltraSolv are flammable 3 Make sure printer s Purge First Piece feature is disabled turned off Printing with this feature enabled can damage or shorten the life of the Solvent Ink cartridge s NOTICE The Purge First Piece feature will commonly be enabled turned on when you receive a new printer since this is the printer s default setting You must dis...

Страница 66: ...nter 3 Clean Ink Cartridge nozzles as described on next page 4 Install Ink Cartridge into printer as described in section titled Install Ink Cartridges Printheads 5 Press RESUME to continue printing When Ink Cartridges are Not In Use Ink Cartridges must be properly cleaned and stored when not in use 1 Remove Ink Cartridge from printer 2 Verify that Pad in the Storage Clip is clean If not clean as ...

Страница 67: ...you can attempt to clean Solvent Ink cartridge nozzles using Isopropyl Alcohol 70 or higher on a lint free cloth This should only be done as a last resort on rare occasions Do NOT use liquids other than Isopropyl Alcohol to clean Solvent Ink cartridge nozzles WARNING Never Shake or Bang Inkjet Cartridges This can cause air bubbles and or foam to form within cartridge bladder which can result in po...

Страница 68: ...print on the media NOTE If print quality is still unacceptable after you have cleaned and purged nozzles you may need to replace Ink Cartridge s For more information see Troubleshooting Printheads in Section 5 Troubleshooting Ink Cartridge Storage Solvent Inks Short term Cartridge Storage Less than 1 hour Solvent ink cartridges should only be left in the Printer for short periods of time The next ...

Страница 69: ...enough may not be usable Media that meets Postal stiffness requirements for automated feeding is acceptable in the Printer Nested Envelopes envelope caught under the flap of another or stuck to one another Media hesitating or slipping as it travels through the printer Commonly caused by improper Media Thickness adjustment or Media Side Guides set too tight Removing Jammed Media 1 If necessary rais...

Страница 70: ... cleaner that does not contain plastic harming solvents Exterior Areas Covers and Frame May be cleaned with any standard non abrasive household cleaner that does not contain plastic harming solvents CAUTION NEVER SPRAY OR POUR CLEANERS DIRECTLY ON OR INTO THE PRINTER EXCESS LIQUID COULD HARM ELECTRONIC PARTS ALWAYS DAMPEN A RAG WITH THE CLEANER AND APPLY IT TO THE PARTS TO BE CLEANED Cleaning Tran...

Страница 71: ...lector surface under the mounting plate with a clean lint free cloth NOTE If necessary you can remove the screw and nut A to remove the Media Sensor Reflector Plate 3 Wipe off dust or use canned or compressed air aimed into the Media Sensor port B to remove dust and debris from the Sensor CAUTION Compressed Air propellant can be flammable Let printer sit to ventilate for a few minutes before recon...

Страница 72: ...maged Nozzle s Lint or dust blocking nozzles Poor contact between Printhead and Printhead Pen Stall Clean and Purge the Cartridge Nozzles as described in section titled Ink Cartridge Printhead Care Remove and reinsert Ink Cartridge into Pen Stall Remove clean and dry cartridge contacts Swap positions with known good cartridge If problem follows cartridge then this is a cartridge issue Insert new P...

Страница 73: ...wer Switch Wait for 60 seconds If white screen is displayed for more than 60 seconds turn OFF Main Power Switch disconnect communications USB Network cable s wait 20 seconds and Power ON again If problem persists contact technical support No communication Improper settings or connection Check interface settings and connections Remove and reload Printer Driver Improper output garbage characters mis...

Страница 74: ...e settings Install Ink Cartridges Clean replace Ink Cartridges Use Ink Status feature in Quick Start menu to verify that printer is recognizing ink cartridges Install compatible Ink Cartridges Adjust Print Unit s position Select correct paper size Adjust margin settings and position of data in software layout Properly Shutdown and Restart Printer Blurry address Image is not sharp Media Thickness a...

Страница 75: ...ces Clear media from printer transport area Press OK to continue Use Reprint on Quick Menu screen to retrieve restore any missing or misprinted pages in the print job DOUBLE FEED ERROR 02 Wrong Paper Size selected in driver Media sticking together or overlapping No gap between pieces Check set correct Paper Size in driver Adjust Feeder s Sheet Separators Check adjust Media Thickness Reduce Feeder ...

Страница 76: ...ess OK to continue NO ENCODER SIGNAL ERROR 05 Printer Motor has stopped Wire Harness connection is loose or broken Encoder Belt worn or broken Encoder Sensor not working Check clear possible Jam Press OK to continue Properly shutdown and cycle printer power If problem persists contact Service Support STOP TIME OUT ERROR 06 Printer Transport was left running and automatic 5 minute timeout has start...

Страница 77: ...3 to 15 76 2 mm to 381 mm NOTE AS FDR14 Feeder Max 17 L x 14 W MEDIA THICKNESS Minimum 0 008 0 2 mm Maximum 0 5 12 7 mm NOTE AS FDR14 Feeder Max 0 375 thick MEMORY 1 GB of DDR3 1600Mhz SDRAM 16 GB microSD Not externally accessible FONTS All TrueType fonts available on PC INK MONITOR Visible on Display FEEDER CAPACITY with optional feeder Up to 750 10 envelopes with optional AS FDR14 Feeder SOFTWAR...

Страница 78: ...QP EASYInk Aqueous High Performance ink for aqueous varnished materials EASYInk Fast Black ASINKHPFAST EASYInk Fast Black general purpose quick drying dye based ink EASYInk UltraUV ASINKHPUUV EASYInk UltraUV high performance solvent ink for UV coated non porous media EASYInk UltraSolv ASINKHPUSLV EASYInk UltraSolv high performance solvent ink for non porous media EASYInk Blue ASINKHPBLUE EASYInk B...

Страница 79: ...r AS FDR14 EasyFeed 140 Friction Feeder Riser Stand RS 140 Conveyor Stacker not shown AS CSD3 TB 390 or AS CSD6 TB 690 IR Dryer not shown For conveyors AS 850 left to right feed Printer shown with AS FDR14 EasyFeed 140 Feeder on RS 140 Feeder Stand ...

Страница 80: ...Panel Buttons 38 Control Panel Keys 38 Cover Top 6 D Date and Time 37 Diagnostics Clutch 35 Encoder 35 Media Sensor 35 Piece Count 35 Piece Length 35 Diagnostics Screen 35 Display Cleaning 70 Control Panel 6 Printer 8 Using 23 Disposal Inkjet Cartridge 62 Printhead 62 Double Feeding Media 69 Driver Advanced Options Belt Speed 45 Copy Count 44 Feed Delay 45 Layout Tab 43 Print Inverted 44 Print Opt...

Страница 81: ...0 Inkjet Cartridge 60 Printhead 60 Material Control Guide 21 Media Control Guide 9 Media Exit Roller 6 Media Hold Down Strap 7 Media Hold Down Straps 17 Media Pressure Rollers 7 Media Sensor Cleaning 71 Location 6 Media Side Guide Adjustment 16 Media Side Guides 7 16 Media Thickness Adjustment Knob 6 Media Transport Belt Adjustment 16 Media Transport System Setup 16 Media Thickness Adjustment 18 M...

Страница 82: ...g From Bulk Mailer 47 FlexMail 53 MS Office 59 Purge Ink Nozzles Solvent Inks 68 Water Based Inks 63 Q Quick Menu Horizontal Alignment 39 Ink Status 39 Printer Preferences 39 Purge Print 38 Test Feed Reprint 38 Vertical Alignment 39 Quick Menu Key 6 8 38 R Remove Replace Inkjet Cartridge 61 Jams Media 69 Restart Button 40 Rollers Cleaning 70 S Select Language Screen 31 Set Up Network 36 Printer 28...

Страница 83: ...ubleshooting 72 Inkjet Cartridge 72 Printer 73 Touchscreen Messages 75 76 U USB Disconnect Button 40 USB Port 7 11 Using Touchscreen 23 V Vertical Alignment Screen 32 Vertical Alignment Printhead 32 Voltage Selection 10 W Water Based Ink Cartridge Care 62 WiFi Antenna 11 Port 7 11 Set Up 36 Wireless Status 37 ...

Страница 84: ...84 ...

Страница 85: ......

Страница 86: ...86 Quadient May 28 2020 ...

Отзывы: