UTV STRAIGHT PUSH TUBE ATTACHMENT
3
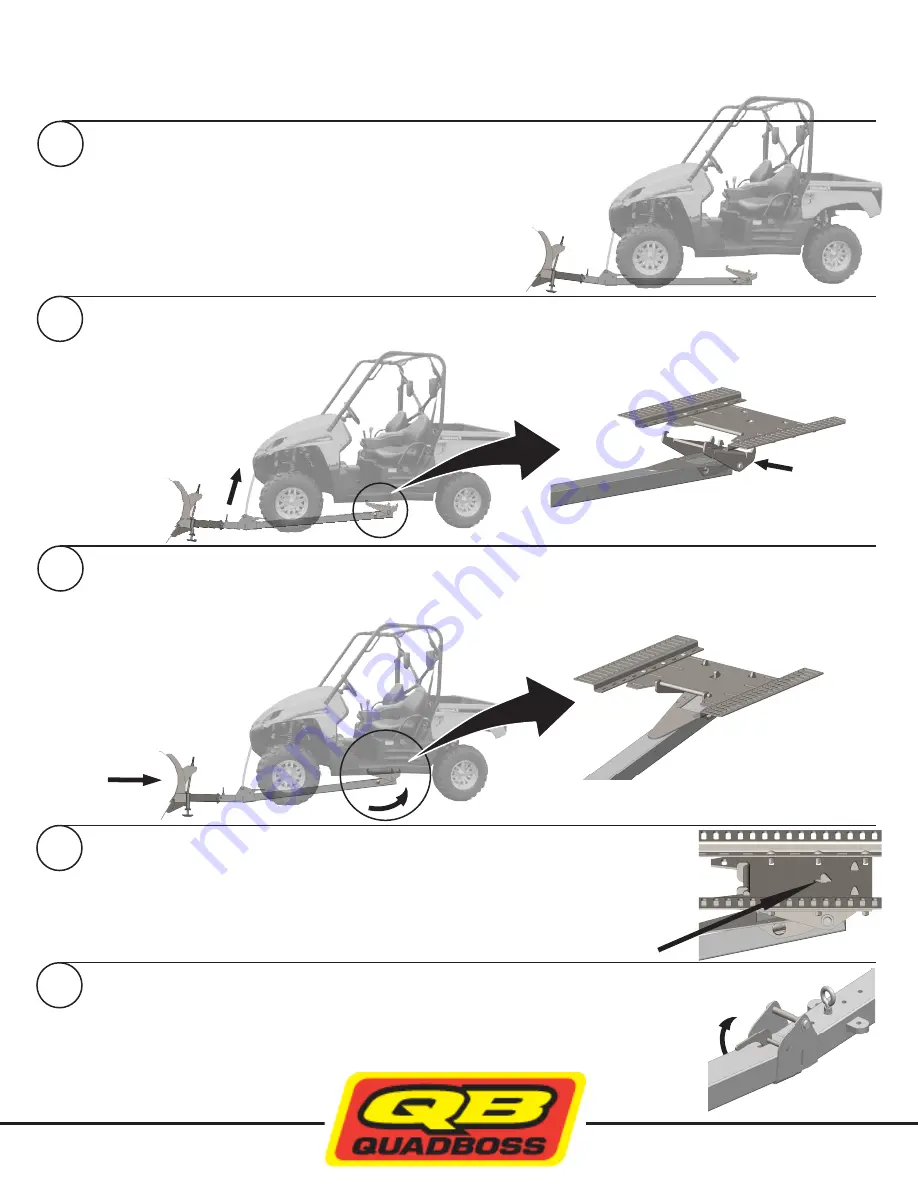
This push tube is designed to attach and detach easily from the front of the machine. The pivoting plate on the back of the push tube has two hooks on the
front that attach to the front of the bottom mount plate. Once hooked in the front the blade can be pushed back to engage the locking lever on the pivot
plate to the bottom mount. After a few tries this can all be done in one swift motion.
1
2
Once you have it raised in place and positioned properly in step 2, you need to attach the plow to the bottom mount. Standing in front of the plow,
pull the system back towards the front of the machine a few inches then forcefully push it backwards in one swift motion until you hear/feel it click
into place. It may take you a few tries the first time you do it until you get the “feel” for it.
NOTE: Keep your feet positioned behind
the plow while attaching to the machine to prevent any possible accidents!
To remove the plow system, let out the winch cable so the blade is on the ground and there is some excess cable.
Simply pull the release lever on the push tube while pulling forward on the blade and the pivot plate will disengage
from the mount. The plow system is quite heavy so it will drop to the ground with some force.
Be careful not to pinch your fingers, toes, or anything else between the push tube and ground.
Remove your winch cable and draw it back up into the winch. You can now drive backwards
away from the plow.
4
Visually look under the machine to confirm the push tube has fully snapped into place.
NOTE: Failure to
confirm the plow is securely attached could cause damage to your plow, ATV, or
person!!
Let out the winch and place the plow back on the ground. Depending upon your winch mounting
location you may want to switch your winch LIFTING position to the other lifting point on the push tube.
If this works better for your machine, switch the winch hook to the other position. You are now ready to plow!
1
Proper position of the pivot plate and
bottom mount for an easy installation.
Pivot
Plate
The latch MUST be hooked
over the bottom mount.
Pull lever
to release.
The front hooks will catch the
rod on the mount and the rear
of the push tube will rotate up
into place.
PUSH
REMOVAL
Now raise the plow with the winch until the pivot plate of the push tube hits the bottom of the UTV and the blade is a few inches off the ground.
Look under the UTV to determine the placement of the pivot plate versus the bottom mount. Ideally the front pivot plate hooks will be a couple
inches in front of the welded rod on the front of the bottom mount. If not, put the plow back on the ground, adjust the lifting or bottom mount
location and try again.
The key to an easy plow installation is setting the proper winch lifting point. Ideally you will have
positioned the bottom mount 30-34 inches back from the winch roller fairlead. (For more detailed
information regarding installation of the bottom mount, please see the instructions that came
with the bottom mount) Position the plow under the UTV with the pivot plate of the push tube
just beneath the bottom mount. Let out some winch cable and attach the cable to the rear
lifting rod (Near the release handle). This should be close to being directly
beneath the roller fairlead. You may need to change the position of the bottom
mount to achieve this.
Plow on ground with winch cable
attached to lifting rod on push tube.
Raise the plow so the
blade is off the ground
and the pivot plate is
against the bottom
of the UTV.
Standing in front of the plow push
the blade back so the front hooks
attach to the crossbar on the
mount and the rear snaps up
into place.
08/09/2011
Rev. 1.1
PAGE 3 of 6
PART #9382
Tech Line 877-847-1558
www.quadboss.com


