

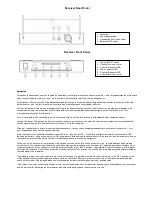

Receiver Rear Panel
Receiver Front Panel
Operation
For handheld transmitters, insert the supplied 9V batteries by carefully unscrewing the base to reveal the + and - terminals inside the microphone
body, connect the battery ( and - are the correct way round) and carefully screw the base back on.
For beltpacks, slide the front half of the beltpack upwards just enough to reveal the battery compartment and position the supplied 9V battery
inside ( and - are the correct way round) and then slide the beltpack case together as before.
Position the receiver within the best available line of sight to the transmitter(s) and connect the DC jack of the supplied power adapter to the
receiver and the plug-top to the mains outlet. Extend both antennae fully upwards and outwards slightly and switch the power on. Turn
microphone level(s) down on the receiver.
Note: for dual sets (with 2 transmitters), both microphones’ outputs will be mixed and fed to both balanced and unbalanced outputs.
Connect the jack or XLR (o
ptional) lead to the receiver’s audio output connector, turn down the volume of any equipment (mixer, amplifier etc.)
that the signal will be fed into and then connect the jack or XLR to the equipment.
Warning! - take care not to point microphones towards speakers
– this can cause damaging feedback (loud whistle or howling noise) – try to
point microphones away from the speaker cabinets.
Move the switch on the handheld or beltpack transmitter to the first notch (MUTE)
– the LED should light momentarily (continuous dim LED
indicates low battery). Move on another notch (ON) and gradually increase the microphone level(s) on the receiver, then increase the volume on
the mixer or amplifier until the sound from the microphone can be heard through the equipment.
During use, it may be useful for the reception of the microphone to be muted for a short period of time (e.g. to avoid feedback when walking
across the front of a speaker or avoid handling noise when placing the microphone down momentarily or adjusting a neckband microphone). In
these circumstances, it may be better to move the transmitter switch to the “MUTE” position, which maintains the radio frequency carrier signal
but mutes the microphone input. When this switch is moved back to the “ON” position, the sound will be immediately restored without waiting for
the radio signal to be reinstated.
If the wireless system is not to be used for more than a few seconds, it is preferable to slide the transmitter switch to the
“OFF” position, which
mutes and deactivates the radio signal and powers down the transmitter. Be sure to turn down the volume of the mixer or amplifier and then
switch off the receiver. Unplug signal leads from the receiver and mixer or amplifier when moving or packing away.
If the system is not to be used for long periods of time, remove the batteries from the transmitter and unplug the power adapter from the receiver
and the mains outlet. Retracting the antennae can also help avoid damage when the system is not in use.
1. Antennae
2. Power adapter input
3. Unbalanced 6.3mm jack output
4. Balanced XLR output
1. Power ON/OFF switch
2. Channel A volume control
3. Channel A indicator LED
4. Power indicator LED
5. Channel B indicator LED
6. Channel B volume control


