14
Mounting the Nooseneck Microphone Models
There are two methods of mounting the Gooseneck Microphone Page Stations. You can
mount the Page Station onto the mounting surface with the Page Station at a 30° angle to
the mounting surface or into a podium or other surface so that the Page Station surface is
flush with the mounting surface. The first method is discussed in this document, while the
flush, or Podium Mount is an optional accessory for the Gooseneck Page Station with separate
instructions.
1. Select the surface on which you wish to mount the Page Station. The surface should have
enough access-room below it to allow for installing the attaching hardware and the Page
Station cables.
2. Place the Angle-Mount Bracket on the surface oriented as you wish.
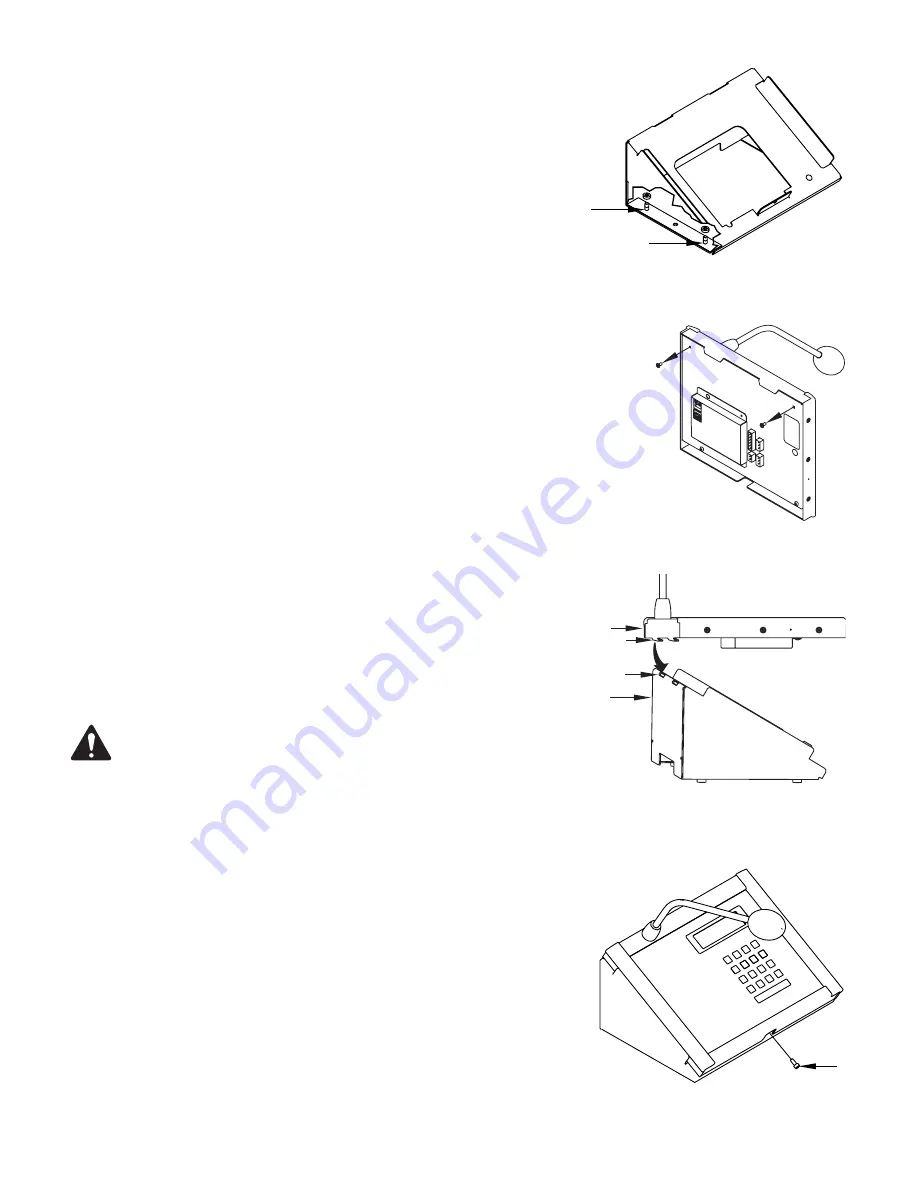
3. Mark four screw holes (one in each corner) along both bottom sides of the Angle Mount bracket.
(See Figure 18)
4. Optionally, you can make an opening in the mounting surface for the cables under the bracket, or feed
the cables through the slot at the bottom back side of the bracket.
5. Use a 1/4” drill bit to drill the six holes.
6. Use a Phillips screwdriver to remove the top two screws on the back of the Page Station. Discard the
screws.
(Figure 19)
7. Align the Angle-Mount Bracket
(2)
with the holes drilled in step
5
and insert six bolts (not supplied)
through the Angle-Mount bracket and the mounting surface, then secure with the appropriate washers
and nuts.
8. Hold the Page Station
(1)
horizontally above the Angle-Mount Bracket
(Figure 20)
and lower
the Page Station down onto the bracket so that the two tabs
(3)
on the Page Station slide into
the two slots
(4)
on the bracket.
9. Lower the front of the Page Station down onto the bracket. Make sure the two tabs on the Page
Station remain engaged with the two slots in the bracket.
10. Connect all Page Station wiring to the proper connectors on the Page Station. Refer to "Q-Sys
Page Station Rear Panel" on page 9.
CAUTIONG!:
Make sure that the wiring is secured so that it does not place stress on
the connectors..
Refer to
Figure 21
.
11. Insert the socket-head cap screw
(1)
through the bracket and into the Page Station. Tighten
with a 9/16" hex wrench.
— Figure 18 —
1
1
— Figure 19 —
— Figure 20 —
1
2
3
4
— Figure 21 —
1


