1
Page Station
Quick Start Guide
Mounting the Hand-held Microphone Models
NOTE:
The product shall be installed in accordance with the applicable local
code requirements.
Q‑Sys Page Stations are designed to be mounted on a wall or podium with an appropriate cutout and
cavity to allow all cables and power sources to connect to the Page Station rear panel with adequate
stress relief. The included Mounting Bracket is designed to mate with a standard triple‑gang U.S.
electrical box, but can be mounted directly to the wall.
1. Remove the Mounting Bracket from the Page Station. It is secured by one screw on the front edge of
the Page Station. Refer to
Figure 3-1
. Set the screw aside for later use.
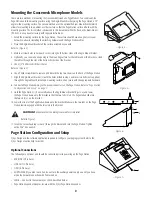
Refer to
Figure 1
.
2. Place the Microphone Strain‑relief Clamp
(1)
over the Microphone cable
(2)
.
3. Plug the RJ‑45 plug
(3)
into the receptacle
(4)
on the Page Station.
4. Install screw
(5)
through the clamp and into the Page Station to secure the Mic cable.
5. Route all Page Station wiring and connectors through the center of the Mounting
Bracket.
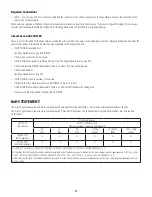
6. Use four tripple‑gang screws (included)
(Figure 2-1)
to align and mount the Mounting Bracket to the
triple‑gang electrical box if you are using one.
7. Use six screws (not included)
(Figure 2-2)
to secure the Mounting Bracket to the wall. The six screws
shall be appropriate for the surface to which the Page Station is mounted.
IMNOOT OE:
The six screws, securing the Mounting Bracket to the wall, are required
even when using the triple‑gang electrical box.
8. Connect all Page Station wiring to the proper connectors on the Page Station. Refer to
"Page Station
Configuration and Setup" on page 2
.
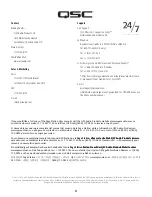
Refer to
Figure 3
.
9. Tilt the top of the Page Station back and install the Page Station onto the
Mounting Plate by aligning the two tabs on the Page Station with the two slots
on the Mounting Plate.
10. With the Page Station still tilted, carefully bundle the wiring back into the wall
(or triple‑gang electrical box).
11. Push the bottom of the Page Station to the wall.
12. Install and tighten the screw
(1)
(removed in step 1) through the Mounting
Bracket up into the Page Station.
NOTE:
Use these installation instructions to mount the
Hand‑held Page Station models to other surfaces as well.
™
— Figure 1 —
1
1
2
3
4
5
— Figure 2 —
1
2
— Figure 3 —
1
Mounting tabs
on back of
Page Station
TD-000359-00-A
*TD-000359-00*


