Attero Tech by QSC
Synapse D16Mio
User Manual
QSC, LLC 2020
614-00051
3 – Device Operation
Certain features of the D16Mio such as channel mutes, output
level, and front panel lockout are controlled using unIFY Control
Panel application. This is available from the
on the QSC website. Details of those features are shown in
Some features of the device are operated from the various
controls on the front panel such as the main display.
3.1 – Display View Operation
During power up the display will show the Attero Tech logo. Once
the device is running, the display will switch to showing a normal
view. If there are any problems, the display will indicate a POST
(Power-On Self-Test) error. If this happens contact QSC technical
support.
Once up and running, the front panel can show various different
views and is used to control a number of D16Mio features. To
save power, the display will turn itself off after 30 seconds of
inactivity. To activate the display again, press either of the knobs
to activate their buttons or the monitor select button. The Display
Timeout timer can be adjusted in unIFY Control Panel.
*Note:
Turning a knob will NOT turn the screen back on. It must
be a button push.
Navigating the views on the display is achieved using the “Menu
Nav” knob. Rotating this left or right will step through the various
views available. If the front panel lock has been activated by
unIFY, the panel lock icon will be shown in the upper right hand
corner of the display and while the “Menu Nav” knob can still be
used to rotate the different views no further action can be taken
on any view.
3.1.1 – Bank Metering Views
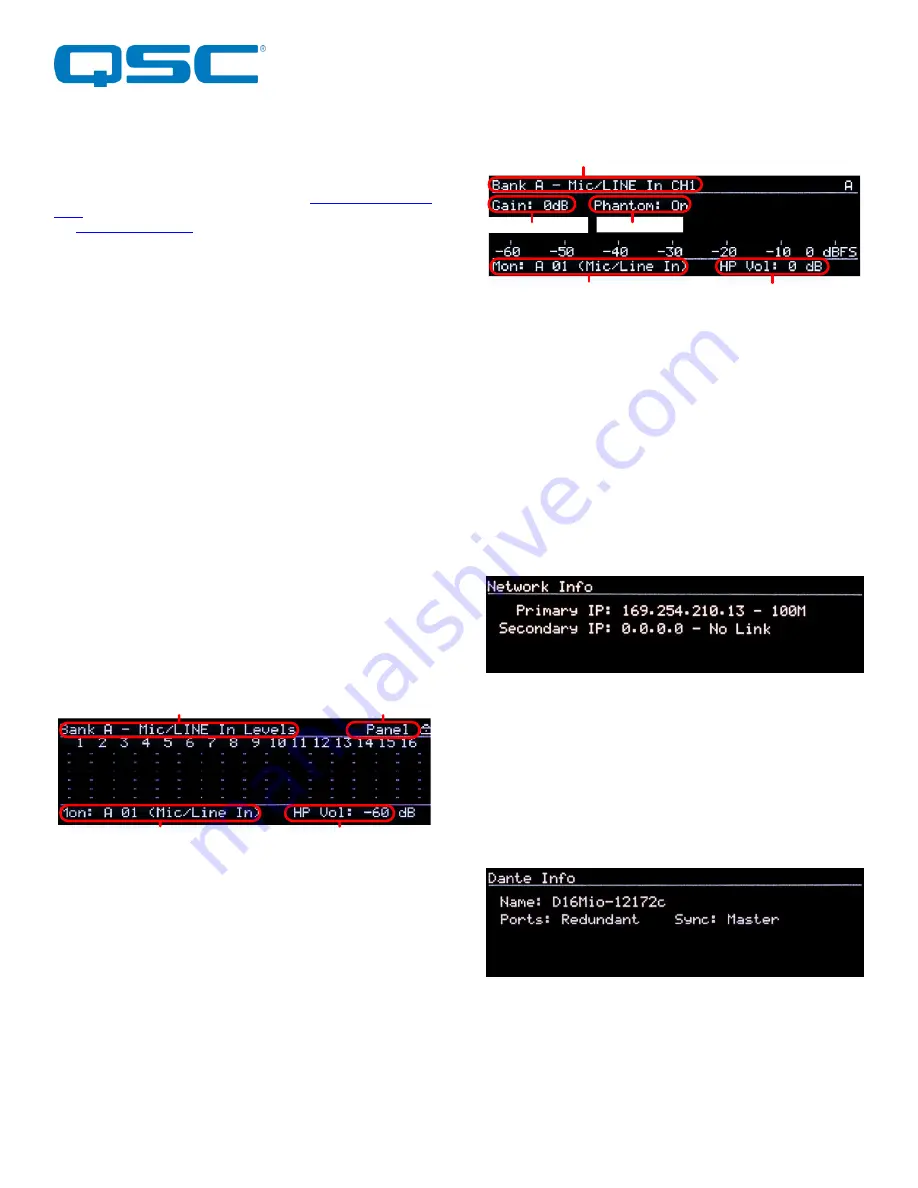
There are two views for bank metering. The main part of each
bank view shows meters for each analog input or output in that
bank. This view can be used to select the monitor output if the
panel lock is not active by pressing in the “Menu Nav” button. This
activates a cursor that can be scrolled used the knob to select one
of the visible channels. Once the desired channel is selected,
press the separate “Monitor Select” button and that channel will
when be routed to the headphone output.
3.1.2 – Channel Metering Views
Each individual input and output channel has its own view. The
meter itself is shown in the horizontally across the main part of
the view from left to right. The name of the current channels
meter being shown is displayed in the upper left hand corner. The
name in parenthesis that follows the name is the channel name
that this channels is identified by on the Dante™ network. This
view can also be used to select the monitor output if the front
panel lock is not active. To do so, with the desired channel on
view, click the “Monitor Select” button.
In the channel metering view, the preamp gain for the channel
may be configured from the front panel by depressing the Menu
Nav encoder. This switches context to the preamp gain control.
In addition the phantom power state can be toggled by pressing
the Monitor Select button. To switch context back to the Menu
Navigation mode.
3.1.3 – Network Info View
The Network info view shows the IP addresses and link speed of
0the D16Mio’s interfaces. In redundant mode, both a primary and
a secondary interface will be shown. The primary port speed will
always indicate the faster of the two possible primary links if they
are both used. The same is true the secondary port speed if both
secondary links are used.
In switched mode, only one interface with its IP address is shown
and the speed indicated will be the fastest speed of any of the
four possible links.
3.1.4 – Dante™ Info View
The Dante™ info view shows information about the Dante™ setup.
The device Dante™ name, its port mode and the devices clock
sync status are all shown. The Dante™ name is name the device
identifies itself as on the Dante™ network. The port state shows
if the device is in either redundant mode or switched mode. The
clock sync indicates whether the device is the “Master” clock for
the system or if it’s a “Slave” to another device. A state of “No
Sync” may indicate a possible problem with either the device or
the network.
Panel Lock
Headphone Volume
Headphone Channel
Screen name
Channel Name (Dante Tx Name)
Headphone Channel
Headphone Volume
Preamp Gain
P48 Status


