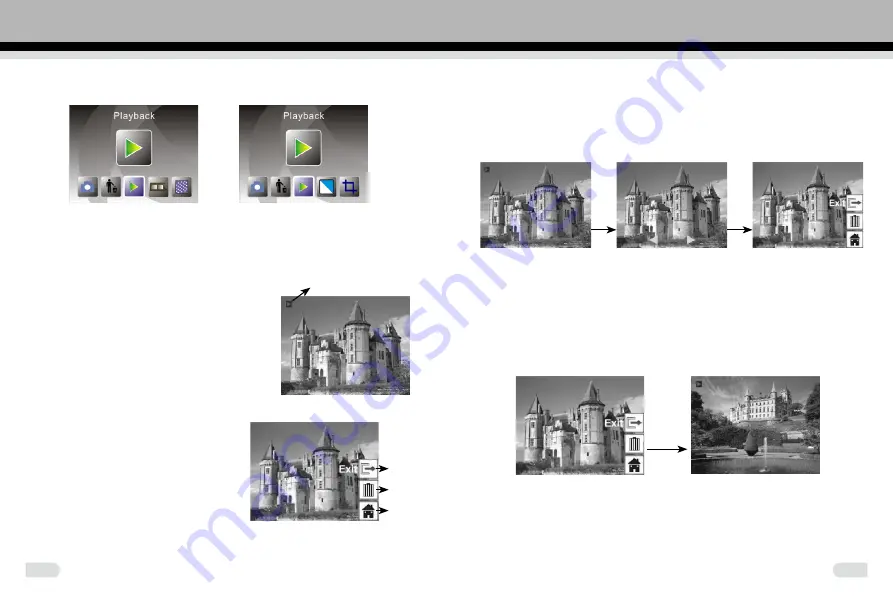
QPIX CBS1400 Скачать руководство пользователя страница 9

14

15

3: Playback

                                                       or

Press the LEFT/RIGHT button to playback mode. Return to the main 

menu by selecting the Home icon or pressing the SCAN button. Press 

the ENTER button to confirm the selection.

3.1 Playback: Auto Slide Show

Playback mode (defaulted to a slide show 

preview), the screen will display all images 

stored in internal memory or memory card. 

There is a 2 seconds interval between 

images. Pause the slide show by pressing 

the ENTER button (Only the images captured 

by the film scanner are displayed in the 

playback mode)

3.2 Playback: Edit Menu

① 

Exit: return to Slide show mode

② 

Delete: delete this picture stored in 

internal memory or memory card

  Home: return to main menu

3.3 Playback: Slide show→Single picture→Edit mode

Pause the slide show mode to single picture playback by pressing the 

ENTER button. Browse through each picture by pressing the LEFT/

RIGHT button. Press the ENTER button to bring out the edit functions to 

modify the selected image.


 Enter                                              Enter

Slide show mode                       Single picture mode Use LEFT/          Edit mode

                                                  RIGHT button To browse pictures

If there is no memory card inserted or there are no images in the internal 

memory, the screen will automatically display 20 frames of defaulted 

images. These images cannot be edited.

3.4 Playback: Exit

                                                                      Enter

Selecting the Exit function in the edit menu, the display will return to the 

slide show mode. It starts from the current picture without any changes 

made.

Slide show mode

Содержание CBS1400

Страница 1: ...CBS1400 MULTI FUNCTION COMBO SCANNER CONVERTS FILMS SLIDES PHOTOS NAMECARDS INTO DIGITAL IMAGES User s manual...

Страница 2: ...ventilation openings The device should be situated away from sources of high heat such as radiators or stoves We strongly suggest using a clean dry nonalcohol cotton swab to periodically clean the gla...

Страница 3: ...oto editing software ISO International Organization for Standardization Film photo scanner 135 Negative Film Holder 135 Positive Slide Holder 110 Film Holder Photo Holder 5 x7 5R 4 x6 4R 3 x5 3R and N...

Страница 4: ...edges so that it locks in place Hold it in the position as shown in the picture Insert the Slide Holder into the slot on the left or right side of the film photo scanner as shown Negative film proper...

Страница 5: ...ng otherwise the device will be powered off automatically To scan film push the switch at the middle of the device to the left side To scan photos push the switch to the right side Insert Slide Negati...

Страница 6: ...in capture mode When enter into capture mode press ENTER button following picture will show on EV means brightness R means red G means green B means blue Press ENTER button to switch press LEFT RIGHT...

Страница 7: ...mode In the capture mode there will be an indicator on the left top corner to indicate that it is in live preview mode Pressing the ENTER button enters the EV value mode Press the LEFT RIGHT button to...

Страница 8: ...aved 1 8 Capture Home Select the Home icon with the LEFT RIGHT button press the ENTER or SCAN button anytime to return to the main menu 1 9 Exit from Edit mode back to Capture mode live view Press the...

Страница 9: ...in internal memory or memory card Home return to main menu 3 3 Playback Slide show Single picture Edit mode Pause the slide show mode to single picture playback by pressing the ENTER button Browse th...

Страница 10: ...he LEFT RIGHT button to delete the current image by selecting the delete icon and press the ENTER button The next image will be shown The selection moves to the Exit icon To continuously delete move t...

Страница 11: ...p proportion 7 Business Card Reader 1 Insert the CD in the CD ROM 2 A pop up installation interface after you put the CD in the CD ROM 3 Install Business Card Reader NIMOCARD is a professional busines...

Страница 12: ...y as below When the scanning is completed you can close the capture window or click on the main window on the back to bring up the preview window as show below 7 2 Edit Window Selected one of the name...

Страница 13: ...Editing User can manually change any content listed on the left side of the window Or right click on any of the selected box on the card image and then re direct them into the right sorting field Use...

Страница 14: ...nds 5 Business card printing Nimocard provides a wide range of printing templates Business card information can be easily printed on a variety of labels or envelopes 6 Data Backup Nimocard provides va...

Страница 15: ...ens Make sure that it is in PHOTO MODE refer to use instructions below 1 Gently push the brush into the scanner 2 Flip the cover open and look through the transparent scanning surface 3 Make sure that...

Страница 16: ...glish French German Italian Spanish Traditional Chinese Simplified Chinese Japanese MADE IN CHINA 1 Gently push the brush into the scanner Question There is unwanted stripe appearance at the edge of t...

Страница 17: ......

Отзывы: