QMS SC-200 Скачать руководство пользователя страница 15

3-1

3. USING QMS SC-200 AS A COPIER

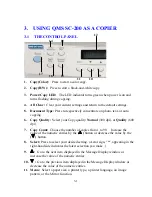
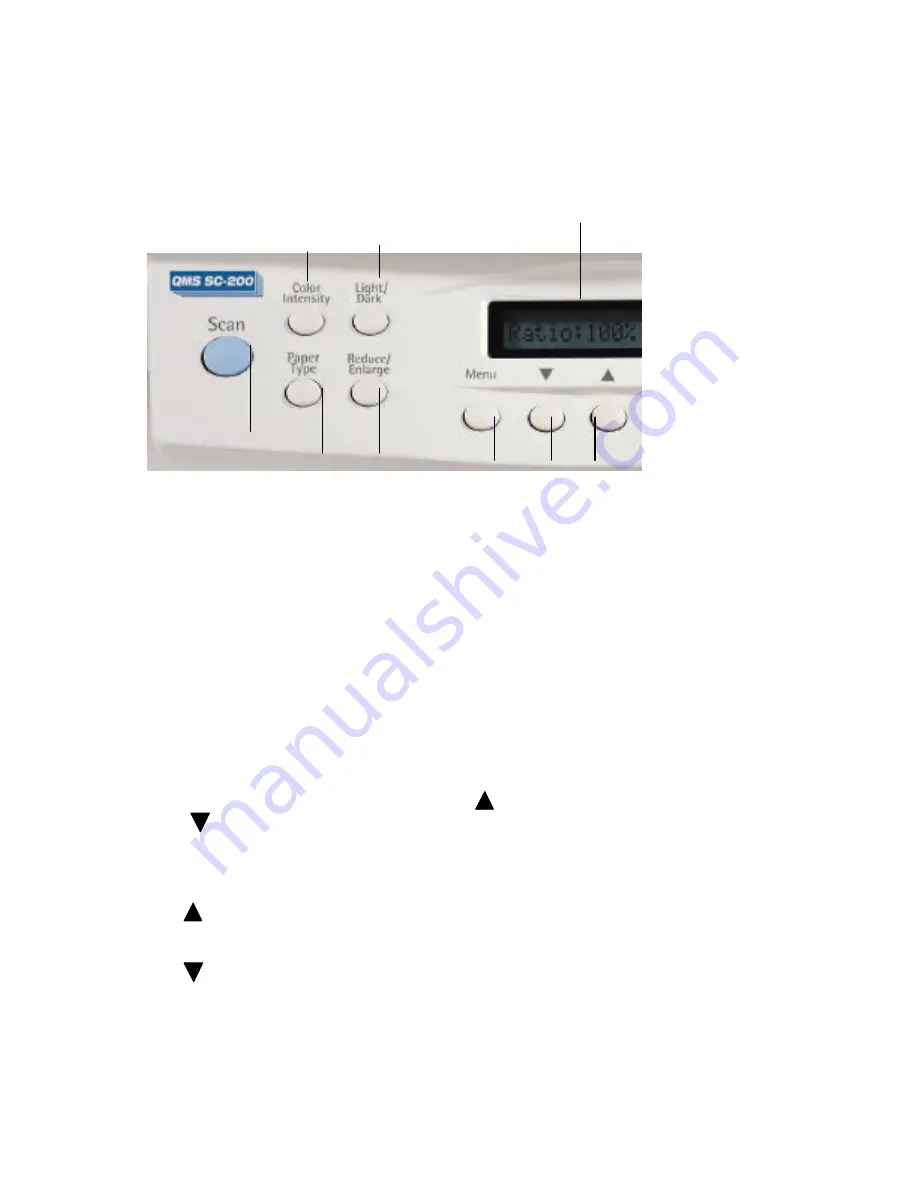
3.1   THE CONTROL PANEL

1. Copy(Color):   Press to start a color copy.

2. Copy(B/W):   Press to start a black-and-white copy

3. Power/Copy LED:   The LED indicator turns green when power is on and

turns flashing during copying.

4. All Clear:  Clear your current settings and return to the default settings.

5. 

Document Type: Press to respectively concentrate on photo, text, or auto
copying.

6. Copy Quality:  Select your Copy quality: Normal (300 dpi), or Quality (600

dpi).

7. Copy Count:  Choose the number of copies from 1 to 99.    Increase the

value of the numeric entries by the (

 ) button or decrease the value by the

(

)  button.

8. Select: Press to select your desired setting. (A star sign, "*", appearing in the

right-hand side indicates the latest selection you make .)

9. 

 :  Go to the next item displayed in the Message Display window or

increase the value of the numeric entries.

10. 

 :  Go to the previous item displayed in the Message Display window or

decrease the value of the numeric entries.

11. 

Menu:  Select a paper size, a printer type, a printer language, an image
pattern, or the Mirror function.

12

13

14

10

11

15

16

17

9

Содержание SC-200

Страница 1: ...QMS SC 200 User s Manual D N 250 0234 E QMS Inc...

Страница 2: ...ight All rights reserved No part of this publication may be reproduced transmitted transcribed stored in a retrieval system or translated into any language or computer language in any form or by any m...

Страница 3: ...warranty of any kind with regard to this material including but not limited to the implied warranties of fitness for a particular purpose The manufacturer shall not be liable for errors contained her...

Страница 4: ...interference by one or more of the following measures Reorient or relocate the receiving antenna Increase the separation between the equipment and receiver Connect the equipment into an outlet on a ci...

Страница 5: ...AKING SIMPLE COPIES 3 6 3 4 MAKING COPIES WITH COPY FEATURES 3 7 3 4 1 MIRROR FUNCTION 3 7 3 4 2 ENLARGING OR REDUCING YOUR ORIGINAL 3 8 3 4 3 AUTO ZOOMING YOUR ORIGINAL 3 9 3 4 4 CHANGING YOUR COPY D...

Страница 6: ...NT PRINTING 5 1 5 1 IMAGE TYPE 5 3 5 2 SCANNING PARAMETERS IMAGE CONTROL 5 5 5 3 SCANNING 5 11 5 4 PRINTING 5 12 6 MAINTENANCE 6 1 7 TROUBLESHOOTING 7 1 7 1 QUESTIONS AND ANSWERS 7 1 7 2 TECHNICAL SER...

Страница 7: ...200 the best convenience copier solution for office The following sections introduce the unpacking hardware and software installation the operation and maintenance information to you Please spend a fe...

Страница 8: ......

Страница 9: ...1 3 Package Contents 1 Software CD 2 Power Adapter 3 QMS SC 200 Cable 4 Quick Installation Guide 5 QMS SC 200 main unit...

Страница 10: ...heat may cause damage to the unit Do not install the QMS SC 200 in a humid or dusty place Be sure to use the proper AC power source Place the QMS SC 200 securely on an even flat surface Tilted or unev...

Страница 11: ...shipment the QMS SC 200 is designed with a lock switch beneath the main unit Therefore before using the QMS SC 200 it is required to unlock QMS SC 200 by moving the lock switch to the Use position See...

Страница 12: ...ING QMS SC 200 TO WORK AS A COPIER Connect the power cable and signal cable as shown below Figure 2 2 Connect QMS SC 200 to a printer 1 QMS SC 200 main unit 2 To Printer port 3 Printer Cable 4 Power J...

Страница 13: ...2 4 2 3 2 CONNECTING QMS SC 200 TO WORK AS A SCANNER Figure 2 3 QMS SC 200 Cable Connection 1 QMS SC 200 main unit 2 Power Adapter 3 QMS SC 200 Cable 4 PC Parallel Port 5 Printer Cable...

Страница 14: ...2 4 DOCUMENT PLACEMENT As shown in Figure 2 4 place the document on the glass face text down Figure 2 4 Document Placement 1 Document Cover 2 Home Position Mark 3 Document 4 Document Glass 5 Control P...

Страница 15: ...0 dpi or Quality 600 dpi 7 Copy Count Choose the number of copies from 1 to 99 Increase the value of the numeric entries by the button or decrease the value by the button 8 Select Press to select your...

Страница 16: ...by the button 15 Reduce Enlarge Reduce enlarge or auto zoom your original document Press to select the preset ratios 100 115 122 141 200 400 Auto 25 50 and 86 Choose your desired ratio or adjust the...

Страница 17: ...1 An item message in the Message Display Windows ending with a means the last setting 2 The default settings are Letter Size Normal Print Quality 100 ratio 1 copy IMPORTANT PRINTER MEMORY To make goo...

Страница 18: ...ul color copy Copy Quality Document Size Min Printer Memory Normal Letter Size Legal Size 4MB 8 MB Quality Letter Size Legal Size 16MB 20MB If there is not enough memory in your printer you may probab...

Страница 19: ...ow displays A4 If your current paper supply is letter size please press the Select button The Message window now displays A4 This means you have successfully changed the default size to A4 If legal si...

Страница 20: ...iginal face down on the document glass 2 Press the Copy button The Message window displays Copy and the Ready LED is flashing 3 Within a few seconds the copying is done The Message window then display...

Страница 21: ...mirror The Operating Steps 1 Place your document face down on the document glass 2 Keep on pressing Menu button till the message Mirror off appears 3 Press the or button to get the message Mirror on 4...

Страница 22: ...e button to see more options For example if you need 150 enlargement select 141 then press the s button to increase the percentage to 150 in 1 increment 4 Press the Copy button And then the printout s...

Страница 23: ...tion or reduction will be larger than the existing paper size set on the SC 200 The Operating Steps 1 Repeat the above Enlargement Step 1 2 2 Repress the Enlarge Reduce button until the Message Window...

Страница 24: ...mpensate the unsatisfactory original The Operating Steps 1 Place your original face down on the document glass 2 Press the Lighter Darker button The Message Window displays the default degree of darkn...

Страница 25: ...of this function you could get the most optimal color preference desired The Operating Steps 1 Place your original face down on the document glass 2 Press the Color Intensity button The Message Windo...

Страница 26: ...ess the Copy Count button and the Message Window displays 2 copy 100 3 Repress the Copy Count button and the Message Window displays 3 copy 4 Press the Copy button After a few seconds you have 3 copie...

Страница 27: ...ass 2 Press the Copy Quality button The Message Window displays Normal mode 3 Repress the Copy Quality button and the Message Window displays Quality mode 4 Press the Copy button The copying begins pr...

Страница 28: ...portion of the photo image is almost the same as that of text in the original to be copied it is recommended to utilize the Auto function from Document Type button in order to get the most optimal pri...

Страница 29: ...gly clear The Operating Steps 1 Place your 3D object on the document glass 2 Press the Copy Quality button and the Message Window displays Normal mode 3 Repress the Copy Quality and the Message Window...

Страница 30: ...SC 200 over an hour it automatically turns into power saving status At this moment the Message Window displays Power Saving while the Ready LED is flashing To resume the ready status press any one of...

Страница 31: ...ilable EPP enhanced parallel port 20 Megabytes of available hard disk space for installation 16 Megabytes of RAM 32 Megabytes or higher recommended A video graphics array VGA monitor A Microsoft Windo...

Страница 32: ...3 Press the Start button choose RUN type d driver SC 200 exe d the CD ROM drive in use and then click O K See Figure 3 1 3 2 4 Follow the on screen instructions to complete the installation Fig 3 1 Fi...

Страница 33: ...4 19 4 2 UNINSTALL THE QMS SC 200 DRIVER You can uninstall the QMS SC 200 driver by selecting Start Programs QMS SC 200 and clicking the Uninstall driver icon from QMS SC 200 group...

Страница 34: ...user guide of your application to learn how the TWAIN link is used 2 A dialog box appears containing the different TWAIN sources that you can choose to bring an image into your application 3 Select SC...

Страница 35: ...5 2 6 From the File menu select Acquire 7 The TWAIN user interface will pop up on the screen Click on the Preview or Scan button to get the image The TWAIN user interface...

Страница 36: ...well as transparency Line art Line art presents the image in black and white only and there are no intermediate shades of gray in between Halftone In addition to the black and white display Halftone c...

Страница 37: ...els of gray scale 12 bit Gray presents a 4096 shades of gray in an image Color Internal 68 7 billion colors The 36 bit True Color internally presents 68 7 billion color levels with much more tonal ran...

Страница 38: ...up to a certain level the resolution will not be visually increased but the disk space will be increased Brightness Adjusts the lightness or darkness of an image The higher the value the brighter the...

Страница 39: ...ts the whole document as the scan area no matter what its size Descreen Eliminates the Moire patterns commonly found in printed matter Before descreen After descreen Invert Advance_Settings Quality Mo...

Страница 40: ...ill be changed into its complementary color at the command of Invert Advance Settings The Advance Settings provide several functions such as Dynamic Background Removal and Color Drop out These functio...

Страница 41: ...then the text or background in blue color will be removed On the other hand if your original contains various color data then check the Neutral Gray to retain all the color data in gray since removin...

Страница 42: ...rding to their own need Select quality mode scanning if your emphasis is on the quality of the scanned image Or you can select speed mode scanning if you want to speed up the scanning process Pixel In...

Страница 43: ...5 10 Set Gamma Adjusts the midtone of the image yet without losing details of the lightest and the darkest areas at the same time Image Information Gives related information of the scanned image...

Страница 44: ...it Cancels the current job Document Size To designate the size of your document just click on its icon on the margin of the preview window As shown in the figure below in the Preview window you can de...

Страница 45: ...f you want to do pass through printing 2 Do not scan and print at the same time 3 If your PC does not support EPP mode or has pass through compatibility problem please contact your authorized local de...

Страница 46: ...e optimum image quality and performance Procedure 1 Open the document cover as shown in Figure 6 1 2 Dip a soft clean cloth with isopropyl alcohol 95 3 Gently wipe the document glass and the white she...

Страница 47: ...6 2 1 Document Cover 2 White Sheet 3 Document Glass Figure 6 1 Cleaning 1 3 2...

Страница 48: ...ess setting of the TWAIN user interface to get a brighter image Question The scanning speed of my QMS SC 200 is much slower than that of those installed at other computers Can I speed it up Answer Set...

Страница 49: ...n con Question The printer does not print the documents Why Answer Pass through printing may pose a problem for some printers It is suggested to add a second printer card for printing purpose or you m...

Страница 50: ...g pass through printing please be sure to power on the QMS SC 200 Else without power the QMS SC 200 can not transfer the printing data signals to the printer Question Why my GDI printer does not work...

Страница 51: ...ith devices other than printer Therefore if you would like to connect some parallel port devices other than printer please do not connect them to the same parallel port that the QMS SC 200 currently u...

Страница 52: ...n e g your host CPU type RAM size free disk space display card interface card The name and version of your scanning software application The version of your scanner driver The brand and model name of...

Страница 53: ...South Africa QMS United Kingdom and Ireland QMS Netherlands and all unlisted countries Internet http www qms nl 61 2 9901 3235 514 340 0646 33 1 410 79 393 49 89 63 02 67 0 39 52 1231 998 46 8 600 01...

Страница 54: ...ormal 300x300dpi 360x360dpi Quality 600x600dpi 720x720dpi Print Area Max 8 5 x 14 0 Legal size Zooming 25 up to 400 1 increment with 10 pre settings 100 115 122 141 200 400 86 50 25 and Auto Zoom Dens...

Страница 55: ...Switching Adapter Power Consumption 15 W Scan Accuracy 1 Leading Edge 1 2mm 2 Side Edge 1 2mm 3 Skew 1mm 4 Magnification Rate Tolerance Total 1 5 1 5 Physical Dimension Width 457mm 18 Depth 356 mm 14...

Страница 56: ...se Operating 50 dBA or less Electrostatic Discharge IEC 1000 4 2 ESD Standard Safety Regulation CSA C UL UL 1950 3rd Edition EN60950 IEC 950 EMI regulation FCC Part 15 Subchapter J Class A CE Marking...

Страница 57: ...te at 300dpi color Letter size 4 PPM at 300dpi gray Letter size Scan Method Color Charged Coupled Device CCD Light Source Cold Cathode Fluorescent Lamp CCFL CPU RISC CPU Scan Area Max 8 5 x 14 0 Legal...

Страница 58: ...34 633 4300 declare that the product Model Number QMS SC 200 conforms to the following Product Specifications Emission EN 50081 1 1992 EN 55022 Class A Conducted Radiated 1994 Immunity EN 60555 2 Harm...

Отзывы: