4
QMS
magicolor
2+ Print System
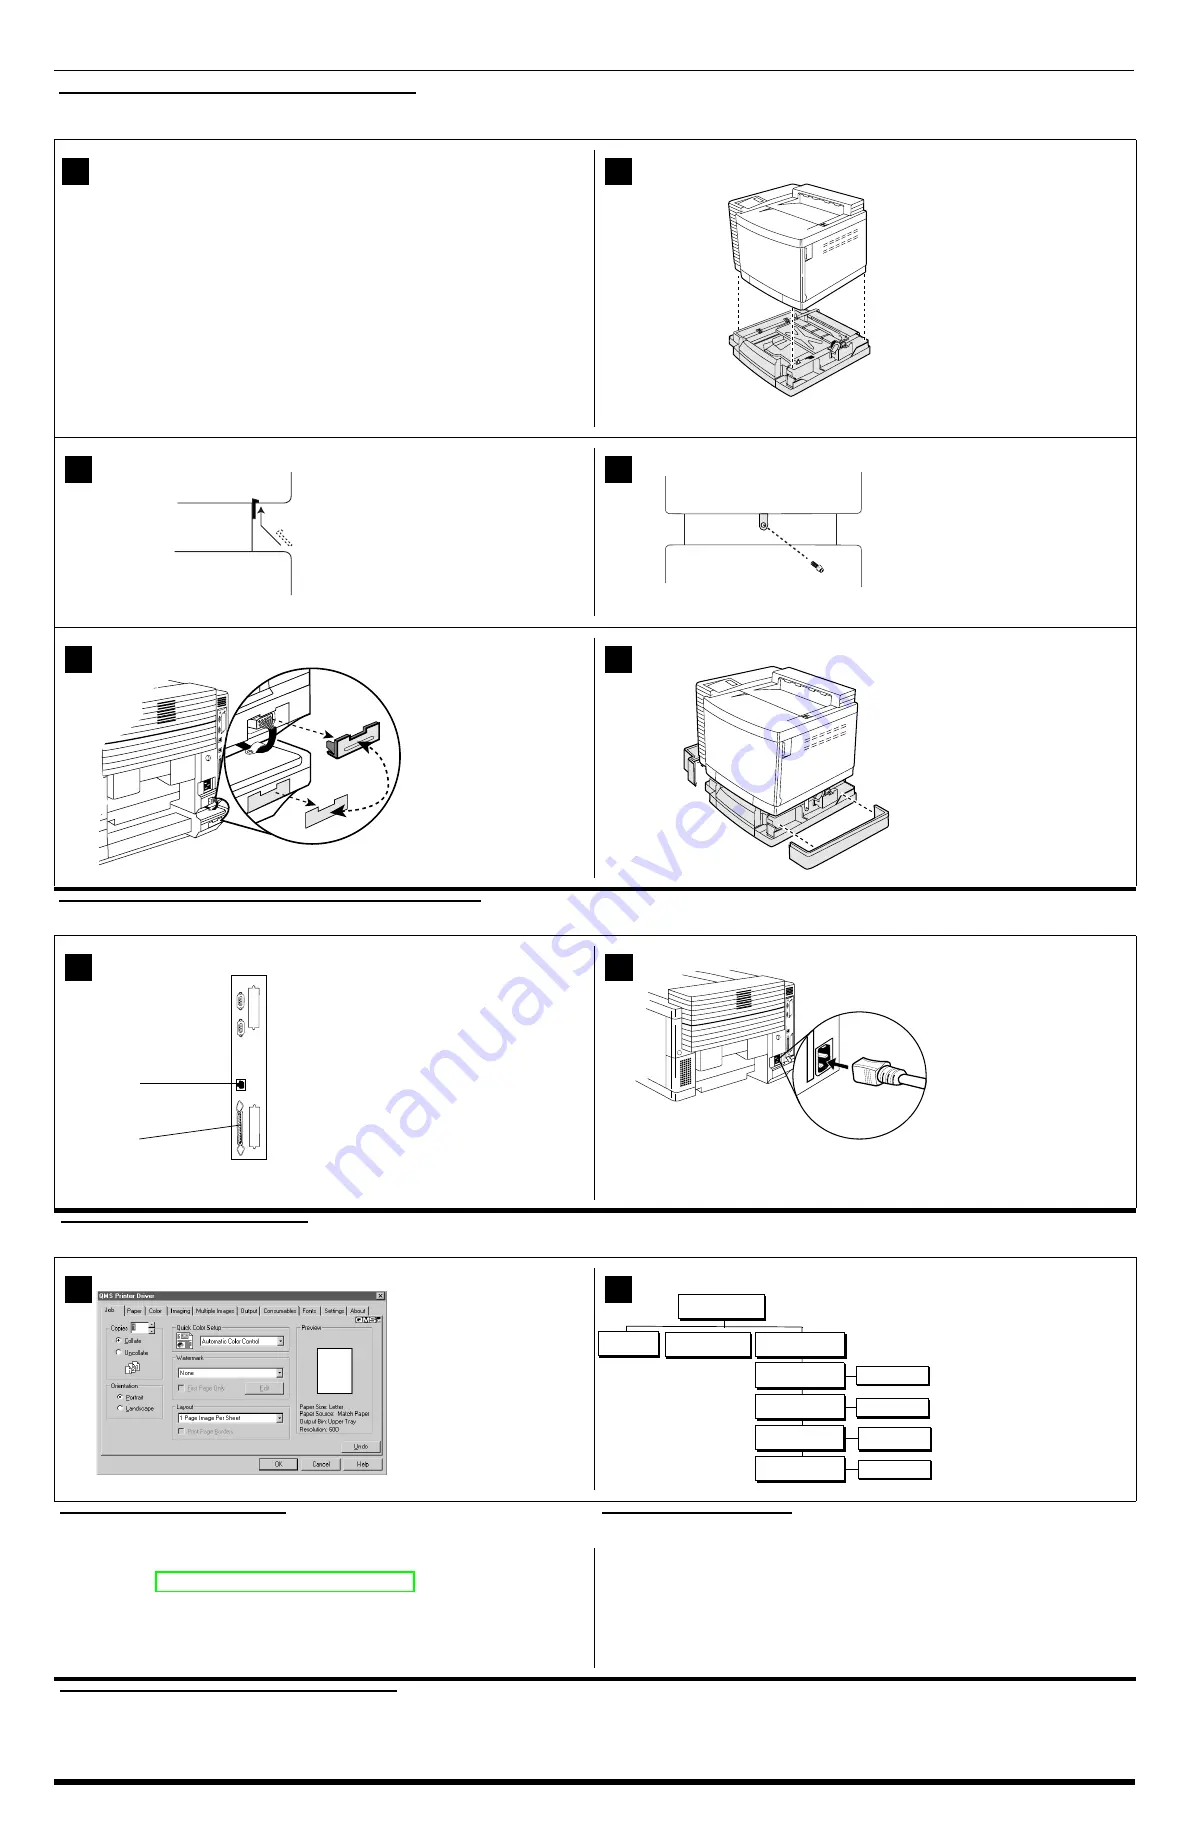
G. Installing the Lower Input Feeder
(Skip to “H. Connecting Interface and Power Cables” if you have an EXD
model or if you didn’t purchase a lower input feeder.)
Check the lower input feeder kit contents:
•
Input feeder unit
•
Letter/A4 media cassette
•
Two small metal brackets with thumbscrews
•
Two plastic side covers
Remove the feeder from the shipping carton, and place it on a flat surface.
WARNING!
If consumables are installed, be sure to keep the printer
level when moving it to prevent accidental spills.
ACHTUNG!
Achten Sie bitte darauf, das der Drucker mit eingebauten
Tonerkartuschen nur waagerecht transportiert wird.
Remove any tape and
packing material from the
feeder.
Set the printer on top of the
input feeder.
Be sure to align the printer
and input feeder as
precisely as possible.
Install the two metal
brackets underneath the
sides of the printer.
Holding the bracket at a
slight angle, slide it up into
the hole underneath the
printer before setting it to
vertical.
Make sure that the hole in
each metal bracket is lined
up with the corresponding
hole on the input feeder.
Use the thumbscrews to
attach the two brackets to
the lower input feeder.
Locate the cable at the left
rear of the optional feeder,
and connect it to the printer.
Switch the feeder cover
plates after the cables have
been connected.
Snap the plastic side
covers onto the appropriate
sides of the input feeder.
Caution:
If you move
the printer with the
lower input feeder
attached, lift the unit
by the four bottom
corners of the feeder,
not by the feeder's
cassette slot and not
by the printer itself.
H. Connecting Interface and Power Cables
Refer to the
Connecting
Your QMS Print System
manual
for instructions on
how to connect your printer
to a computer or network.
» Note:
The printer requires a brief warmup
(typically 3 minutes).
Plug the printer into a
grounded, surge-protected
electrical outlet.
»
Note:
In compliance
with UL guidelines, “The
appliance inlet is
considered to be the
main disconnect
device.”
A startup page should
print when the printer is
turned on.
I. Configuring the Printer
See the
Connecting Your
QMS Print System
manual
for instructions on installing
the QMS printer driver.
Use the on-line help to
configure the driver for
printing.
See the
Reference
manual
manual
(on the
magicolor
2+
Documentation
CD-
ROM) for further
instructions on advanced
printer configuration
through the control panel
menus.
Registering the Printer
Further Assistance
Internet—Visit the QMS Product Registration page on the Internet
at http://www.qms.com/support/prodreg/.
Mail—Fill out and send in the warranty card enclosed in your
shipment.
Telephone—In the US, call QMS toll-free at (887) 778-2687.
Refer to one of the following:
•
QMS
magicolor
2+ Operation
manual.
• Appendix A, “QMS Customer Support,” in any QMS
magicolor
2+ Print
System manual.
Trademarks and Copyright Notice
QMS,
magicolor
, and the QMS logo are registered trademarks of QMS, Inc. This document is Copyrighted © 1999 by QMS, Inc., One Magnum Pass, Mo bile, AL
36618. All Rights Reserved. This document may not be copied in whole or in part, nor transferred to any other media or language, without the express written
permission of QMS, Inc.
1
2
3
+&
,(
*!
- .
, /
4
+&
,(
( /
5
6
1
'''
0
2
1
2
Operator
Use Operator
Admin
Use Admin
Off, On
(Enter
Off, On
password)
Idle
password)
(Enter
Operator
Control
Administration
Installation


