background image

++ 

!,+


'&  

9

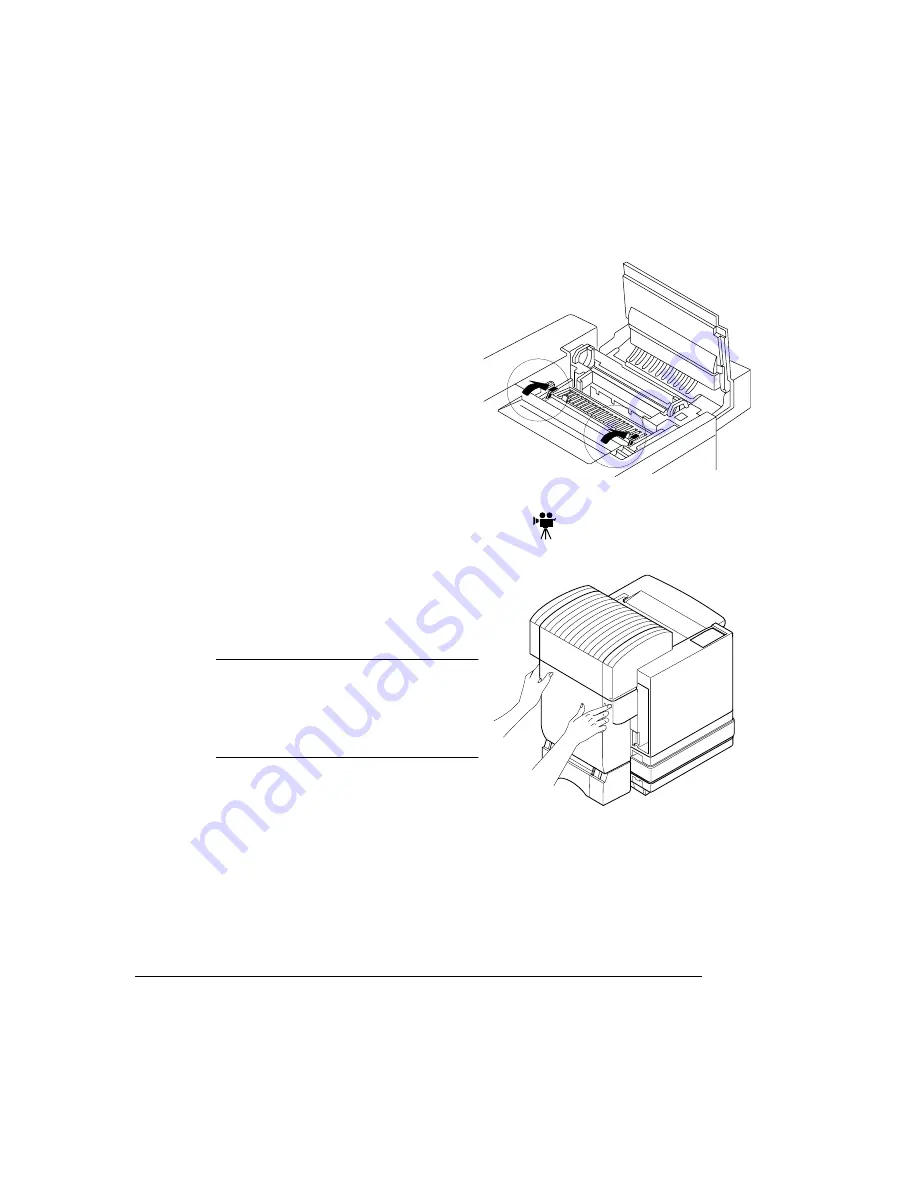
Rotate the two lock levers to secure 
the OPC belt cartridge in the printer. 

10 Close the printer’s front cover. 

1

If it’s not already open, open the 
duplexer’s rear cover.

If you do not have a duplex model, skip 
to step 2.

Caution: If you have a duplex model, 
make sure you have opened the 
duplexer’s rear cover before opening 
the top of the printer. Forced opening of 
the top cover first may damage the unit.

Содержание Magicolor 2 Desklaser

Страница 1: ......

Страница 2: ...in whole or in part without the express written permission of QMS Inc This manual is Copyrighted 1999 by QMS Inc One Magnum Pass Mobile AL 36618 All Rights Reserved This manual may not be copied in wh...

Страница 3: ...Manuals on the CD ROM 2 Typographic Conventions 4 Find a Good Location 5 Location Requirements 5 Power Requirements 7 Computer Requirements 7 Check Shipment Contents 8 Shipment Contents 8 Media 9 Unp...

Страница 4: ...te 25 Prepare the Paper 25 Load the Cassette 26 Connect the Printer to Your Computer and Plug It In 28 Parallel Connection 28 Install Options 29 Ethernet Connection 29 Install a Printer Driver 30 Wind...

Страница 5: ...QMS World wide Offices A 4 QMS United States and Latin America A 4 QMS Canada A 4 QMS in Japan A 5 QMS EMEA A 5 Index...

Страница 6: ......

Страница 7: ...d on the QMS magicolor 2 DeskLaser Print System Documentation and Software CD ROM You re looking at this document right now It con tains detailed illustrated instructions to guide you as you unpack an...

Страница 8: ...g capability up to 800 You can conduct full text searches through all of the manuals You can watch QuickTime video clips that enhance the text and illustrations for a number of commonly performed proc...

Страница 9: ...the document As you browse through the document the open hand tool will sometimes turn into a pointing hand You have discovered an embedded link in the manual You will find these links in the table o...

Страница 10: ...e sich exakt an die im Handbuch beschriebene Vorgehensweise da sonst Verletzungsgefahr bestehen k nnte Mixed Case Courier Text you type and messages and information displayed on the screen Mixed Case...

Страница 11: ...r on a hard flat level within 1 5 surface capable of supporting about 110 lbs 50 kg for the DeskLaser or 126 lbs 57 1 kg for the Duplex Model A surface can be tested for levelness with a standard roun...

Страница 12: ...DeskLaser Duplex Model...

Страница 13: ...electrical outlet as the printer The recommended frequency is 50 60 Hz 2 Hz for a 100 V system 60 Hz 2 Hz for a 120 V system and 50 Hz 2 Hz for a 220 240 V system Printer performance depends upon the...

Страница 14: ...bottle Fuser cleaning roller Fuser oil removal syringe QMS magicolor 2 DeskLaser Installation Guide QMS magicolor 2 DeskLaser Setup Guide this manual A plane is a single pass of the OPC belt one tone...

Страница 15: ...If you need a cable contact your local vendor or a local computer store See Connect the Printer to Your Computer and Plug It In on page 28 for information on the type cable needed If you need alterna...

Страница 16: ...rom the base tray and place it in its permanent location When lifting or carrying the printer use the carrying grips on the bottom sides of the printer WARNING The DeskLaser weighs about 66 lbs 30 kg...

Страница 17: ...ide the duplexer Reach into the duplexer s rear cover to access the printer s rear cover 8 Remove any tape securing the printer s rear cover 9 Pull the handle on the printer s rear cover to open it No...

Страница 18: ...13 Remove any packing material from the printer s waste toner pack Caution Remove the waste toner pack once and reinstall it to ensure that it has not become dislodged during transportation 14 Remove...

Страница 19: ...l from inside the printer 17 Remove the orange shipping spacers from between the fuser rollers Caution It s very important to remove both shipping spacers Note Save the spacers in case you need to rep...

Страница 20: ...Before installing the consumables and operating the printer you should become famil iar with certain physical items...

Страница 21: ...Before installing the consumables and operating the printer you should become famil iar with certain physical items...

Страница 22: ...4adupbk eps...

Страница 23: ...steps 1 and 5 show the printer without the duplexer However the instructions are the same for both models 2 Remove the toner cartridges from their shipping cartons 3 Distribute the toner in the cartr...

Страница 24: ...e in easily don t force it In addition don t push it in until you hear a click If you hear a click you ve locked it into place against the OPC belt cartridge and your prints may be smudged Align the t...

Страница 25: ...OPC belt is also extremely sensitive to touch Always handle the cartridge so you don t touch the surface of the belt Any body oil left on the surface of the belt will prevent toner from adhering to t...

Страница 26: ...printer Forced opening of the top cover first may damage the unit 3 Pull the top latch to release the top cover then open the top cover Note The illustrations for steps 3 through 10 show the printer...

Страница 27: ...e spacers in case you need to repack the printer for relocation or shipping later 7 Holding the cartridge above the printer align the guide pins on the cartridge with the guide slots in the lock lever...

Страница 28: ...front cover 1 If it s not already open open the duplexer s rear cover If you do not have a duplex model skip to step 2 Caution If you have a duplex model make sure you have opened the duplexer s rear...

Страница 29: ...ase the top cover and then open the top cover Note The illustrations for steps 2 through 7 show the printer without the duplexer However the instructions are the same for both models 3 Open the two cl...

Страница 30: ...e bottle must be on the right Note Because the first oil bottle must prime the printer it has less than the normal 12 000 page 1 sided life expectancy 5 Install the cleaning roller in its slot The lar...

Страница 31: ...r through the sheets and prevents static buildup If you re loading other media types see Using Media Other Than Paper on page 3 6 in the User s Guide 3 Take off the top and bottom sheets These sheets...

Страница 32: ...he size paper you re loading Squeeze the retainers at the ends of the left width guide and or the length guide move the guide to the appropriate location media sizes are listed on the cas sette and re...

Страница 33: ...s initial cooldown pause the printer automatically resumes its printing From that point forward while doing continuous printing the 3 minute cooldown pause occurs every 50 pages until the continuous p...

Страница 34: ...parallel port on the PC If you re replacing a printer already connected to a PC you probably already have a parallel cable If not contact your local vendor or computer store Also see appendix B Techni...

Страница 35: ...pair RJ45 Ethernet cable con nect the Ethernet port on the printer to a 10BaseT concentrator If you re replacing a printer already connected to an Ethernet network you may already have a twisted pair...

Страница 36: ...your PC in the usual way 2 Turn on the printer the power switch is on the left side The printer goes through an initialization warmup and self testing that lasts less than 2 minutes When the warmup i...

Страница 37: ...s 3 From the Settings menu choose Printers 4 Double click on the Add Printer icon The Add Printer Wizard opens 5 Follow the instructions in the Add Printer Wizard 6 When prompted select Local Printer...

Страница 38: ...printer into the CD ROM drive on your PC 2 In the Windows NT Start menu choose Settings 3 In the Settings menu choose Printers 4 In the Printers window double click the Add Printer icon The Add Printe...

Страница 39: ...name or type a new one and then choose Next 15 If you re adding a new Windows NT 4 0 printer driver perform this step oth erwise go to step 16 a When prompted choose not to replace the existing drive...

Страница 40: ...ws NT 4 0 printer driver installs and then the Windows desktop appears 18 Remove the CD ROM from the computer and store it in a safe place Note If you connected your printer via the parallel port you...

Страница 41: ...es of the existing monitor If you want to create backup files choose Yes If you choose Yes the Select Backup Directory dialog box appears Enter an appropriate destination and press Enter or choose OK...

Страница 42: ...ays in the Print to list box of the Printer Properties dia log box in Print Manager If the port name exists already the following message displays The port name port_name already exists on this comput...

Страница 43: ...e port before the address is entered in the Network Host Name file printing of the job fails c Select Cancel to abort adding the port and to exit from the Add QMS Port dialog box 10 Choose OK 11 Choos...

Страница 44: ...n the QMS Network Print Monitor updates Print Manager with status information on the print device attached to the port Scroll through the list box and select a value between 1 and 600 seconds The defa...

Страница 45: ...ndows 95 98 refer to the installation instructions on page 34 The QMS Network Print Monitor is installed on your Microsoft Windows NT worksta tion or server There are two different methods for install...

Страница 46: ...t Monitor If the monitor is not located in the source directory that displays edit the path and choose OK The monitor installation dialog box displays briefly informing you that the setup program is c...

Страница 47: ...open it 13 Choose the Services icon 14 Highlight Spooler in the Services dialog box and choose the Stop button located on the right side of the dialog box The following message displays Are You Sure Y...

Страница 48: ...he right mouse button 4 In the Print Servers Properties dialog box select the Ports tab 5 Choose the Add Port button 6 Choose the Printer Ports button 7 Select QMS Port from the list then choose OK 8...

Страница 49: ...ifier is given the following message displays The port address IP_Address could not be resolved on this computer Accept it anyway Do one of the follow ing a Select No and type another valid IP address...

Страница 50: ...o the port Scroll through the list box and select a value between 1 and 600 seconds The default is 5 seconds b Status request timeout Sets the amount of time that the QMS Network Print Monitor waits f...

Страница 51: ...ing in the log c Information Enables information message reporting in the Application Event Log Click the Information check box to enable information message reporting A clear check box disables error...

Страница 52: ...one of the following ways Internet To register on the Internet visit the QMS Registration page at http www qms com support support_set htm Mail To register by mail fill out and send in your warranty...

Страница 53: ...Sources of Support on page A 2 QMS World wide Offices on page A 4...

Страница 54: ...l information about QMS The QMS ftp resource is ftp qms com The QMS Answer Base is a free interactive online technical support system for the QMS magicolor 2 DeskLaser It answers common questions and...

Страница 55: ...F The application and version you re using The emulation of the file you re trying to print listed on both the status and startup pages Your printer firmware version displayed on the control panel LCD...

Страница 56: ...National Service Service Information Installation and Maintenance Pricing 1 800 858 1597 1 800 762 8894 Custom Service Contracts Only On Site Service and Depot Repair Information 1 877 778 2687 7 00...

Страница 57: ...ands and all unlisted countries Planetenbaan 60 Corner Plaza 3606 AK Maarssen The Netherlands Telephone 31 346 551333 Fax 31 346 550170 Internet http www qms nl V lizy Plus 1 Bis Rue du Petit Clamart...

Страница 58: ...30 Fax 46 8 600 01 33 Saskay House Unit 24 Sunninghill Business Park Peltier Road Sunninghill Johannesburg Republic of South Africa Telephone 27 11 807 6957 Fax 27 11 807 6960 United Kingdom and Irela...

Страница 59: ...DeskLaser 5 Documentation Standard product 1 Driver printer Installing Windows 95 98 30 31 Installing Windows NT 4 0 32 Duplex 5 15 Energy Star 7 Installation Cassette 25 Printer driver Windows 95 98...

Страница 60: ...Windows NT 4 0 32 QMS Customer Response Center CRC A 3 World wide offices A 4 QMS Port Add 35 42 QMS Port Configure 37 44 Timers 38 44 Registration printer 46 Requirements PC 7 28 Service United Stat...

Отзывы: