Qlink XF200 Скачать руководство пользователя страница 1

INTRODUCTION

Thank you for choosing a Qlink Brand  F200 motorcycle. Our company uses the latest advanced 
production technology and equipment in the design and development of this type of motorcycles to offer 
you a reliable performance, novel style and good appearance. Riding a motorcycle is one of the most 
exciting activities, and also an ideal traffic tool that make you happy. Before operating your motorcycle,
read this manual carefully.
This manual outl ines the correct met hods of repairing and maintaining motorcycles. Compliance with the
stipulations and requirements will contribute to the long-lasting and trouble-free operation of your 
motorcycle. The well-trained and skilled maintenance personnel in the sales agencies and service centers 
of Qlink are ready to offer the best service.

X

USER'S MANUAL

Содержание XF200

Страница 1: ...ost exciting activities and also an ideal traffic tool that make you happy Before operating your motorcycle read this manual carefully This manual outlines the correct methods of repairing andmaintain...

Страница 2: ...operations that cause the engine to be overheated Refer to the section on Running in of New Motorcycles for details about the running in operation Please carefully read this manual and strictly obser...

Страница 3: ...3 Operation 5 Hints on Use of Fueland Engine Oil 13 Running in Operation 14 Inspection Prior to Riding 15 Main Points for Riding 17 Check and Maintenance 21 Measures of Reducing Pollution 37 Troubles...

Страница 4: ...t Riding speed variesaccording to theroad conditions yourriding skill andthe weather Awarenessof your safety speed limit may help avoid accidents At any time only ride within your safety speed limit T...

Страница 5: ...tion or authorizeddealers the numberwill also lend you a hand The chassis number is stamped on the vertical pipe of the chassis and the engine number is on the left of the crankcase The metal nameplat...

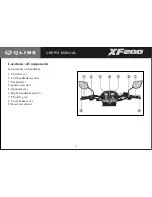
Страница 6: ...Locations of Components 3 Instruments on handlebar 1 Clutch lever 2 Left handlebar switch 3 Tachometer 4 Ignition switch 5 Speedometer 6 Right handlebar switch 7 Throttle grip 8 Front brake lever 9 Re...

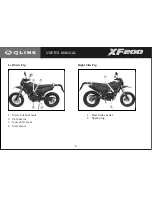
Страница 7: ...USER S MANUAL 4 1 Switch of fuel tank 2 Carburetor 3 Gear shift lever 4 Side stand Left Side Fig Right Side Fig 1 Rear brakepedal 2 Spark plug...

Страница 8: ...the right side indicator is yellow when to the left the left side indicator becomes yellow Tachometer It indicates the running speed of the engine in rpm Hi Beam Indicator The blue indicator will be...

Страница 9: ...then insert the key Rotate it connter clockwiseto full stopfor locking thehandlebar WARNING If the handlebaris locked themotorcycle is neverpushed any longer otherwise you willlose balance Left Handle...

Страница 10: ...the turning signal lamp in time After turning switch off the turning lamp in time Horn Button Press this button to make the horn sound Clutch Lever Grip this lever to disengage the driving system at...

Страница 11: ...t on thestarter motor cannot start andthe starting circuitbreaks completely Throttle Grip The grip is used to control the speed of the engine Turn it anti clockwise towards yourself to speed up conver...

Страница 12: ...n in the Fig Otherwise expansion of the gasoline owing to higher temperature will cause overflow The engine shouldbe stopped duringthe refilling andthe ignition switchshould be turned to OFF No smokin...

Страница 13: ...e Pedal When stepping on this pedal therear brake functions and the brake indicator on the instrument panel will be lit simultaneously Stands This motorcycle is equipped with a side stand To locate th...

Страница 14: ...taplever to RESERVE to supply 1 6 L of the fuel from the reserve tank OFF Position Set the tapto after the engine stopped CAUTION If the tapis set to ON or RESERVE some problems may occur i e the carb...

Страница 15: ...ne graduallywarm up When theengine acquiresthe normal working temperature reset the choke lever to original position The choke system works only when the throttleis entirely closed If the throttlegrip...

Страница 16: ...e gasoline can prolong the lifetime of the spark plug Engine Oil Use of high quality 4 stroke engine oil would extend the lifetime of the engine Grade SG or SH engine oil in API method is recommended...

Страница 17: ...ead of being kept steady so that each component of the engine acquires a loaded pressure When the pressure is unloaded the components will be cooled down Such process contributes to the engagement of...

Страница 18: ...the components of engine are run in and all the other parts are also engaged All the necessary adjustments tightening and replacement of contaminated gear oil should be done in time The timely mainten...

Страница 19: ...front braking connection rod 2 No sponge like dull braking Indicators of neutralgear 1 Correct cable clearance 2 Smooth speeding up and swift slowing down 1 Calibrate air pressure 2 Adequate tread dep...

Страница 20: ...se thechoke system 3 Step onthe starting rodtwo or threetimes 4 Quickly turnthe ignition switchto ON Stepon the startinglever to startthe engine Press the choke lever fully down The throttle valve is...

Страница 21: ...gear lever toengage the bottomgear Twist the throttle grip counterclockwise and release the clutch lever slowly and gradually When the clutch is engaged the motorcycle will set out To shift to a highe...

Страница 22: ...se the forward rushing force When the motorcycle runs downwards along a slope shift to lower gears so that the motorcycle can be braked easily Bear in mind that the speed should not be too high in dow...

Страница 23: ...he clutch lever and shift to the neutral gear so asto stop Observe the neutral indicator to confirm the neutral gear WARNING As the speed is high the braking distance will be longer accordingly Correc...

Страница 24: ...r motorcycle has been used under bad conditi ons for example continuously running with large throttle in a windy or dusty environment necessary maintenance should be done each time after operation in...

Страница 25: ...fied technician to maintain the items marked with a The others may be maintained by yourself under the instructions of this Manual Maintenance Schedule Battery specific gravity of electrolyte Carburet...

Страница 26: ...kes Front fork Tires Driving chain Steering assembly Rear shock absorber Cylinder nuts and exhausting pipe bolts Clean and lubricate once every 1 000 km I I I I I I I I I I I I I I I I T T T Engine oi...

Страница 27: ...worn itmust be changedimmediately Every 3000 hereafter mileage Km 500 1500 3000 5000 8000 Items Intervals First 5 000 km or 6 months Every 1 000km or12 months Throttle cable Machine oil Clutch cable M...

Страница 28: ...listed below Battery WARNING This vehicle used sealed rechargeable battery When using youshould notice tocharge to prolong its servicelife Note For the first 1 000 km and every 3 000 km entrust the au...

Страница 29: ...ark plug The normally worked spark plug usually is light gray or light brown If the spark plug is white or seem flashing it shows that the spark plug works under the overheat condition In such case ch...

Страница 30: ...m and every 1000 km thereafter Carry out oilchange with a warm engine so as to empty the old oil thoroughly as follows 1 Park the vehicle on its side stand 2 Remove refilling cap 3 Remove drain plug o...

Страница 31: ...y Always keep it in good adjustment Front brake Brake fluid WARNING Brake fluid isharmful for drinkingor contacting toeyes and skin In case of drinking by mistake vomit it out by force Incase of conta...

Страница 32: ...maintenance it is advisable to have the job done by your distributor He has the special tools and skills to fulfillit in the safest and most economical manner Precaution Disc braking system involves h...

Страница 33: ...orcycleridden for along time isat a high temperature so do not touch it in order to protect you from scald Fuse The fuse boxis installed inthe cover ofleft chassis Ifsome troubles occurin an electric...

Страница 34: ...f the extensionline exceeds thelimit entrust thedealer to havethe brake assembly replaced for the safe purpose Rear Brake Lamp Switch This switch is mounted at the right chassis Toadjust it up and dow...

Страница 35: ...in bulb replacement to avoidreducing its servicelife Turning signal lamp 1 Remove two screws and take off the lamp lens 2 Press thebulb and turnit leftward totake it out 3 To install a new bulb press...

Страница 36: ...the outer frame Carburetor The stability of carburetor contributes to the performance of the engine The carburetor has been adjusted to the best state before leaving the factory Please do not attempt...

Страница 37: ...f it can be turned normally The idle speed should not be increased due to this adjustment The throttle grip should be able to turn freely Adjustment of the Clutch Before the clutch is released the cab...

Страница 38: ...Note When a new chain is replaced the two chain sprockets must be checked If necessary make replacement CAUTION The opening end of chain joint should be installed in reverse to the turning direction 1...

Страница 39: ...ing of control The air pressure should be always kept with the specified limit Adjust the air pressure as the tire is cold Air pressure of tires Front tire 225kpa Rear tire 225kpa Outer Tire Tread Rid...

Страница 40: ...m the carburetor turn the tap to ON position and check if gasoline flows out of the hose 4 Make sure the fuel has flown to the carburetor then proceed to check the ignition system WARNING When checkin...

Страница 41: ...of the Engine 1 Check the fuel in the tank 2 Check theinterval spark ofthe ignition system 3 Check ifthe idle speedof the engineis normal Note It s better to contact with the dealer before you make an...

Страница 42: ...eposit 4 The clearanceof spark plugisnot proper 1 Dismount and dry it 2 Replace the spark plug 3 Clear carbon deposit 4 Adjust the clearance The carburetor has oil The engine can t start or stop sudde...

Страница 43: ...or 2 The oil route is clogged 3 The crankcase leaks 4 The joint of the carburetor and engine has leakage 5 The mixing gas is too thick or too thin 1 Clean the carburetor 2 Blow or replace the oilpipe...

Страница 44: ...ain you should check it thoroughly to make sure the performance of all parts is well Fuel The fuel in theoil tank shouldbe drained outbefore storage The gasoline used for the motorcycle is flammable a...

Страница 45: ...lean thewhole motorcycle 2 Remove the spark plug push down the foot starting rod and let the engine rotate for a while then install the park plug 3 Reinstall the battery Note Make sure that the batter...

Страница 46: ...27 Steering turning angle left right 48 48 Minimum turning diameter inch mm 21 2 6 5400 Quality Parameter Dry weight include oil and fuel lb kg 123 Maximum load quality lb kg 150 Fuel tank capacity G...

Страница 47: ...0 Starting type Electric start Lubrication type Pressure and spraying lubrication Lubricant type SAE 10W 50 Fuel type 90 gasoline Air filter type Polyurethane foam plastic type Transmission System Clu...

Страница 48: ...rear wheel psi kpa 33 225 Front brake disc type Rear brake Drum Shock Absorber Front shock absorber Spring oil damper Rear shock absorber Spring oil and Gas damper Electrical System Spark plug NG K D...

Страница 49: ...aking distance 30 km h m 7 Max noise dB A 80 Max speed mph kph 60 96 Climbing ability 22 Economic oil consumption G Mile 1 9 Min stable speed mph kph 15 6 25 Gliding distance m 200 Starting accelerati...

Страница 50: ...ferent countr ies or are as therefore while this manual contains the most current product informationavailable atthe time of printing there may be minor discrepancies between your vehicle and this man...

Страница 51: ...ter Times Date Mileage km Items Maintained Dealer M D Y M D Y M D Y M D Y M D Y M D Y M D Y M D Y M D Y M D Y 1 2 3 4 5 6 7 8 9 10 500 1000 2000 3000 4000 5000 6000 7000 8000 9000 Oil Oil Filter All n...

Страница 52: ...ECORDS This bike s traveledmileage is Kilometer Times Date Mileage km Items Maintained Dealer M D Y M D Y M D Y M D Y M D Y M D Y M D Y M D Y M D Y M D Y 11 12 13 14 15 16 17 18 19 20 10000 Oil Air Cl...

Отзывы: