QHYCCD QHY8L-C Скачать руководство пользователя страница 17


17 

Chapter 5 

Camera Attachment 


The QHY8L can be used with both telescopes and lenses.  The methods of attaching the 

camera to telescopes and lenses are given below. 
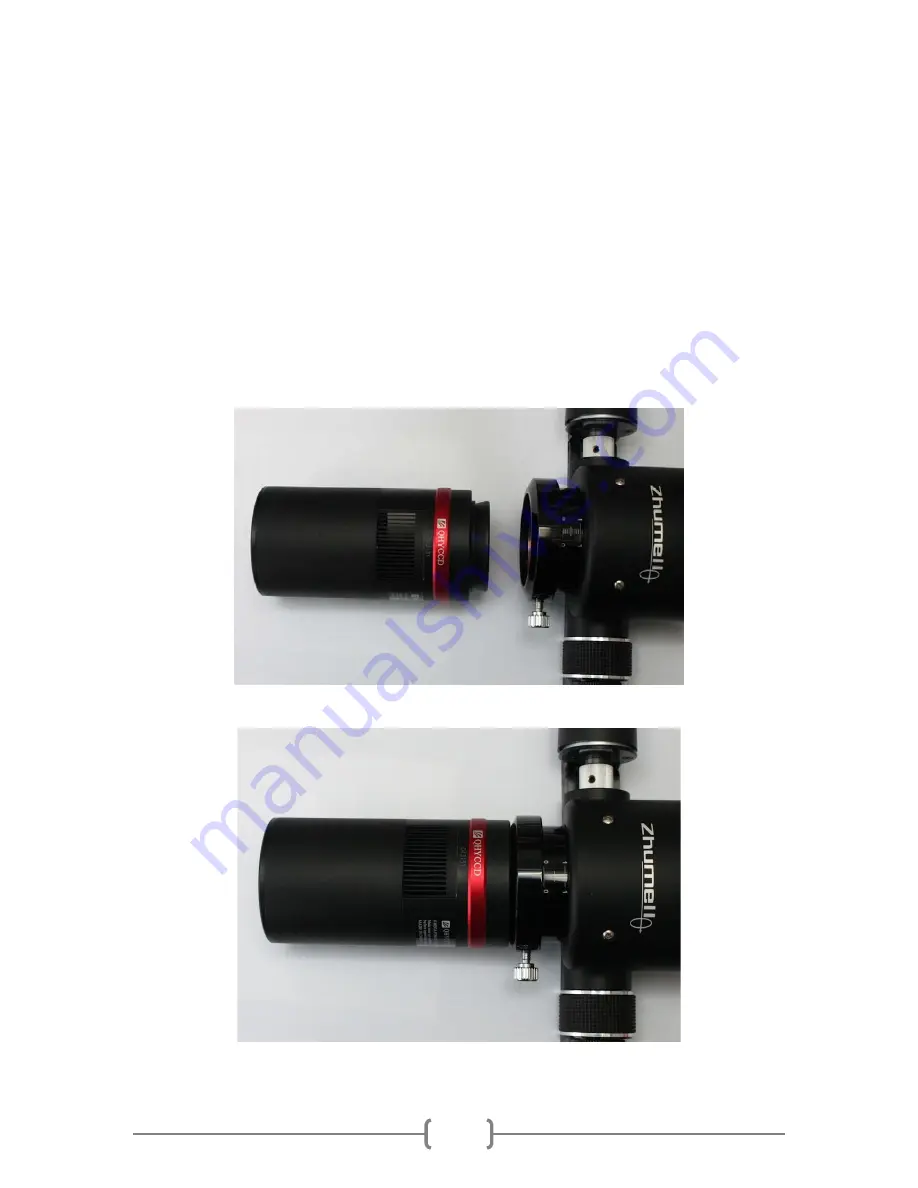
 
1.


Direct attachment to telescope.  Simply insert the image end of the camera into 

a 2” draw tube, press it firmly against the drawtube end, and tighten the retaining 

screw.  Figure 1 shows the two before insertion, and Figure 2 shows the camera 
inserted into the draw tube. 


Figure 1. Camera and drawtube 


Figure 2. Camera inserted into drawtube 

Содержание QHY8L-C

Страница 1: ...1 QHY8L C Instruction Manual 1 4 13...

Страница 2: ...3 2 Driver Installation and Software Quick Start Guide 7 3 Set the GAIN and OFFSET 13 4 Image Calibration 14 5 Camera Attachment 17 6 Camera Parameters 20 7 Accessories and Interface Specification 22...

Страница 3: ...d fan Please limit the maximum power of your cooling settings if you have to use your camera in this case Please check Favorite TEC Protect in the EZCAP software If you are using the ASCOM driver this...

Страница 4: ...low on the top left corner of the image The glow must be compensated through a dark frame calibration For 2 2 4 4 binning modes the QHY8L chip uses progressive scan mode so there is no such problem 7...

Страница 5: ...the camera always check that the CCD chamber is sealed and dry If there are many ice crystals around the chip this indicates high relative humidity in the CCD chamber You must dry the CCD chamber Che...

Страница 6: ...clean the CCD surface Make sure to maintain an appropriate pressure for CCD with your hand Finish cleaning and reinstall the front cover of CCD If there is high humidity in your environment it is nec...

Страница 7: ...e QHY8L Make sure that the DC201 FAN and TEC LED are on and the fan of the QHY8L is blowing Software Quick Start Guide EZCAP Run EZCAP exe Select scan camera in camera menu then EZCAP will show QHY8L...

Страница 8: ...click Properties button to set some usual value of parameters like the value of GAIN OFFSET and the speed of readout Then click OK button and go back to the Camera Control window click Connect button...

Страница 9: ...need to be set once but De mosaic RAW button must be pressed for every new image for color conversion Images can be saved as FITS files without De mosaicing they can be converted to color later For f...

Страница 10: ...does not have live view To focus click the FOCUS METRICS tab and press EXPOSE In the resulting image select a small area with stars and draw a box around it by pressing left mouse button the press Use...

Страница 11: ...rmal BIN11 Mode you can switch to this mode It has higher sensitivity as it is bin2 2 We recommend that you use this mode guide stars Viewing Images Produced by QHY8L Camera The QHY8L camera can produ...

Страница 12: ...y to load a package from NASA ESA the FITS Liberator available at http www spacetelescope org projects fits_liberator download_v301 The package will automatically be loaded into the Photoshop director...

Страница 13: ...analyze The ideal average value is around 500 to 1000 If the value is higher then you should reduce the OFFSET If the value is lower then you should increase the OFFSET Repeat steps 1 2 to obtain the...

Страница 14: ...constant temperature control It will take for some time to achieve the target temperature for the CCD Wait until the temperature of the CCD stabilizes then start to shoot calibration images The calib...

Страница 15: ...ftware to get a FLAT master and save this image It is best to take FLAT images immediately before shooting or after shooting Otherwise the position of dust on CCD surface may be moved when you dismoun...

Страница 16: ...cal histogram Lights Any Low N A Darks Same as lights Same as Lights Binning same as lights Similar to bias Bias Shortest possible Any Binning same as lights Flats Long enough to get white level 20 30...

Страница 17: ...re given below 1 Direct attachment to telescope Simply insert the image end of the camera into a 2 draw tube press it firmly against the drawtube end and tighten the retaining screw Figure 1 shows the...

Страница 18: ...Figure 4 shows it attached to the camera Figure 5 shows the drawtube adapter by itself not included with the camera but available from astronomy equipment retailers Figure 3 Camera and drawtube adapte...

Страница 19: ...but available from astronomy equipment retailers The adapter has 42mm threads that screw into the camera It will take standard Canon EOS lenses The adapter shown has a 7mm spacer which gives approxim...

Страница 20: ...3110 x 2030 Active pixels 3032 x 2016 Pixel Size 7 8um x 7 8um square Color method RGB BAYER film on CCD Effective sensor area 28 4 mm diagonal Readout noise 6 10 e 600K pixel s QE 60 at Green Peak 5...

Страница 21: ...sive Scan How to select QHY8L 8PRO the QHY8L has a low price than QHY8PRO The major difference is the CCD sensor the QHY8L using a Two field readout sensor After exposure the Red and half of green pix...

Страница 22: ...22 Chapter 7 Accessories and Interface Specification Accessories included with camera...

Страница 23: ...23 QHY8L Interface Specification...

Страница 24: ...24 Chapter 8 QHY8L Mechanical Dimensions...

Страница 25: ...25 Chapter 9 Clip Installation 1 Clip for QHY8L QHY8PRO QHY10 QHY12 camera...

Страница 26: ...26 2 Before installing the clip 3 Unscrew two screws at the back of the camera...

Страница 27: ...27 4 Screw two M3 8 copper cylinders to the camera 5 Plug in the camera s USB cable and power cable...

Страница 28: ...28 6 The front of the clip 7 The back of the camera...

Страница 29: ...29 8 Install the clip Note You should use the standard Belkin USB cable otherwise the clip cannot be installed or USB cable cannot be attached...

Отзывы: