QFX PBX-3010BT Скачать руководство пользователя страница 14

-13-

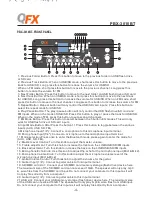
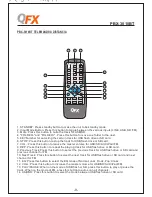
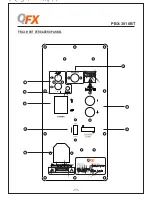
PBX-3010BT PANEL FRONTAL 

PBX-3010BT

2 3

1

7

17

4

8

9

10

11

12

13

14

15

16

18

5 6

19

20

21

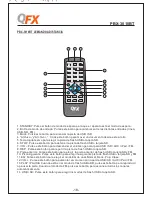
1. El botón del archivo arriba:Click este botón para mover al drive USB flash o archivo arriba del 
tarjeta SD.
2.Botón de pista anterior: Cuando está en el mode de USB / SD, pulse brevemente este botón para 
ir a la pista anterior de USB / SD. Mantenga pulsado este botón para descender el volumen de USB / 
SD.Cuando está en el modo FM, pulse brevemente este botón para pasar al canal anterior. 
Mantenga pulsado este botón para descender el volumen de FM.
3.El botón del archivo abajo:Click este botón para mover al drive USB flash o archivo abajo del 
tarjeta SD.
4. Botón de siguiente pista : Cuando está en el mode de USB / SD, pulse brevemente este botón 
para pasar a la siguiente pista de USB / SD ,Mantenga pulsado este botón para ascender el volumen 
de USB / SD.Cuando está en el modo FM, pulse brevemente este botón para pasar al siguiente 
canal. Mantenga pulsado este botón para ascender el volumen de FM.
5. El botón repito:el botón repito es para controlar solamente entrar la tarjeta USB/SD.Click este 
botón para seleccionar el modo repito de USB/ SD.
6.El botón de transmitir/ pausa:el botón de transmitir/pausa es para controlar solamente entrar del 
drive USB flash /la tarjeta SD y FM. En el modo de USB/ SD,click el botón para transmitir/pausa la 
música de USB/SD.En el modo de FM,click este botón puede buscar todos los canales.
7. El botón del mpdo EQ:Click este botón para seleccionar 5 modos de EQ,y sólo entrar el drive USB 
flash o la tarjeta SD.
8.Botón de Modo entrado:. Pulse este botón para cambiar entre las distintas entradas (línea, USB, 
SD , FM ) 
9. Entrada de micrófono(1/4" "): Conecte un micrófono a este terminal entrado de micrófono.
10.Entrada de micrófono(1/4" "): Conecte un micrófono a este terminal entrado de micrófono.
11.Selección de modo

pulsa este botón para entrar en el modo bluetooth, pulsa otra vez para 

entrar en el modo de

AUX, USB, SD, FM

).

12. Control maestro: Para ajustar el volumen principal.
13. Ajuste de tiple: Gire este botón para ajustar el treble  de USB/SD/FM   
14.Ajuste de Bombo: Gire este botón para ajustar el bombo  de  USB / SD / FM 
15. Botón de micrófono: Gire este botón para ajustar eco de micrófono (Mic1& Mic2).         
16..Botón de volumen de micrófono: Gire este botón para ajustar el nivel de volumen del micrófono
(Mic1 y Mic2)
17. Botón de volumen de guitarra: Gire este botón para ajustar el volumen de la guitarra.
18. Entrada de guitarra (1/4" "): Conecte un cable de la guitarra a este terminal entrado.
19. Ranura de la tarjeta SD / MMC :Inserte la tarjeta SD / MMC y de memoria (flash drive) dispositivo 
aquí. La capacidad máxima de la tarjeta SD / MMC no puede exceder de 8 GB.El  altavoz sólo se 
puede abrir archivo de mp3 de la tarjeta SD / MMC. No conecte su ordenador a esta entrada, ya 
que no se puede abrir archivos directamente desde un ordenador.
20.Entrada de guitarra (1/4" "): Conecte un cable de la guitarra a este terminal entrado..
21.Ranura de USB: Conecte el almacenamiento de memoria USB (flash drive) aquí. La capacidad  
máxima de la tarjeta USB no puede exceder de 8 GB.El altavoz sólo se reproducirá archivos de 
mp3 desde la entrada de la tarjeta USB. No conecte el equipo a esta entrada, ya que no se puede 
abrir archivos directamente desde un ordenador.

Содержание PBX-3010BT

Страница 1: ...www qfxusa com PBX 3010BT 120V 240V 60W RMS User Manual for PBX 3010BT Portable Speaker ...

Страница 2: ... by holding the plug not by pulling the cord 10 Unplug the unit during lightning storms or when unused for long periods of time 11 When wiring this unit and all other equipment used in connection to this unit make sure that all of your equipment is turned OFF 12 Once installation and wiring is complete power on all your equipment with the volume and level controls turned DOWN Once all the equipmen...

Страница 3: ...PBX 3010BT REAR PANEL 2 PBX 3010BT 1 3 6 7 8 2 4 5 ...

Страница 4: ...u are using 5 Power Button Press this button to power the unit on off or to charge the unit If the battery needs to be charged set the unit to AC and connect the power cable to the rear of the unit When set to AC the unit can also be powered by an external power supply electrical outlet even if the battery is dead In this case you need to have the unit set to the voltage corresponding to the volta...

Страница 5: ... Button After Press the button 11 Press this button to toggle between the various inputs AUX USB SD FM 9 Microphone Input 1 4 Connect a microphone to this microphone input terminal 10 Microphone Input 1 4 Connect a microphone to this microphone input terminal 11 Mode selection Press once to enter the Bluetooth mode press again to enter the mode for AUX USB SD FM 12 Master Level Control Turn this k...

Страница 6: ... SD Card is inserted into the USB SD input the unit will automatically switch to USB SD mode and begin playing mp3 or wma audio files from the USB flash drive SD Card 2 Elapsed Time The elapsed time on the track currently playing from the USB flash drive SD Card will display here 3 EQ Mode All EQ modes will display here 4 Repeat Mode Repeat mode will display here When the USB flash or SD card mode...

Страница 7: ...n the unit is ON you can set the alarm after you adjust the correct time of the unit Alarm Cycle You can select the unit s alarm ring once ring daily and ring multi day Alarm Music You can select the track from USB flash or SD to be the alarm music Alarm Volume You can adjust the alarm volume also the master volume 13 Contrast Adjust the contrast of the display 14 Firmwave Version The program vers...

Страница 8: ...10BT TOP PANEL PBX 3010BT 7 USB charger device slot Device slot is available for putting any device such as mobile or tablet PC USB Charger Any device such as mobile or tablet PC can charge with che USB cable ...

Страница 9: ...unit and begin charging the battery 4 With standard usage a fully charged battery can play for about 4 5 hours 5 Battery can be recharged about 300 times in its lifetime 6 When not in use the speaker should always be set fo OFF to prevent the unit from draining the battery 7 When the unit is not used for prolonged periods of time the battery will gradually lose its power It is recommended to fully...

Страница 10: ...er volume for USB SD AUX iPad FM 8 REP Press this button to repeat the playing track for USB flash drive or SD card 9 Previous Track Press this button to select the previous track for USB flash drive or SD card and previous channel for FM 10 Next Track Press this button to select the next track for USB flash drive or SD card and next channel for FM 11 EQ Press this button to select the EQ mode of ...

Страница 11: ... el cable de la tomacorriente sácalo sosteniendo el enchufe sino el cable 10 Desenchufe el aparato cuando encuentra el tiempo de las tormentas o no utilice durante un período largo 11 Asegúrese de que todo el equipo esté apagado cuando conecte al fuente de alimentación y otros equipos utilizados 12 Una vez que mande la luz y instale todos equipos descienda el volumen y los niveles controlables Pos...

Страница 12: ...PBX 3010BT VERDADERO PANNEL 11 PBX 3010BT 1 3 6 7 8 2 4 5 ...

Страница 13: ...rriente 5 Botón de encender Pulse este botón para encender y apagar el aparato o para cargar Si la batería necesita cargar ajuste a CA y conecte el cable a la parte posterior del aparato Cuando se ajusta a CA el aparato también puede conectar fuente de alimentación de corriente tomacorriente aunque la batería no tenga carga Es necesario ajustar el voltaje del aparato para corresponder a lo de toma...

Страница 14: ...h o la tarjeta SD 8 Botón de Modo entrado Pulse este botón para cambiar entre las distintas entradas línea USB SD FM 9 Entrada de micrófono 1 4 Conecte un micrófono a este terminal entrado de micrófono 10 Entrada de micrófono 1 4 Conecte un micrófono a este terminal entrado de micrófono 11 Selección de modo pulsa este botón para entrar en el modo bluetooth pulsa otra vez para entrar en el modo de ...

Страница 15: ...ta SD se repetirán Cuando D en el pantalla todas las música del archivo se repetirán Cuando 1 en el pantalla la música de Play se repetirá 5 Número del canción total Número del canción transmitido del USB la terjeta SD se mostrará arriba Número del canción total del SUB flash la tarjeta SD se mostrará abajo 6 Información de la canción Se mostrará el tipo del archivo y capacidad del canción del USB...

Страница 16: ...ne el modo de apagar el monitor Keypad Tones Select ON or OFF for the keypad tone El despertador encenderlo y puede establecer el despertador despúes ajustar la hora correcta El ciclo del despertador Puede seleccionar la despertador una vez también puede seleccionar el ciclo de la alarma diaria La música de la despertador Puede seleccionar la música de la despertador del SUB flash o la tarjeta SD ...

Страница 17: ...10BT 16 cargador USB Ranura del dispositivo Ranura del dispositivo está disponible para poner cualquier dispositivo como móvil o tablet PC Cargador USB Cualquier dispositivo como móvil o tablet PC puede cargar con el cable USB ...

Страница 18: ...pague y gargue 4 En el caso de usar con estandarización una batería totalmente cargada puede reproducir 4 5 horas apróximadamente 5 Se puede recargar la batería aproximadamente 300 veces en su vida 6 Cuando no está en uso el altavoz debe estar en posición de OFF para evitar descargar la batería 7 Cuando el aparato no se utiliza durante períodos largos la batería perderá gradualmente su poder Se re...

Страница 19: ...ste botón para descender el volumen general para USB SD AUX iPad FM 8 REP Pulse este botón para repetir la pista de flash USB o tarjeta SD 9 Pista anterior Pulse este botón para elegir la pista anterior de flash USB o tarjeta SD y FM 10 Pista siguiente Pulse este botón para elegir la siguiente pista de flash USB o tarjeta SD y FM 11 EQ Pulse este botón para elegir el modo EQ de Jazz Normal Rock Po...

Страница 20: ......

Отзывы: