

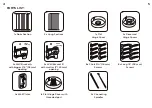


8
9
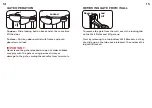
Step 7
Start with the end of the gate with the “flat” hinges
sticking out. Position the Flat Hinge Cover with the
threaded post under bottom hinge.
Insert the Flat Hinge Cover on the Top Hinge on the same
side of the gate, then slide Wall Bracket B over the top
hinge and insert the Connecting Spindle.
Slide the second Wall Bracket B onto the Connecting
Spindle before connecting to and tightening to the
Hinge.
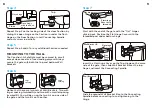
Step 4
Repeat Step 3 on the locking side of the door Section, by
sliding the open hinge on the Section in under the flush
hinge on the Door Section. Insert Connecting Spindle
and only screw in partially.
Step 5
Repeat Step 3 and 4 for any additional Sections needed.
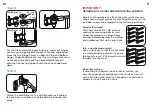
MOUNTING TO THE WALL
The Construct-A-SafeGate must be secured to a wall,
except when used as a free standing playard. Always
secure the gate with both the top and bottom Wall
Brackets.
Step 6
Notice that there are two sets of Wall Brackets. Two with
larger spacing (marked A) and two with a smaller spacing
(marked B). You will be using the two A’s on one side of
the gate and the two B’s on the other.
Floor
Top
Flush hinge
Open hinge
with threaded
post
Flat Hinge
Cover with
threaded
post
A
Small
opening
Large
opening
B
Wall Bracket B
Flat
Hinge
Cover
Wall Bracket B
Flat hinge
Flat hinge