background image

1) General

P.3

B

efore carrying out any work on the fan, disconnect it from the electrical supply!

C

heck if the electrical specifications of this appliance are compatible with your installation. The suppler

accepts no responsibility for any physical injury or material damage resulting from incorrect use or installation
of this fan. If you have the slightest doubt, please contact electrician.

U

nauthorized use and technical modifications to the appliance can lead to danger to life and health.

T

his appliance can be used by children aged from 8 years and above and persons with reduced physical,

sensory or mental capabilities or lack of experience and knowledge if they have been given supervision or
instruction concerning use of the appliance in a safe way and understand the hazards involved. Children shall
not play with the appliance. Cleaning and user maintenance shall not be made by children without
supervision

C

hildren should be supervised to ensure that they do not play with the appliance.

T

his appliance is for indoor use only.

M

eans for disconnection must be incorporated in the fixed wiring in accordance with the wiring rules.

N

ever install the appliance in a moist or wet room.

B

e careful when working near the rotating blades. The fan should be installed at least a height of 2.3m

B

efore pushing the reversible slide switch, it is necessary to stop the action of the blades by turning off the fan

D

on’t place your arm or other object in the path of the blades, when the fan is operating.

A

lways maintain the minimum distance between the lamp and any inflammable material

(curtains, wall etc), as indicated on the pictogram

M

eans for all poles disconnection having a contact separation that provide full disconnection under over

voltage category III conditions must be incorporated in the fixed wiring in accordance with national wiring
rules.

P

ower supply wire from ceiling needs 1.5 sq mm wire

W

arning: Before obtaining access to terminals, all supply circuits must be disconnected.

Содержание Wind 91339

Страница 1: ...P 1 INSTRUCTION MANUAL English and Dutch Wind Fan 42 Brass Wind Fan 42 White Wind Fan 42 Grey 91339 91340 91341...

Страница 2: ...n manual thoroughly before using the appliance and save it for future reference and if necessary pass the instruction manual on to a third party WARNING When using electrical appliance basic safety pr...

Страница 3: ...en without supervision Children should be supervised to ensure that they do not play with the appliance This appliance is for indoor use only Means for disconnection must be incorporated in the fixed...

Страница 4: ...ng point for environmentally friendly disposal in accordance with local regulations Contact your local authorities or stockist for advice on recycling The packaging material is recyclable Dispose of t...

Страница 5: ...HANG UP THE FAN WHEN WIRING CONNECTION 3 SCREWS 4 SCREWS 5 HANGER BALL 6 UPPER CANOPY 7 DOWNROD 8 CROSS PIN 9 SCREWS 10 COTTER PIN 11 DOWNROD YOKE 12 MOTOR 13 BLADE HOLDERS SCREW 14 BLADE 15 BLADE HOL...

Страница 6: ...on of the ceiling fan 1 Install the mounting plate by screw Fig 1 2 Insert downrod over upper canopy Fig 2 3 3 Then insert the cross pin over yoke and Cotter pin Fig 4 4 Connect the wire as the fig sh...

Страница 7: ...wn wire L Blue wire N Green yellow wire 6 Hang up the fan and assembly the mounting plate with the motor set by 4 side screws Fig 7 7 Assembly the blades to blade holders Fig 8 8 Install the holder on...

Страница 8: ...If the fan or light kit is PARTIALLY pre assembled you can skip the assembly procedures to next step 11 11 Now the fan is completed Fig 12 P 8...

Страница 9: ...n can be installed with remote control but make sure you know how to install the device in safe way or consult licensed electrician Warranty may be affected if you install the improper remote control...

Страница 10: ...troller A Lower Canopy from ceiling to ensure minimum 3 mm clearance B Re tighten all screws on fan blades but never over tighten C Re tighten all screws in the hanging bracket or plate D Change the c...

Страница 11: ...ually high speed setting to the speed which creates to greatest wobble Turn the fan off select on blade place the balance clip on it Halfway between the blade holder and the blade up on the rear edge...

Страница 12: ...ot be made by children unless they are older than 8 and supervised Keep the appliance and its cord out of reach of children aged less than 8 years Appliances can be used by persons with reduced physic...

Страница 13: ...TRUCTION MANUAL Wind Fan 42 Brass Wind Fan 42 White Wind Fan 42 Grey 91339 91340 91341 HANDLEIDING Plafondventilator Wind 42 91339 91340 91341 P 1 HANDLEIDING Plafondventilator Wind 42 91339 91340 913...

Страница 14: ...iding als toekomstige referentie garantie en geef dit boekje door wanneer nodig aan de derde partij WAARSCHUWING Bij gebruik het van elektrische producten neem de voorzorgsmaatregelen in acht om kans...

Страница 15: ...e of materi le schade die te wijten is aan het niet naleven van deze handleiding of wanneer blijkt dat de ventilator niet naar behoren is gemonteerd Als je enige onzekerheden hebt neem dan contact op...

Страница 16: ...te zijn bij het werken aan of in de buurt van de ventilator en bij het schoonmaken ervan Schoonmaken en onderhoud van de ventilator mag niet worden gedaan door kinderen zonder toezicht Gebruik geen w...

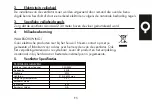
Страница 17: ...erming 5 Ventilator Specificaties WAARSCHUWING Gooi elektrische producten niet bij het huisvuil Neem contact op met je gemeente of fabrikant voor advies over het recyclen van de ventilator Ook het ver...

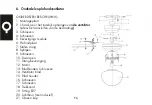
Страница 18: ...BULB Not provided 21 GLOBE P 5 ONDERDELEN BESCHRIJVING 1 Montageplaat 2 J haak voor het tijdelijk ophangen van de ventilator tijdens het aansluiten van de bedrading 3 Schroeven 4 Schroeven 5 Bevestig...

Страница 19: ...n G e b r u i k d e z e v e n t i l a t o r n i e t i n d e z e l f d e r u i m t e e n o p h e t z e l f d e o g e n b l i k m e t e e n g a s v u u r o f v u u r m e t a n d e r e b r a n d s t o f...

Страница 20: ...de motor door middel van de meegeleverde schroeven fig 10 11 Installeer de lichtbron niet incl fig 11 12 Installeer het glas en bevestig dit met een schroef fig 12 P 8 7 Zorg dat de bedrading correct...

Страница 21: ...r een gedeelte al gemonteerd is kun je deze stappen overslaan 0 12 03 4 5 65 4 5 4 0 65 7 8 9 2 3 4 3 0 0 3 13 A 8 P 9 13 Zo nu is de ventilator helemaal gemonteerd Fig 13 13 Als de ventilator voor ee...

Страница 22: ...en Voor het gebruik van de lamp gebruik je het koord voor het licht Door 1x te trekken gaat het licht aan en door 2x te trekken gaat deze uit De knop voor de zomer winterstand zit op de bovenkant van...

Страница 23: ...t de lichtbron afkoelen Gebruik geen natte spons Gebruik geen schuur hardnekkige reinigingsmiddelen of andere vloeistoffen om de ventilator te reinigen Maak de motor motorbehuizing en andere elektrisc...

Страница 24: ...d D Teveel geluid van de snelheidsregelaar A Verlaag de plafondplaat met een minimaal 3mm speling tussen plafond en plafondplaat B Draai alle schroeven aan maar nooit te strak C Draai alle schroeven a...

Страница 25: ...f de bladen op dezelfde hoogte hangen draai met de handen de ventilator rond zodat je alle bladen kunt controleren en eventueel aanpassingen kunt maken door de bladhouder voorzichtig in de juiste posi...

Страница 26: ...Maximale ventilator capaciteit F 73 4 9 m min Opgenomen vermogen P 4 4 10 W Bedrijfswaarde SV 1 67 m min W Standby stroomverbruik PSB 0 00 W Seizoens stroomverbruik Q 14 11 kWh a Decibel LWA 4 3 50 dB...

Отзывы: