Qasair Rangehoods Installation Instructions
33
INSTALLATION INSTRUCTIONS
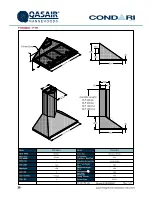
• H SERIES
• PYR
5HPRYHFDQRS\DQGIOXHIURPER[HVDQGFKHFN\RXKDYHFRUUHFWPRGHODQGIOXH
/RFDWHFHQWUHSRLQWRIFRRNWRS
3.
8VHOHYHORUSOXPEOLQHWRPDUNFHQWUHXSWRFHLOLQJ
4.
0DUNOHYHOOLQHIRUEDVHRIFDQRS\PPDERYHEHQFKPPGHVLUDEOH
5.
&KHFNURRIVSDFHDERYHIRUZLUHVDQGREVWUXFWLRQVDVQRZLVWKHWLPHWRGHFLGHRQDQ\FKDQJHVWRORFDWLRQGXH
WRLPPRYDEOHREVWUXFWLRQV
6.
0DUNIOXHVL]HRQFHLOLQJDQGFXWQHDWH[DFWKROHWRSDVVIOXHWKURXJK
7.
)RUUHDUGXFWHGPRGHOVFXWKROHLQZDOOIRUYHQWWRSDVVWKURXJK
8. Fix mounting bracket to wall at desired height.
9.
5HPRYHIDQVIURPFDQRS\E\UHPRYLQJVLGHIL[LQJEROWVDQGGLVFRQQHFWLQJHOHFWULFDOSOXJDWIOH[LEOHFRQQHFWRU
/RFDWHVROLGIL[LQJSRLQWVRQZDOODQGGULOOKROHVLQUHDURIFDQRS\WRVXLW,IQRVROLGIL[LQJLVDYDLODEOHWKHQQRZLV
the time to install fixing points. Four points are recommended with one on each side at top and one on each side
at bottom.
'ULOOKROHLQUHDURIXQLWWRSDVVSRZHUFRQQHFWLRQWKURXJKZKHUHDYDLODEOHRQZDOO
Check flue slides through hole in ceiling.
3ODFHFDQRS\IODWRQIORRUDQGILWVWDLQOHVVIOXHRYHUVSLJRWSXVKLQJDOOWKHZD\GRZQIRUDQHDWILW'ULOOKROHLQ
UHDURIIOXHDQGIL[WRFDQRS\ZLWKSRSULYHWRUVFUHZ
Carefully lift canopy into position, guiding flue through ceiling and feeding power cable through hole in rear of
canopy. Make sure canopy is sitting correctly on mounting bracket then fix to wall through fixing holes with solid
screws. (You may need to place a packer behind canopy if wall is bowed to make the canopy sit correctly).
&RPSOHWHHOHFWULFDOFRQQHFWLRQWR$03MXQFWLRQER[WRORFDOHOHFWULFDODXWKRULW\UHJXODWLRQVHQVXULQJSRZHULV
turned off during work.
)LWGXFWLQJWRRXWVLGHRUH[WHULRUZDOOYHQWIRUUHDUGXFWHGPRGHOV6HDOUHDUYHQWVRQWRUHDURIKRRGZLWK
silicone). A plumber should seal roof penetration with appropriate flashing. All joins in ducting need to be sealed
ZLWKGXFWWDSHRUVLOLFRQHDQGRQO\XVHDSSURYHGGXFWLQJRIWKHFRUUHFWVL]HIRU\RXUFDQRS\
Fit motor(s) back into canopy with fixing bolts and plug electrical connector in.
Test run hood.
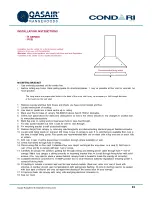
MOUNTING BRACKET
•
8VHYHUWLFDOO\SXQFKHGVORWIRUFHQWUHOLQH
•
Before cutting any holes check ceiling space for structural beams. It may be possible at this point to relocate the
hood position.
The fixing points are prepunched holes in the back of the hood and it may be necessary to drill through the back
of the hood into the wall stud.
5HFRPPHQGHGÀ[LQJSRLQWV
Installation must be carried out by the procedure outlined.
Failure to do so may void the guarantee.
Electrical:
Wiring to the appliance must comply with State and local Regulations.
Connection to be carried out by a registered electrician.


