background image

18

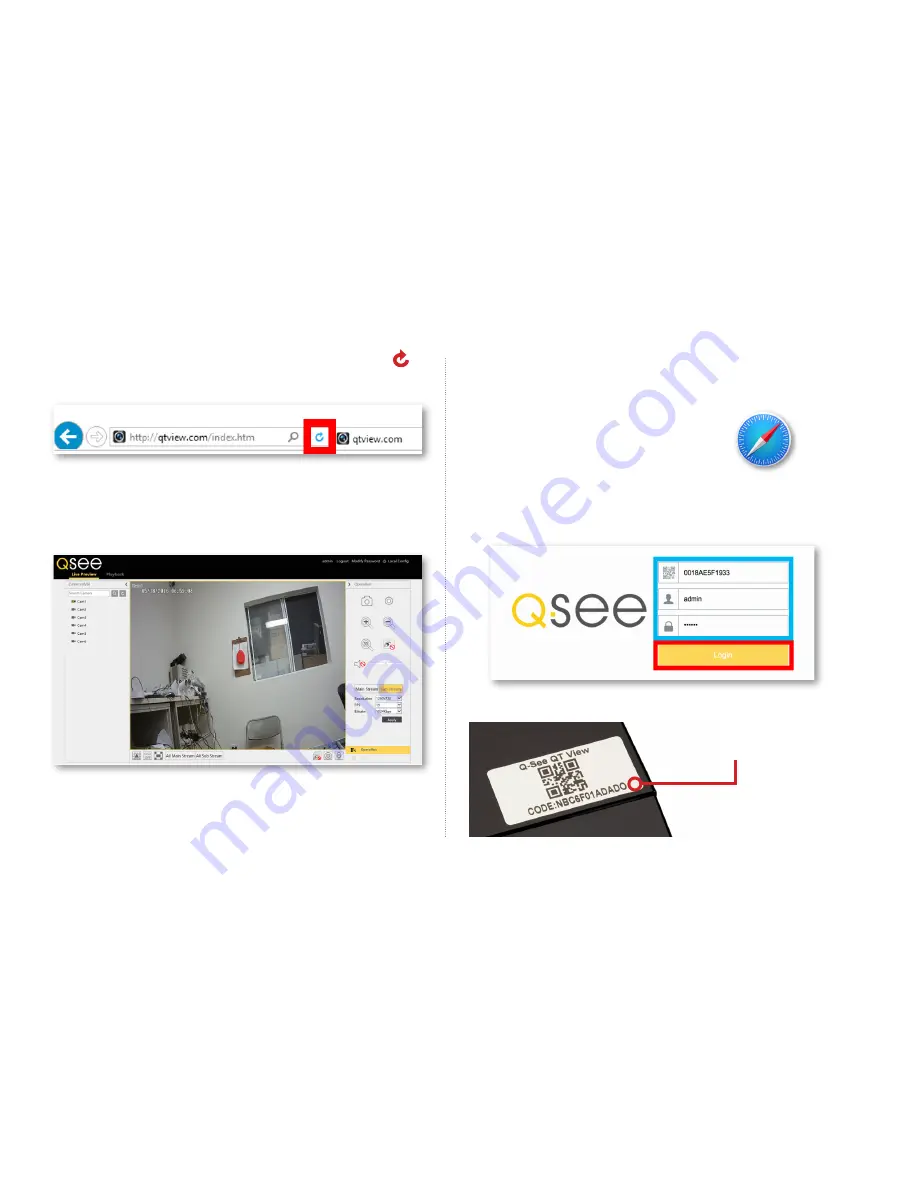
Using QT View on a Mac With Safari

Safari is the only supported browser on OS X.

1.

  Open the Safari browser and go to 

www.QTView.com

.

2.

  Enter the 

Serial Number

Username

, and 

Password


for your system and click 

Login

.

8.

  Once the plugin has been installed, click 

Refresh


or press F5 on your keyboard.

9.

  Access to your cameras will automatically appear 

once the page reloads.

NOTE:

 The serial number is located 

on the label on top of your NVR.

Содержание QTN8019B

Страница 1: ...QUICK START GUIDE QT IP CAMERA NVR BUNDLE ENGLISH ...

Страница 2: ...s on social media Welcome What s Included 3 Understanding your NVR 4 Get Connected Registration 5 Connect Your Cameras 5 Connect NVR to Display 6 Connect Mouse 7 Connect to the Router 8 Powering Up the NVR Cameras 8 Startup Wizard 9 Setting Up the QT View Mobile App 12 Adding Additional Mobile Devices 14 QT View On Your Computer Using QT View in a Windows Browser 16 Using QT View on a Mac With Saf...

Страница 3: ...uded with every system Number of cameras included vary by system Actual NVR will vary by system Products shown in this section may vary by system 100 feet of Network cable per IP camera HDMI Cable Network Ethernet Cable SATA Cable A B NVR Cables Power Supply Cameras Camera Network Cables ...

Страница 4: ...ND BULLET POINT PTZ VGA MONITOR VGA 19 NETWORK USB MOUSE IP CAMERAS POWER SUPPLY HDMI DISPLAY HDTV EXTERNAL MICROPHONE EXTERNAL EXT ESATA BACKUP ALARM SENSORS CVBS SPOT OUT ALARM OUT ALARM IN SAMPLE KEYLINE AND BULLET POINT PTZ VGA MONITOR VGA 19 NETWORK USB MOUSE IP CAMERAS POWER SUPPLY HDMI DISPLAY HDTV EXTERNAL MICROPHONE EXTERNAL EXT ESATA BACKUP ALARM SENSORS CVBS SPOT OUT ALARM OUT ALARM IN ...

Страница 5: ...in need of technical or warranty support NOTE Your username and password used to register your device are not the same as those you use to log in to your system Please write down your username password and model number s in the spaces provided below Username Password Model Step 2 Connect Your Cameras A Plug the camera network cable into the camera by connecting the Ethernet cable into the camera n...

Страница 6: ...p 3 Connect NVR to Display There are two options to connect the NVR to a display Option A HDMI A1 Plug the included HDMI cable into the NVR s HDMI port A2 Connect the other end of the HDMI cable to the monitor or TV A3 Plug the monitor or TV into a surge protector NOTE Channels are assigned to cameras in the order they are connected Port numbers do not indicate the channel that will be assigned to...

Страница 7: ...nect the other end of the VGA cable to the monitor A 19 monitor or larger with 1280 x 1024 resolution is highly recommended B3 Plug the monitor into a surge protector Step 4 Connect Mouse Plug the included mouse into the USB port on the back of the NVR If your model has two USB ports on the back either one will work 19 Monitor or Larger ...

Страница 8: ...rly connected Step 5 Connect to the Router A Plug the included Network Ethernet cable into the Network LAN port on the back of the NVR Step 6 Powering Up the NVR Cameras A Plug the NVR power supply cable into the DC Port on the back of the NVR B Plug the NVR power supply cable or power adapter into a surge protector not included ...

Страница 9: ...e logo will appear If the logo appears on your monitor but goes blank your display may not be compatible with your NVR This NVR requires a display capable of support ing 1024 x 768 1280 x 720 1280 x 1024 or 1920 x 1080 Step 7 Startup Wizard In order to effectively use the search functions and maintain accurate recordings you must complete the Startup Wizard To prevent the wizard from appearing aft...

Страница 10: ...ge from English to any other the system will restart B Create a security question in case you forget your password by clicking Edit Security Question in the window below If the option to Edit Security Question is not visible go to www q see com support and search for answer ID 2894 ...

Страница 11: ... case sensitive D Set the current Date and Time Click Next to proceed to the Network Setup NOTE If you will be connecting the NVR to the internet en abling NTP allows the NVR to check a network server in order to maintain accurate time Setting the start and end dates of Daylight Savings Time DST will allow your NVR to automati cally adjust its internal clock ...

Страница 12: ...appear Ensure that your NVR is properly connected to your network router before clicking on Previous to try again Please refer to the Troubleshooting section on page 30 if this problem persists Step 8 Setting Up the QT View Mobile App Download our free QT View mobile app to your mobile device available for both Android and iOS NOTE Please do not log in to the app yet ...

Страница 13: ...y skip any tutorials Select the QR Code Scanner B Scan the QR code displayed on the label on top of your NVR with your mobile device Select Skip to bypass the demo screens You can also proceed by swiping the screen to view each slide NOTE All screenshots shown are from Android The app may show Preview in place of Play button on iOS devices ...

Страница 14: ...ou have now successfully connected to your cameras Step 9 Adding Additional Mobile Devices After completing the process on your first mobile device repeat Step 8 with a new mobile device if desired NOTE If this is your first time connecting to the NVR you will be shown a brief demo If you have any further questions please refer to our support portal for additional information If there is no image ...

Страница 15: ......

Страница 16: ...t QT View experience possible but you can also use the IE Tab Plugin available for Chrome or Firefox 1 Open the Microsoft Edge browser If you are using Windows 8 7 Vista or XP open Internet Explorer and skip to Step 4 2 Go to www QTView com and click on the menu in the upper right corner and select Open with Internet Explorer from the drop down menu 3 Right click Internet Explorer in the taskbar a...

Страница 17: ...htm in the address bar 6 You will be prompted to install a plugin Click Here to download the plugin 7 The prompt for the download will appear at the bottom of your browser Click Run 5 Enter the Serial Number Username and Password for your system and click Login NOTE The serial number is located on the label on top of your NVR ...

Страница 18: ... to www QTView com 2 Enter the Serial Number Username and Password for your system and click Login 8 Once the plugin has been installed click Refresh or press F5 on your keyboard 9 Access to your cameras will automatically appear once the page reloads NOTE The serial number is located on the label on top of your NVR ...

Страница 19: ...will be prompted to install a plugin Click Here to download the plugin 4 The plugin will appear in the Downloads of your browser Click the Downloads button Double click NVMS9000 pkg to begin the installation NOTE If you see a message that the file is from an uniden tified developer click OK and refer to answer ID 2634 at www q see com support for info on allowing installations from unidentified de...

Страница 20: ... click Close 8 Safari must be restarted before proceeding Click Safari in the Menu Bar Click Quit Safari 9 Open the Safari browser again and go to www QTView com 10 Enter the Serial Number Username and Password for your system and click Login ...

Страница 21: ...a feed to appear Click Main Stream to view in High Quality Viewing your cameras in high quality will require a fast data connection and will result in higher data usage 13 Please be patient while the stream refreshes NOTE High Quality Streaming may cause your network to slow or cause your browser to become unresponsive if your network speed is insufficient ...

Страница 22: ...indows software 2 Follow the on screen instructions to install the program after accepting the license terms 3 Launch the program by double clicking the QT View icon on your desktop 4 Create a username and password for the program These credentials do not need to be the same as those on the NVR and are independent 5 Log into QT View using the credentials you created 6 Select the computer hard driv...

Страница 23: ...ote that using this option to connect automat ically will mean that your computer will need to be connected to the same network as your NVR to view camera feeds Visit www q see com support for more information 11 Click on Serial Number from the drop down options 10 Click in the IP Domain Serial Number field for the New Device ...

Страница 24: ... If the Username and or Password for the system has been changed enter them now Otherwise enter the default username and password Default credentials Username admin Password 123456 13 Click Add 14 Click on Control Panel Home in the top left corner ...

Страница 25: ...by selecting Search and Save in the pull up menu You can search for video that was recorded during a certain time by type of recording and by reviewing snapshots of recordings Search by Time This is the best way to search one or more cameras to identify an incident Search by Event This allows you to search through incidents which the system has flagged one camera at a time More info on these recor...

Страница 26: ...ch Backup Playback Close Camera002 Manual Schedule Sensor Motion 00 00 02 00 04 00 06 00 08 00 10 00 12 00 14 00 16 00 18 00 20 00 22 00 24 00 01 24 2016 01 24 2016 02 28 34 24 By Time By Event Snapshots Search and Save Camera002 Camera004 Camera006 Camera008 Backup Camera002 00 00 02 00 04 00 06 00 08 00 10 00 12 00 14 00 16 00 18 00 01 24 2016 01 24 2016 02 28 34 A B C D E F G H I Search by Time...

Страница 27: ...e Motion Searching by Event A Set the start and end times of your search B Select which camera s to search C Click Search D Video recorded during the search period will appear in a list E Refine your search by selecting the type of event Playback F Select a file to view and press Playback Backup G Select the file s you want to backup H Press Backup Insert a USB flash drive into the port on the fro...

Страница 28: ...ngth especially concrete Mounting Surface Thickness Mount your camera on a wall that is at least 2 5 thick Avoid direct exposure to weather Mount your camera under an eave or awning if possible Follow these tips to maximize the life and performance of your cameras Camera Distance from NVR Signal Quality 100 ft 200 ft ...

Страница 29: ...as 2011 NEC 820 44 Light levels should be approximately the same between camera and target area Consistent lighting conditions will provide optimal camera performance Do not place near high voltage wires or other sources of electrical interference Do not place camera behind a window ...

Страница 30: ...his indicates that your camera has power and is working properly If you still do not have a video signal from the camera ensure that the camera network cable is properly connected to both the camera and the NVR as shown in Step 2 on pages 5 and 6 Other Tests Connect the camera to a cable that has a working camera attached If the camera works the cable may need to be replaced Please contact technic...

Страница 31: ... do not hesitate to call us at 1 877 998 3440 Monday Friday 6 00 AM 7 00 PM PST Visit www q see com support for 24 7 support and access to our online Support Portal Warranty Support Q See is always here to answer your questions and take your valued suggestions Our focus is providing excellent customer support and always working to improve our customers experience DISCLAIMER Although Q See has made...

Страница 32: ...e Support Portal and Knowledge Base www q see com support ADDITIONAL SUPPORT Rev 4 26 17 QT878 QT874 Firmware Updates How To s Manuals and Guides Repairs and Returns Software Support Videos Chat Support Mon Fri 6AM 7PM PST Sat Sun 9AM 5PM PST Languages English Spanish ...

Отзывы: