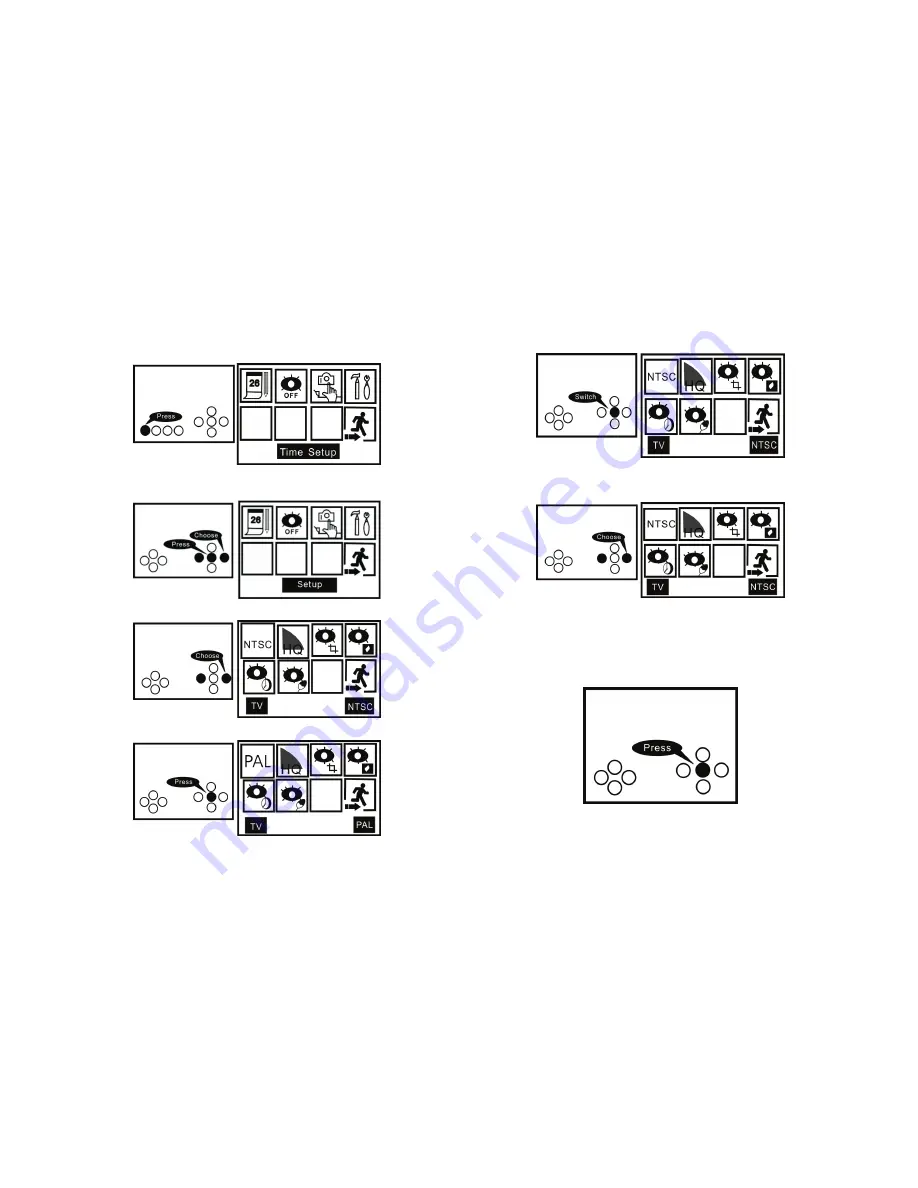
Q-See QSW1001R Скачать руководство пользователя страница 8

NTSC/PAL Setup 

(1)


Press MENU to enter system main menu. 


(2)Press LEFT/RIGHT to setup option, then press OK to confirm. 


(3)  Press LEFT/RIGHT to NTSC/PAL option, then press OK to confirm. 


(4)  Press OK to switch to PAL mode (default is NTSC mode). 


(5)  Press OK again to switch to NTSC


mode. 


(6)  Press LEFT/RIGHT to Exit option then press OK to exit.. 


Exit Setup 
 

Press MENU to exit directly. 


Содержание QSW1001R

Страница 1: ...IP Function 7 Image Setup 8 Date time Setup 9 Record AVI Photo Setup 11 NTSC PAL Setup 13 Image Quality Setup 16 Motion Detection ON OFF 17 Motion Detection Area 19 Motion Detection Count 21 Motion De...

Страница 2: ...n front of a camera 3 If there is no motion in front of the camera or a moving object stops moving DVR doesn t record or stops recording 4 A 128MB SD card can store about 2000 photos or 400 video clip...

Страница 3: ...cord time 10s pc Compression format Motion JPEG Record signal Video Audio Video Video Input 75 Typ 1Vp p Video output 75 Typ 1Vp p Dimensions 5 25 x 3 75 x 1 in Weight 10 5 oz PVR Layout The Top of PV...

Страница 4: ...tion The unit can support a SD Card up to 2GB It supports FAT32 file system SD Card Caution Physical electrostatic charge can damage the SD card so please do not touch the metal part of the card Pleas...

Страница 5: ...e use special AC DC Adapter or battery 4 Please connect when power off PIP Picture in Picture Function Monitor When the wired camera and wireless camera are on at the same time it will show a dual scr...

Страница 6: ...ed option Year month day 4 Press UP DOWN to set the date Year month day 5 After setting year month day press RIGHT button to set hour minute second hour minute second 6 Press UP DOWN to set time and t...

Страница 7: ...option 2 Press OK to switch photo option 3 Press OK to switch record option Exit setup 1 Press LEFT RIGHT to exit option and then press ok 2 Press MENU to exit directly Photo AVI quick setup Pressing...

Страница 8: ...option then press OK to confirm 3 Press LEFT RIGHT to NTSC PAL option then press OK to confirm 4 Press OK to switch to PAL mode default is NTSC mode 5 Press OK again to switch to NTSC mode 6 Press LEF...

Страница 9: ...then press OK to confirm 3 Press LEFT RIGHT to image quality setup option 4 Press OK to switch to Low image quality mode default is High 5 Press OK again to switch to High image quality mode 6 Press...

Страница 10: ...detect on off option 3 Press OK to enter motion detect on status 4 Press OK again to enter motion detect off status Exit Setup 1 Press LEFT RIGHT to exit option and then press OK 2 Press MENU to exit...

Страница 11: ...to confirm 3 Press LEFT RIGHT to motion detect area option 4 Press OK to motion detect area setup 5 Press LEFT RIGHT to choose detect area and then press OK 6 Press UP DOWN LEFT RIGHT to move detect a...

Страница 12: ...hoose to take in one motion detection you can choose 1 3 or 5 pictures 1 Press MENU to enter system main menu 2 Press LEFT RIGHT to setup option and then press OK to confirm 3 Press LEFT RIGHT to moti...

Страница 13: ...wo motion detection events 1 Press MENU to enter system main menu 2 Press LEFT RIGHT to setup option and then press OK to confirm 3 Press LEFT RIGHT to motion detect interval setup option and at the b...

Страница 14: ...her the value the higher the sensitivity is 1 Press MENU to enter system main menu 2 Press LEFT RIGHT to setup option and then press OK to confirm 3 Press LEFT RIGHT to motion detect sensitivity optio...

Страница 15: ...value the system would start to record automatically The Motion detect sensitivity value setting will be different in different situations users can set the proper sensitivity value according to the s...

Страница 16: ...the bottom of the screen 2 Press MODE again to return to preview mode Browsing Pictures Browse Six Pictures 1 Press MODE to go to playback interface in preview mode 2 Press OK to go to six thumbnail b...

Страница 17: ...e in preview mode 2 Press DISP to choose folder 3 Press UP DOWN to select the folder you want to see and then press OK to confirm 4 The picture shows the first photo in current folder Deleting Images...

Страница 18: ...to select DELETE or NOT DELETE option and then press OK to confirm Delete All 1 Press MODE to go to playback interface in preview mode 2 Press MENU to delete menu 3 Press LEFT RIGHT to select Delete A...

Страница 19: ...cope of our company You would need to pay for repair in these cases 1 Equipment damage caused by improper operation 2 Improper environment and conditions in on which the equipment operates e g imprope...

Страница 20: ...20 Company Name Postal Address Postal code Phone Number E mail Model Number of Product Serial Number of Product Purchase Date Distributor...

Отзывы: