Q-See QS434 Скачать руководство пользователя страница 22

42

43

CHAPTER 5  RECORDING

5.3 MASK FIELD

The Mask Field lets you block a specific portion of a channel you do not want recorded or 
shown on the display screen. This can be useful if you need to conceal a sensitive area being 
captured by the installed camera.
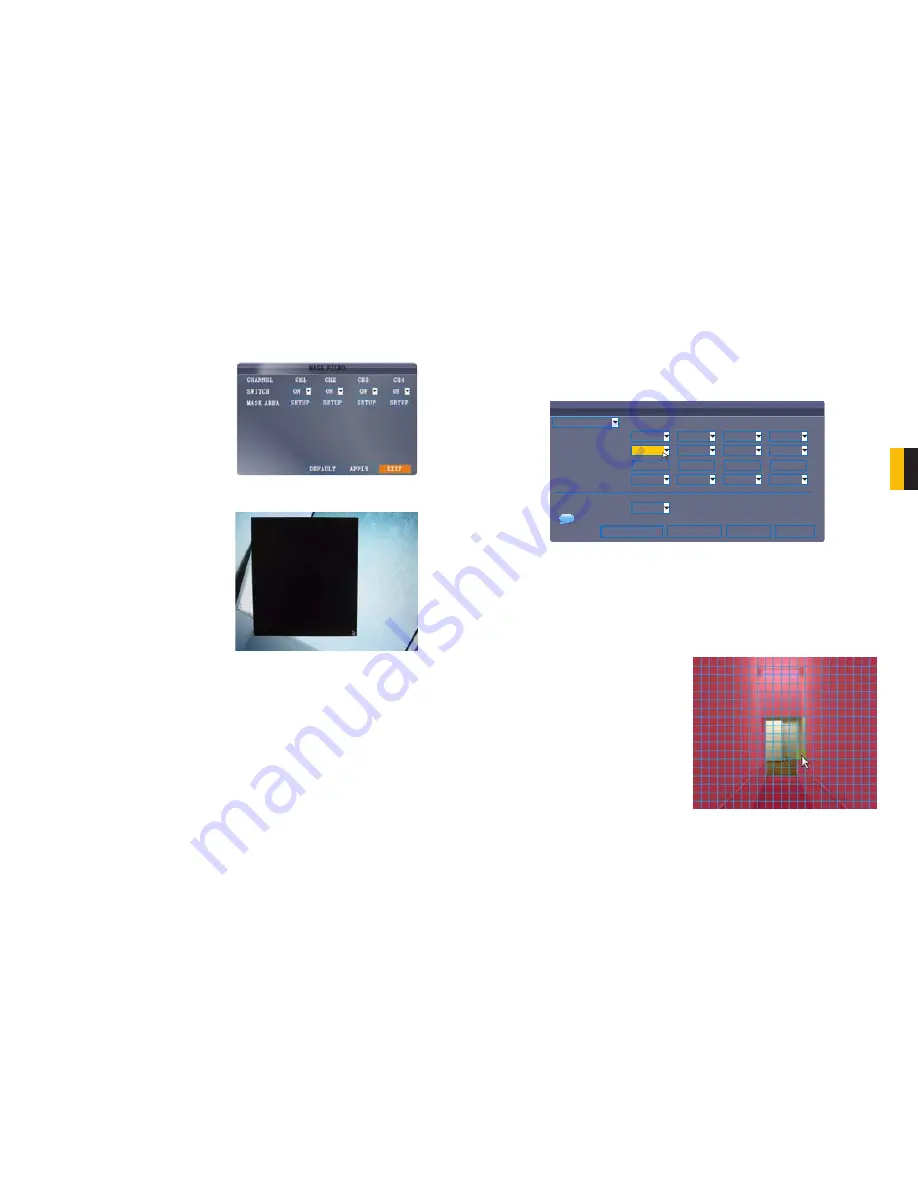
5.4 MOTION DETECT

The default recording mode for your DVR is “Alarm’ which includes motion detection. The 

Motion Detection

 menu can be found by accessing the 

Advance

 menu from the 

Main 

Menu

. In this menu you can configure motion detection for each channel.

The menu will only display four channels at a time. The pull-down menu in the upper left of the 
menu allows you to switch between available groups of four channels.
The motion detection options for each camera can be selected independently and are 
available below each camera’s channel number.

To use the mask field:

STEP 1

. From the 

Record

 menu, click 

MASK FIELD SETUP

. The 

Mask 

Field

 menu opens.

STEP 2

. Choose a channel you wish to 

apply the Mask Field. 

STEP 3

. Select 

ON

 from the 

SWITCH


drop-down menu.

STEP 4

. Click 

SETUP

. The 

Mask

 menu 

will be replaced by the full-screen 
camera view of the desired channel.

STEP 5

. Using the mouse, click and drag 

the cursor over the area you want to 
conceal. A single click will produce a 
small black square.

STEP 6.

 Right-click anywhere on the 

screen to return to the Mask Field 
menu.

STEP 7

. Click 

APPLY

. Click 

CLOSE

 in 

the confirmation window.

STEP 8

. Click 

EXIT

 in all menus until all 

windows are closed.

PICTURE 5-4

PICTURE 5-5

PICTURE 5-6

PICTURE 5-7

Motion Detection Settings

STATUS

 Select ON to enable motion detection for the desired channel. 

SENSITIVITY

 Select 1 through 8. The higher the number, the more sensitive the motion 

detection.

MD SETUP

 This allows you to chose which areas of the camera’s field of view should detect 

motion.

STEP 1

. Click 

SETUP

 and a motion 

detection grid appears over the 
selected camera’s video in full screen.

STEP 2

. Click the blocks in the grid to 

enable/disable motion detection.

    Red=Motion detection enabled
    Clear=Motion detection disabled.

STEP 3

. Right-click anywhere on the 

screen to return to the Motion 
Detection menu.

STEP 4

. Click 

APPLY

. Click 

CLOSE

 in 

the confirmation window.

STEP 5

. Click 

EXIT

 in all menus until all 

windows are closed.

The Motion Detection buzzer can be enabled or disabled in the Alarm Setup menu covered in 

Section 6.1 Alarms

.

EMAIL

 An email alarm can be assigned to individual channels. Email notifications are covered 

in 

Section 6.2 Email

.

STATUS
SENSITIVITY
MD AREA
EMAIL

DEFAULT

NEXT PAGE

APPLY

EXIT

MOTION DETECT

CH01-CH04

ON

BUZZER

OFF

ON

 5

SETUP

ON

ON

 5

SETUP

ON

ON

 5

SETUP

ON

ON

 5

SETUP

CH1

CH2

CH3

CH4

i

8 highest, 1 lowest

Содержание QS434

Страница 1: ...1 H 264 NETWORK DVR QS Series User Manual MODEL QS434 QS464 QS408 QS206...

Страница 2: ...lable at www Q See com Be certain to make the most of your warranty by completing the registration form online In addition to warranty and technical support benefits you ll receive notifications of pr...

Страница 3: ...Drive 32 4 7 Playback 33 Video Search 33 Using the On Screen Playback Controls 34 File List 34 4 8 Backup 36 Using the Playback Software 37 5 RECORDING 40 5 1 Recording Configuration 40 5 2 Recording...

Страница 4: ...er securely in place Do not attempt to do any repairs to the DVR yourself If there are unusual sounds or smells coming from the DVR unplug it immediately and contact Q See technical support Under no c...

Страница 5: ...on by enabling copy and paste functions Storage Function Encrypted file format to ensure data security and avoid vicious data modification Compression Format Supports multiple channel audio and video...

Страница 6: ...n the rear panel while all models have a soft power switch on the front For those models with a rear panel power switch it must be flipped to the On position to start the DVR The other models will pow...

Страница 7: ...NNEL NUMBERS Press the number buttons to view the selected channel full screen press buttons 1 0 to input passwords and user IDs 4 NAVIGATION Press to move cursor up in PTZ mode press to pan camera up...

Страница 8: ...ress to set the system in standby mode Press again to wake 2 LED INDICATORS Shows status of hard drive recording alarm HDD full and network 3 NAVIGATION Press to move cursor up in PTZ mode press to pa...

Страница 9: ...NUMBERS Press buttons 1 4 to view that channel full screen Press buttons 1 0 to input passwords and user IDs 4 NAVIGATION Press to move cursor up in PTZ mode press to pan camera up Press to move curs...

Страница 10: ...rse playback speed 1X 2X 4X n Press to freeze playback to one frame then press again to advance frame by frame Press to start playback Press to slow playback speed by 1 2 1 4 1 8 Press to increase for...

Страница 11: ...hese functions are used is based on the context of where they are used Some examples are LEFT CLICK Selecting an item Opening a menu Checking a box or motion detection status Selecting letters numbers...

Страница 12: ...7 EXIT Close menu windows 8 Navigation OK CH Move cursor in menus up Channel Up FWD Move cursor in menus to the right REW Move cursor in menus left CH Move cursor in menus down Channel down OK In menu...

Страница 13: ...it down completely To do so follow the above instructions to put the DVR into Standby mode Once the DVR has gone into hibernation turn off the power switch if present and then disconnect it from its...

Страница 14: ...Display hard drive status and format the internal hard drive of the system BASIC Open the Basic Setup Menu which lets you set the system language date and time Device IDs and passwords and configure...

Страница 15: ...your current location If you are uncertain of your time zone you can find it at http www worldtimezone com STEP 2 Click MODIFY DATE AND TIME Click CLOSE in the confirmation window STEP 3 Click APPLY...

Страница 16: ...nd the system is not recording To enable disable preview channels STEP 1 Choose a channel you wish to conceal For example channel 3 Under PREVIEW select OFF STEP 2 Click APPLY Channel 3 will turn blac...

Страница 17: ...the DVR cannot read the hard drive or the hard drive is not formatted it will display an H in the video preview interface FORMATTING THE INTERNAL HARD DRIVE If you installed a new hard drive you must...

Страница 18: ...dio capable camera connected to this channel at the time of the event Select the box to mute the audio Click X to quit playback and return to the Search menu MUTE 31 Digital Zoom Pause Viewing Mode Cl...

Страница 19: ...enough to hold all the files you wish to backup CAUTION DO NOT remove the USB flash drive during backup USING THE PLAYBACK SOFTWARE The Playback software included on the accompanying software disk wi...

Страница 20: ...5 When you select Play a Playback Control Bar will appear 4 1 2 3 5 6 7 8 9 10 11 12 13 14 15 16 17 18 19 20 21 22 Function Function 1 Hour Blocks 2 Minute 3 Progress Bar 4 Date 5 Play 6 Previous Rec...

Страница 21: ...to search Click APPLY to save your settings Click CLOSE in the confirmation window Click EXIT in every menu until all windows are closed 5 1 RECORDING CONFIGURATION In addition to scheduling the recor...

Страница 22: ...will produce a small black square STEP 6 Right click anywhere on the screen to return to the Mask Field menu STEP 7 Click APPLY Click CLOSE in the confirmation window STEP 8 Click EXIT in all menus u...

Страница 23: ...s number PICTURE 6 1 PICTURE 6 2 PICTURE 6 3 ALARM SETTINGS I O CHANNEL Consult your alarm s manual for the proper settings Select NO Normal Open NC Normal Closed or OFF HDD LOSS The alarm will sound...

Страница 24: ...p a dedicated e mail address specifically for the system to send alert notices If you do not have your own e mail system such as a corporate mail server you should consider using a free e mail provide...

Страница 25: ...TZ camera for complete information about your camera including protocol and baud rate Configuring a PTZ camera STEP 1 Connect a PTZ camera to the BNC and 485A TX and 485B RX ports and power outlet STE...

Страница 26: ...CIFICATION QS206 QS408 QS434 QS464 SYSTEM LANGUAGE ENGLISH CHINESE GUI GRAPHIC MENU OSD MENU PASSWORD ADMINISTRATOR PASSWORD USER PASSWORD VIDEO VIDEO IN 16 CH 8 CH 4 CH 4 CH COMPOSITE VIDEO INPUT 1 0...

Страница 27: ...ral minutes after starting Answer Instability or low input voltage Bad track on hard drive or the hard drive is bad Power supply is not producing enough power The front end video signal is not stable...

Страница 28: ...on area is not correct Sensitivity is too low Question 12 Why is the USB device giving me a backup error Answer The data exceeds the capacity of backup device The backup device is incompatible The bac...

Страница 29: ...e not within the free service scope of our company 1 Equipment damage caused by improper operation 2 Improper equipment operation environment and conditions e g improper power extreme environmental te...

Страница 30: ...OR COMMENTS CONTACT US PRODUCT SUPPORT DOWNLOADS FIRMWARE UPDATES MANUALS 24 7 Technical Resources Live Chat M F 9 5 PST www Q See com Support Digital Peripheral Solutions Inc 8015 E Crystal Drive An...

Отзывы: