background image

Q-SEE QUICK INSTALLATION GUIDE 

M

M

O

O

D

D

E

E

L

L


N

N

U

U

M

M

B

B

E

E

R

R


Q

Q

R

R

4

4

2

2

7

7

4

4

-

-

4

4

1

1

8

8


7 | 

P a g e


PART 8 - BACKING UP THE VIDEO ON THE DVR 
 

Attach a USB flash drive or USB hard drive to the USB backup port and follow the instructions in Part 8 to go to 
the File List in the Search menu.  
 
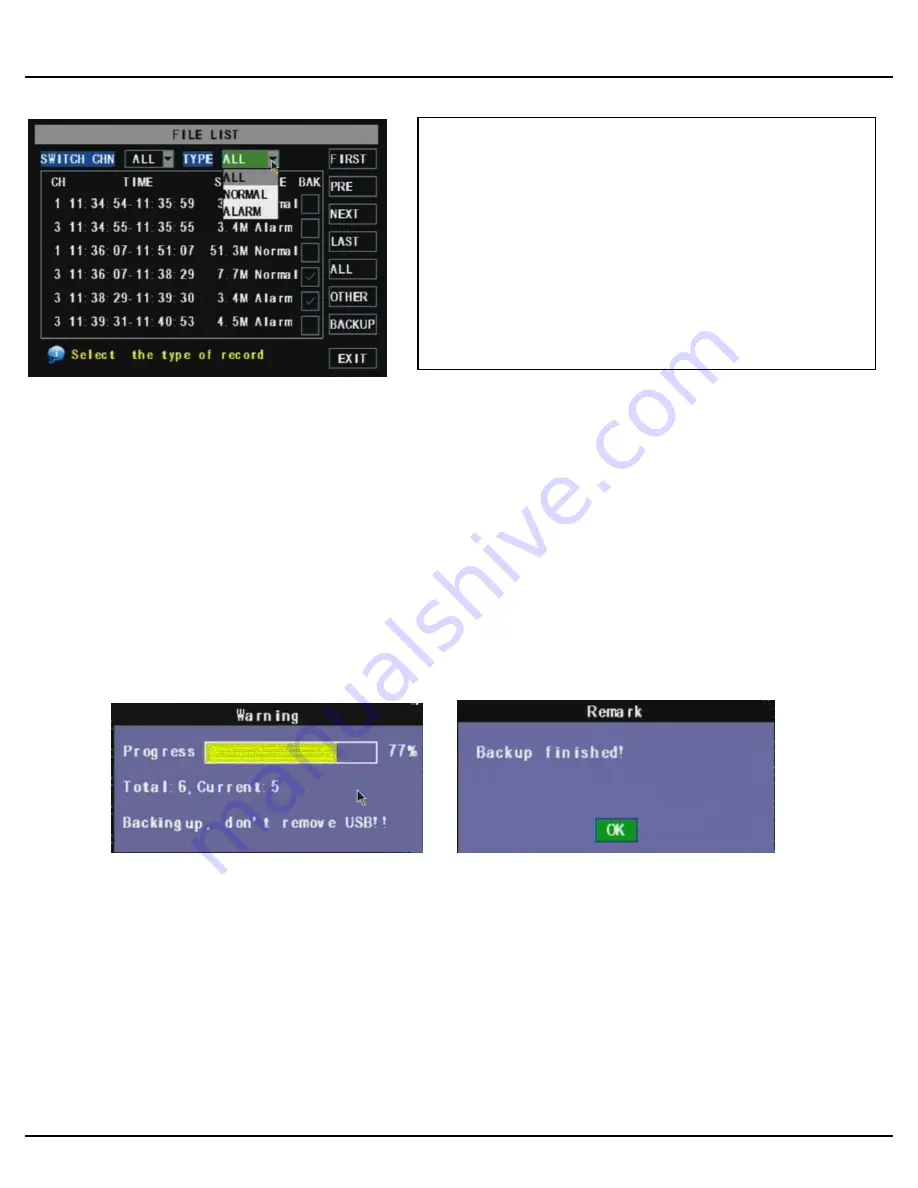
If you want to backup a single recorded file from the file list, from the File List dialog box pictured above, select the 
file you wish to back up by placing a check mark in the accompanying green box and hit the [BACKUP] button on 
the right of the screen.  You will then receive a pop up screen as illustrated in the first picture below showing you the 
progression of your backup.  Once backup is complete, you will then receive a pop up message informing you that 
you have backed up your files successfully as illustrated in the second picture below.  Note that all files will be in an 
H264 format that can be converted to AVI using the Multi Player program that comes with the DVR or through the 
net-viewer program.  Once converted, you can then view these files through any program that supports an AVI 
format. 


File List: 

On the Video  search menu mode, click File  list  to display 
the sub-menu shown in the picture on the left. 
This option will allow you to view all of the available files by 
channel and type (all, normal, or alarm). 
You can select a file and push the SEL button to playback 
the file, or use the FWD button and down button to select 
the backup option and backup the recorded file you 
selected. You can also put a checkmark in the BAK box at 
the end of multiple files if you want to backup more than 
one file. See section 5.2.4 Search Recordings in the User 
Manual for more information on using the File List option. 

Содержание QR4274-418

Страница 1: ...Quick Installation Guide 4 Channel H 264 Compression DVR with Built in Retractable 7 LCD Display Screen CIF Real Time Recording and 4 Color CCD Camera Kits M MO OD DE EL L Q QR R4 42 27 74 4 4 41 18 8 ...

Страница 2: ...612D Cameras 6mm Lens 2 QSDS3612D Cameras 3 6mm Lens Remote Control USB 2 0 Mouse Ethernet Cable BNC M RCA F Adapter Camera Cables 4 Included Power Supply 4 Way Splitter For Cameras Pre Installed Hard Drive Software CD User s Manual Power Supply For DVR QSDR74RTB DVR w Built in Retractable 7 LCD Display Screen PART 1 PACKAGE CONTENTS ...

Страница 3: ...27 74 4 4 41 18 8 2 P a g e PART 2 DVR CAMERA AND POWER CONNECTIONS Please note that it is STRONGLY recommended to use a surge protector that is UL 1449 rated Look for a clamping voltage of 330 or lower a Joule rating of at least 400 and a response time of 10 nanoseconds or less ...

Страница 4: ...20 Up Button 10 View all Channels 21 Down Button 11 Rewind Focus PART 4 ACCESSING THE DVR MENUS Choose MENU by right clicking on the mouse or by pushing the MENU button on the DVR front panel or remote control The Main Menu offers the following Setup Features CAMERA Setup name display position image view and record quality of each channel cameras RECORD Enable recording audio set resolution qualit...

Страница 5: ...ing instructions below PACK TIME Choose the time length of all recorded files 15 30 45 60 min Max 60 min From the Main menu select CAMERA Here you can setup the name display up to 8 characters and position of each channel cameras Select COLOR SETUP to adjust the image brightness saturation contrast and hue settings for each channel camera You can also choose whether each channel can be previewed i...

Страница 6: ...es with the Pack Time Interval you selected Click APPLY to activate your customized schedule and then reboot the DVR You can also click on the DEFAULT button to use the system defaults The system default settings are Hr 01 00 am 07 59 am No recording Hr 08 00 am 18 59 pm General recording Time Schedule Hr 19 00 pm 00 59 am Alarm recording Motion Detection Motion Detection Recording From the Record...

Страница 7: ...right click with the mouse or push the ESC key to save the setting After you have set all of the cameras click on the Apply button to save the settings PART 7 SETTING UP THE DVR TO PLAYBACK Search Playback From the Main Menu select SEARCH to display the Video Search Menu shown to the right If you input a specific date and click Search you will find all the recordings for that day When you select a...

Страница 8: ...u have backed up your files successfully as illustrated in the second picture below Note that all files will be in an H264 format that can be converted to AVI using the Multi Player program that comes with the DVR or through the net viewer program Once converted you can then view these files through any program that supports an AVI format File List On the Video search menu mode click File list to ...

Страница 9: ... Comments Contact Us Mailing Address Customer Service DPS Inc Phone 877 998 3440 x 538 8015 E Crystal Dr Email cs dpsi usa com Anaheim CA 92807 Live Chat from our Website Website Tech Support http www q see com Phone 877 998 3440 x 539 Fax Email ts dpsi usa com 714 998 3509 Live Chat from our Website REVISED 4 14 2010 ...

Отзывы: