background image

HF-90 Operation & Installation Guide 

T A B L E   O F   C O N T E N T S

T A B L E   O F   C O N T E N T S

T A B L E   O F   C O N T E N T S

T A B L E   O F   C O N T E N T S     

 
Introduction 


1.1     About this Guide......................................................


1.2     Glossary of terms.....................................................


Understanding HF/SSB


2.1     What is HF/SSB?.....................................................

3  

2.2     How does HF/SSB work?........................................

4  

2.3     Factors which affect HF/SSB communications .......


Speaking on air 

3.1     How to make a voice call.........................................

9  

3.2     Radio alphabet .......................................................

11 


Overview of the HF-90 

4.1     HF-90 Versions and Models..................................

12  

4.2     Operating the HF-90 ..............................................

14 

 
Standard functions 

5.1     ON/OFF switch......................................................

16 

5.2     Volume control knob .............................................

18 

5.3     Channel up/down scroll keys.................................

19 

5.4     Clarifier up/down scroll keys.................................

21 

5.5     USB/LSB mode selection key ...............................

23 

5.6     Tune key ................................................................

25 

5.7     LED display...........................................................

26 

5.8     Erase function ........................................................

27 

5.9   Press to talk (PTT) switch........................................

28 


Section 1 


Section  2 


Section 3 


Section 4 


Section 5 

Содержание HF-90

Страница 1: ...HF 90 Operation Installation Guide ...

Страница 2: ...ny manner or form whatsoever for commercial purposes without obtaining prior written permission from Q MAC Electronics Pty Ltd However limited copying is permitted for private use providing authorship is acknowledged Copyright of Q MAC Electronics Pty Ltd Print date Sep 2003 Literature Reference Number GUIDE07 PUB ...

Страница 3: ...hich affect HF SSB communications 7 Speaking on air 3 1 How to make a voice call 9 3 2 Radio alphabet 11 Overview of the HF 90 4 1 HF 90 Versions and Models 12 4 2 Operating the HF 90 14 Standard functions 5 1 ON OFF switch 16 5 2 Volume control knob 18 5 3 Channel up down scroll keys 19 5 4 Clarifier up down scroll keys 21 5 5 USB LSB mode selection key 23 5 6 Tune key 25 5 7 LED display 26 5 8 E...

Страница 4: ...lcall Mute 41 6 6 Advanced functions summary 42 Compatible products 7 1 TA 90 autotune system 44 Installation 8 1 Mobile systems 45 8 2 Vehicle systems 48 8 3 Base station systems 51 External connectors 54 Accessories 55 Further reading 56 Notes 57 Section 6 Section 7 Section 8 Section 9 Section 10 Section 11 Addendum Notes ...

Страница 5: ...d Q MAC Representative It also contains an Addendum concerning Field Programming which is relevant only to international users outside of Australia who are licensed to program their own operating frequencies The Guide also covers basic principals of installation by way of check lists It does not give comprehensive instructions on how to install the HF 90 We recommend that the installation of your ...

Страница 6: ... pad HF High Frequency Hz Hertz measure of frequency ID Identification kHz Kilohertz measure of frequency LSB Lower Sideband MHz Megahertz measure of frequency PSU Power Supply Unit PTT Press To Talk RFDS Royal Flying Doctor Service Selcall Selective Call SSB Single Sideband Telcall Selective Call with Telephone Call facility USB Upper Sideband 2 Section 1 2 ...

Страница 7: ...F frequencies with SSB modulation to provide very efficient flexible and inexpensive communications HF SSB will enable short medium and long range communications over flat hilly or mountainous terrain without the need for expensive re transmission devices such as the repeaters used in VHF Very High Frequency communications Also unlike satellite communications there is no dependence on a service pr...

Страница 8: ...s less than 50km However because ground wave follows the contours of the earth it is affected by the type of terrain it passes over For example ground wave is rapidly attenuated reduced when it passes over hilly or mountainous terrain Sky wave is used to communicate over medium range and longer distances up to 3 000km and beyond in good conditions Because of the nature of sky wave propagation it i...

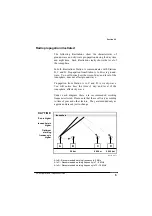
Страница 9: ...re does not affect ground wave Propagation from Station A to C and D is via sky wave You will notice how the time of day and level of the ionosphere affects sky wave Under each diagram there are recommended working frequencies listed Please note that these will vary according to time of year and other factors They are intended only as a guide and are subject to change 5 Section 2 2 Ionosphere A to...

Страница 10: ... 800 km 20 km Ionosphere A to B Recommended working frequency is 3 MHz A to C Recommended working frequency is 5 to 7 MHz A to D Recommended working frequency is 9 to 12 MHz NIGHT TIME Sun is lower Ionosphere is lower Optimum working frequency is lower 6 Section 2 2 ...

Страница 11: ... times of the day There are a number of different factors which will affect the success of your communications via HF SSB radio These are outlined below Your choice of frequency Generally speaking the higher the frequency you select the longer the distance covered Frequency selection is perhaps the most important factor which will impact on the success of your HF SSB communications Correct frequen...

Страница 12: ... your Q MAC Representative Please note that communications on any HF SSB radio will sound different to that on a VHF Very High Frequency radio UHF Ultra High Frequency radio or telephone Because of the nature of HF SSB propagation a marginal level of background noise is always expected This is normal 8 Section 2 3 Weather conditions Certain weather conditions will also affect the success of your H...

Страница 13: ...Press and hold down the PTT switch on your microphone handset and give a long voice call 5 10 seconds indicating the station you are calling on Perth base Perth base Perth base this is Mobile 5ABC Mobile 5ABC Mobile 5ABC calling on Channel 50 Over Please note this is also the recommended method of voice calling any Telstra Radphone Station or RFDS Royal Flying Doctor Service Station relevant only ...

Страница 14: ... or mouthpiece on a telephone handset when speaking over HF SSB radio As a general rule you should speak clearly and a little slower and louder than normal when speaking over HF SSB radio Instructions for making a Selcall Selective Call are outlined in Section 6 1 of this Guide 10 Section 3 1 ...

Страница 15: ...vidual letters The Radio Alphabet listed below is used in all countries as an International Standard Letter Word Letter Word A Alpha N November B Bravo O Oscar C Charlie P Papa D Delta Q Quebec E Echo R Romeo F Foxtrot S Sierra G Golf T Tango H Hotel U Uniform I India V Victor J Juliet W Whisky K Kilo X X ray L Lima Y Yankee M Mike Z Zulu 11 Section 3 2 ...

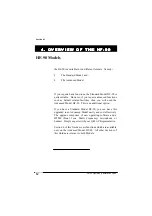
Страница 16: ...table However if you require advanced functions such as Selcall related facilities then you will need the Advanced Model HF 90 This is an additional option If you have a Standard Model HF 90 you can have this upgraded to an Advanced Model easily and cost effectively The upgrade comprises of new operating software and a DTMF Dual Tone Multi Frequency microphone or handset Simply enquire with your Q...

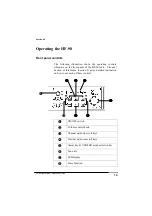
Страница 17: ...nt panel of the HF 90 radio The next Section of this Guide Section 5 gives detailed instruction on how to use each of these controls Section 4 2 Front panel controls 14 ON OFF switch Volume control knob Channel up down scroll keys Clarifier up down scroll keys Alarm key USB LSB mode selection key Tune key LED display Erase function ...

Страница 18: ...g controls which are on the DTMF microphone handset supplied with the Advanced Model HF 90 Section 6 of this Guide gives detailed instruction on how to use each of these controls Section 4 2 DTMF microphone handset controls 15 Press to talk PTT switch STAR key Numeric keys HASH key ...

Страница 19: ...N 5 S T A N D A R D F U N C T I O N 5 S T A N D A R D F U N C T I O N S S S S ON OFF switch To switch the HF 90 on move the ON OFF switch downward to the ON position When the set is switched on an audible beep is heard and the front panel display appears as follows 16 Section 5 1 Switching the HF 90 on ...

Страница 20: ...1 The display showing software information will also time out after half a second If you have an Advanced Model HF 90 the display will then show your Selcall ID 4 digits for one second At this point the HF 90 will revert to the default channel frequency display refer to Section 5 8 of this Guide The channel frequency shown will be the one which was last in use Switching the HF 90 off To switch the...

Страница 21: ...ere are no physical high low limits when adjusting the volume ie the knob will keep rotating without coming to a stop As you rotate the knob you will detect the high low limits Once a limit is reached turning the knob in the same direction will no longer affect the volume A small audible click occurs with each increase and decrease of volume Please note that the VOLUME control knob can also be use...

Страница 22: ...ply release the CHAN up key and the display will stop on the new channel number For example 19 Section 5 3 Selecting a channel To select a channel lower than the one in use press the CHAN down key in the same manner as mentioned above for the CHAN up key This display shows that the selected channel is Channel 200 If you are operating an International Version HF 90 the channel display will time out...

Страница 23: ...90 you may notice when scrolling between the lowest and highest channel number that the display shows the word SCAN This is a separate channel designated for Selcall Scan refer to Section 6 4 of this Guide Special Note Advanced Model Channel configuration Once the appropriate channel has been selected you are ready to commence communication To transmit simply press and hold down the PTT switch on ...

Страница 24: ... display indicates that the clarifier has not yet been adjusted ie it is at zero level Press and release the CLAR up key again This time the display will appear as follows This display shows that the clarifier has been adjusted by 5 units Section 5 4 Adjusting clarifier The CLAR keys on the HF 90 will adjust the clarifier by increments of 5 units The clarifier function enables a maximum adjustment...

Страница 25: ... the previous page Press and release the CLAR down key again This time the display will appear as follows This display shows that the clarifier has been adjusted by 5 units Each subsequent press of the CLAR down key will decrease the receive frequency by another 5 units until the lower limit of 100 units is reached Once the clarifier has been adjusted for a particular channel the new setting will ...

Страница 26: ...this Guide then press and release the MODE key The new mode will now be selected and the display will show this change For example This display shows that USB mode is selected OR LSB Section 5 6 LSB decimal indicator If LSB channels are pre programmed in the HF 90 or manually selected a decimal indicator will appear on the bottom left of the display The decimal indicator appears just above the LSB...

Страница 27: ...go back to its original programmed setting This display shows that the mode selection function is CLOSED ie disabled When you see the above message on the display you will know that the operating mode cannot be manually adjusted Some countries have restrictions regarding the operating mode s which can be used on an HF radio Warning Section 5 6 When mode selection has been disabled Please note that...

Страница 28: ...whips when used in conjunction with an antenna tuning unit ATU This display shows that the tune function is in process Section 5 7 Activating the tune function To activate the tune function press and release the TUNE key Your HF 90 will transmit a continuous carrier signal at reduced power for several seconds You will hear a continuous tone and the display will appear as follows 25 ...

Страница 29: ...function has automatically timed out Default display The HF 90 incorporates an automatic display time out facility which applies to the use of most advanced functions within the set such as sending Selcalls Telcalls or Beacon Requests The time out facility will take effect once you have pressed a function key from the DTMF keypad on your microphone handset Once the function is completed or if anot...

Страница 30: ...gether for six seconds The display will appear as follows Erase function This display shows that the Erase Function is in progress The display will show the word ErASE for twelve seconds whilst the memory is being erased Finally the HF 90 will reset as though being turned on for the first time refer to Section 5 1 of this Guide Please note that this function will erase all channels in memory excep...

Страница 31: ...on of the HF 90 is 100Hz the frequency is displayed to one decimal place For example Press to talk PTT switch To begin communications ie to transmit simply press and hold down the PTT switch on your microphone handset and then communicate in accordance with radio protocol refer to Section 3 of this Guide Please note that if you are using the HF 90 in conjunction with a Q MAC Electronics autotune s...

Страница 32: ...e able to use Selcall the radio which you wish to communicate with must also have the Selcall function The HF 90 uses a Selcall format which is compatible with all major Australian brands and Telstra Radphone Services Please refer to the end of Section 6 1 for instructions on how to program the Selcall ID number To send a Selcall use the DTMF keypad on your mic handset or front panel if using HF 9...

Страница 33: ...lcall You will hear a varying high pitched tone as the Selcall is being transmitted and your display will appear as follows This display shows that Selcall is being sent ie in transmit mode Several seconds after pressing the STAR key to send the Selcall you should hear a series of high pitched beeps This is your positive confirmation known as the Selcall Confirmation being transmitted from the cal...

Страница 34: ...l Alarm Once the Selcall Alarm has been cancelled the display will revert to the default channel display When a Selcall is being received you should not adjust the user controls as this may result in the incoming call being lost Receiving a Selcall When receiving a Selcall you will hear a series of continuous loud beeps which cannot be adjusted with the VOLUME control knob this is the Selcall Alar...

Страница 35: ...rwritten If you leave your radio unattended and then return to find that someone has sent you a Selcall you will know immediately who has called you by looking at the flashing Selcall ID on your display To return their call simply press the STAR key twice This will initiate the Selcall Resend function Please note that if you are using the HF 90 in conjunction with the TA 90 autotune system you may...

Страница 36: ...connect Station As you press each individual numeric key the corresponding number will appear on the display until all numbers have been selected As this point all numbers will appear on the display together An example is illustrated on the following page Sending a Telcall To send a Telcall use the DTMF keypad on your mic handset Prior to sending a Telcall ensure you are on the correct Selcall Tel...

Страница 37: ...ers have been selected Please note that the display can only show a maximum of six digits characters therefore as you enter the telephone number the digits will scroll across the left side of the screen For example This display shows that a telephone number has been selected with 224555 as the last six digits If in the process of selecting the telephone number you press an incorrect number you can...

Страница 38: ... refer to Section 2 3 of this Guide If your Telcall is successful ie you hear the Telcall Confirmation you will hear the telephone ring at the other end This will take several seconds as the Telephone Interconnect Unit has to complete its dialling After the person at the other end picks up the telephone you will generally have to wait for a start tone before proceeding with your call Please note t...

Страница 39: ...l be in progress until the auto time out is activated After pressing the HASH key twice your display will appear as follows Receiving a Telcall When receiving a Telcall from a telephone user you will hear the Selcall Alarm In addition your display will flash the Selcall ID of the station that is calling you ie the Telephone Interconnect Station For example Telcall Resend Please note that you can r...

Страница 40: ... you ever leave your radio unattended and then return to find that someone has sent you a Telcall you will know immediately which station has called you by looking at the Selcall ID on your display If the telephone user has left their telephone number for you to call them back you can retrieve this number by pressing the STAR key followed by the HASH key The telephone number will scroll across the...

Страница 41: ...quest use the DTMF keypad on your mic handset This display shows that the Beacon Request is being sent ie in transmit mode Sending a Beacon Request Sending a Beacon Request is very simple It is almost the same procedure as sending a Selcall the only difference being that instead of pressing the STAR key to initiate a normal Selcall you press the HASH key to initiate a Beacon Request The rest of th...

Страница 42: ... having received a valid Beacon Request prior to the transmission of the Beacon This is the Automatic Tuner entering its tune sequence refer to Section 7 1 of this Guide Several seconds after pressing the STAR key to send the Beacon Request you will hear the Beacon as a series of three or four tones depending on which station you are making contact with The strength of these tones will indicate wh...

Страница 43: ...ue until an incoming Selcall Telcall is received at which point the HF 90 will stop scanning and lock on the appropriate channel The HF 90 will then respond in accordance with normal Selcall Telcall procedure as described in Sections 6 1 and 6 2 of this Guide Scanning may be cancelled manually by pressing the PTT switch on your microphone or one of the CHAN scroll keys Activating Selcall Scan To a...

Страница 44: ...above Please note that an audio mute squelch facility is also available via the Q MAC External Mount Speaker Selcall Mute The Selcall Mute function is used to mute the HF 90 receiver whilst you wait for an incoming Selcall Telcall The Selcall Mute cuts out all noise on the receiver including voice ie it is not selective You can operate Selcall Mute when the set is tuned to a particular channel or ...

Страница 45: ...ad Send Telcall DTMF keypad Resend last Telcall DTMF keypad Telcall Hang up DTMF keypad Below is a summary of the steps key presses involved in working through the advanced functions Please note that the letter X is used to denote any individual number 4 digit Selcall ID Telephone No 4 digit Selcall ID 42 Section 6 6 ...

Страница 46: ...nel keypad Press down or to select Scan Programming the Selcall ID Number front panel keypad DTMF keypad The above instruction only applies to the Australian Version or the International Version which has not been set up for Field Programming CHAN CHAN 4 digit Selcall ID CLAR CLAR 4 digit Selcall ID 43 Section 6 6 ...

Страница 47: ...ant channel and the TA 90 will enter its tune sequence prior to transmitting the Selcall Telcall Confirmation or Beacon Receiving Selcall Telcall or Beacon Request in scan mode When you change channel and then press the PTT switch on your microphone handset to transmit for the first time you will hear the TA 90 enter its tune sequence as outlined above Aside from pressing the PTT switch your HF 90...

Страница 48: ...as part of a Mobile Package are supplied with a Quick Reference Guide which explains how you can get the best results from your radio battery and antenna system Those users who are not supplied with a Mobile Package or Quick Reference Guide should observe the following check list 45 Section 8 1 Using the HF 90 inside a backpack or carry case Ensure that the HF 90 is placed in a position which allo...

Страница 49: ...t you have a fuse in line with the battery cable so as to avoid damage to the cable and battery in the event of a short circuit Q MAC offers a variety of battery charger options so that you can charge your battery from a solar source mains power terminal or vehicle battery Power source Grounding In all mobile systems an adequate ground earth is essential for satisfactory operation of the HF 90 rad...

Страница 50: ...tive Instructions on how to set up and operate manpack portable antennas are provided with all Manpack Portable Packages on the Quick Reference Guide If you are using a whip type antenna avoid touching the antenna as this will detune it There is also a risk of receiving an RF burn if touching the antenna when the radio is transmitting Radio Frequency Field Exposure The HF 90 generates high radio f...

Страница 51: ...the operator will sit The HF 90 must be mounted in a position which allows a free flow of air through the rear heatsink cooling fins When mounting the HF 90 in a vehicle you should use the Q MAC HF 90 Mounting Cradle Assembly instructions are provided with each cradle In a vehicle installation the HF 90 may be mounted under the dashboard of the vehicle in the centre console up against the centre c...

Страница 52: ...fit a cartridge fuse 20 Amp in the active wire close to the battery This will protect the power cable from the risk of damage through short circuit Power source Grounding Antenna Where a bull bar is fitted a vehicle whip antenna should be mounted on the front of a vehicle on a special bracket welded to the bull bar on the passenger side of the vehicle 49 Section 8 2 In a vehicle system adequate gr...

Страница 53: ...hat the whip antenna is undamaged the white antenna insulator is clean and undamaged the red wire feeding the top of the insulator is clear of metalwork by at least 50mm and that the ground connection to the TA 90 Tuner is adequate When using a tapped whip antenna always ensure that the tap selected corresponds to the channel frequency in use on your HF 90 radio usually the channel frequency is en...

Страница 54: ...n which allows a free flow of air through the rear heatsink cooling fins When installing the HF 90 in a base station you should use the Q MAC HF 90 Mounting Cradle Assembly instructions are provided with each cradle Do not expose the HF 90 to direct sunlight for extended periods In a base station installation the HF 90 should not be placed directly on top of the Mains PSU Some PSUs can generate an...

Страница 55: ...uitable The power cable supplied by Q MAC is designed to minimise voltage drop between the PSU and the HF 90 Installing a light core cable is not recommended The HF 90 is protected against irregular power surges However if you are installing the radio in a location where there is a danger of lightning you should take adequate measures to further protect the HF 90 as the set cannot withstand a dire...

Страница 56: ... frequency selection a broadband dipole is the best type of base station antenna You should discuss your antenna requirements with your Q MAC Representative Ensure that the coaxial cable which connects the antenna to the HF 90 is no longer than necessary Base station antennas must be mounted away from overhanging power lines and telephone lines Ensure that your base station antenna is mounted away...

Страница 57: ...ne 1 2 Transmit data 3 Receive data 4 Loud speaker 5 Press to talk 6 Ground 7 Microphone 2 8 5 Volt The illustration above shows the pin numbers on the front panel microphone connector 54 Section 9 Microphone connector front panel male Pin No Function 1 Ground 2 Loud speaker 3 Aux power 4 12 to 28 Volt The illustration above shows the pin numbers on the rear panel power connector Power connector r...

Страница 58: ...ccessories which we supply include Antennas and antenna tuning units mobile portable vehicle and base station Batteries rechargeable and non rechargeable Battery chargers mains power vehicle battery and solar Mains power supply units Canvas backpacks olive drab or blue and weather proof fibreglass carry cases grey or red External speakers c w audio mute squelch facility microphones and telephone h...

Страница 59: ...produced by Q MAC include HF 90 Technical Manual TA 90 Technical Manual Quick Reference Guide HF 90 Programming Package Quick Reference Guide HF 90 Mobile Package Quick Reference Guide HF 90 Vehicle Package In addition to the above Q MAC can supply Data Sheets on the various HF 90 packages and accessories which are available Please ask your Q MAC Representative for further details 56 Section 11 ...

Страница 60: ...HF 90 Operation Installation Guide N O T E S N O T E S N O T E S N O T E S 57 Notes ...

Страница 61: ...on Installation Guide Q MAC Electronics Pty Ltd HEAD OFFICE PO Box 1334 Osborne Park Business Centre Western Australia 6916 Phone 61 0 8 9242 2900 Fax 61 0 8 9242 3900 E mail sales qmac com Website http www qmac com ...

Страница 62: ...HF 90 Operation Installation Guide Q MAC Electronics Pty Ltd Western Australia Represented by ...

Отзывы: