background image

Figure 29.

Figure 30.

8

Device Information and Diagnosis

The

DEVICE INFORMATION

screen is launched when

System

(

) is pressed in the measurement mode.

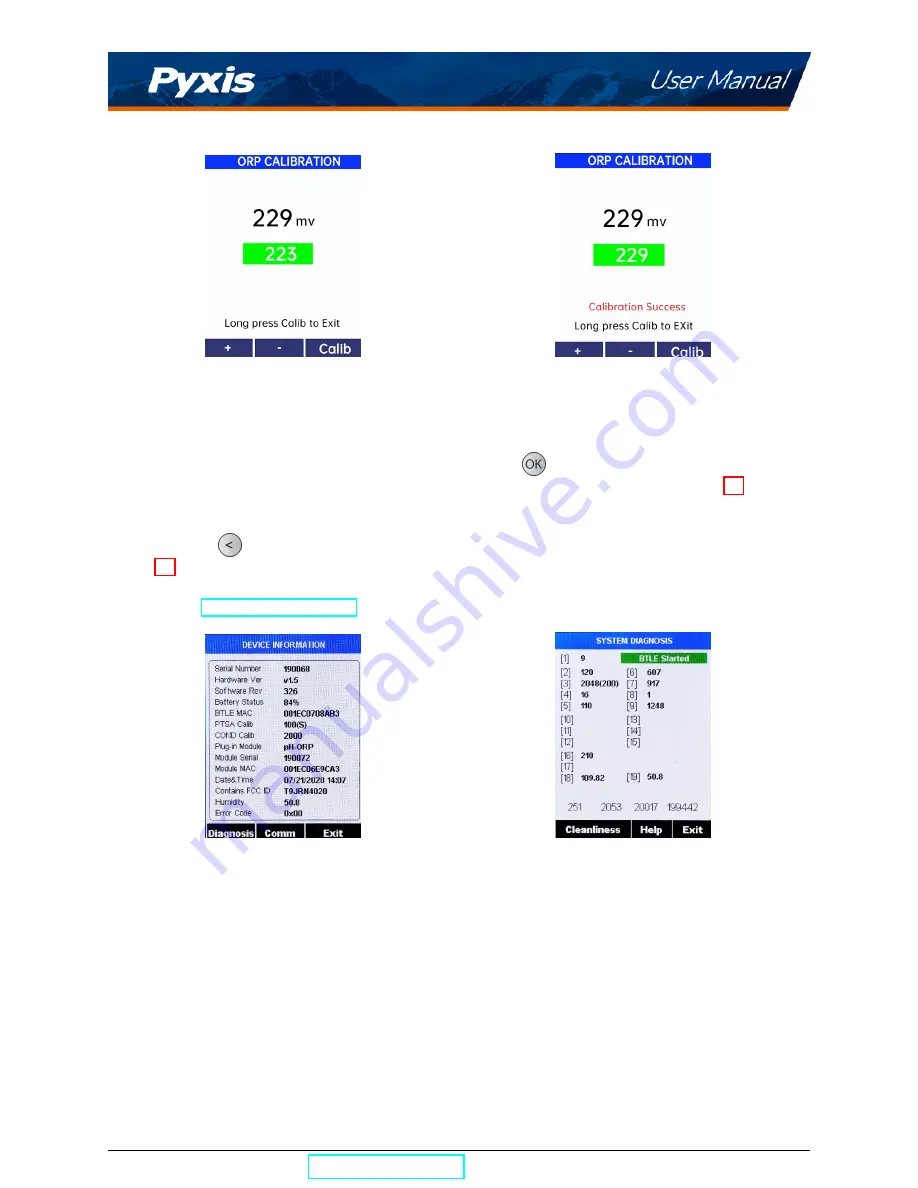
This screen contains the device serial number, software version, and hardware version (Figure 31). The bat-
tery life as a percentage and the MAC addresses for main module also shown.

Press

Diagnosis

(

) to launch the

SYSTEM DIAGNOSIS

screen where raw measurement data are displayed

(Figure 32). The information has no use for normal operation, but instead is used for device troubleshooting.
Provide an image of both the

DEVICE INFORMATION

screen and the

SYSTEM DIAGNOSIS

screen when you

contact Pyxis (

[email protected]

for troubleshooting your device or call +1 (866) 203-8397.

Figure 31.

Figure 32.

SP-710B User Manual

[email protected]

| +1 (866) 203-8397

23

Содержание SP-710B

Страница 1: ......

Страница 2: ...SP 710B Water Multimeter User Manual August 10 2020 Rev 3 01 Pyxis Lab Inc 1729 Majestic Dr Suite 5 Lafayette CO 80026 USA www pyxis lab com 2017 Pyxis Lab Inc Pyxis Lab Proprietary and Confidential...

Страница 3: ...ment 9 6 2 Fluorescein Measurement 10 6 3 Temperature Measurement 11 6 4 pH ORP Measurement 11 7 Calibration 14 7 1 PTSA Calibration Two Point with Zero 14 7 2 Combined PTSA and Conductivity Calibrati...

Страница 4: ...Screen 32 10 4 Setting Screen 33 10 5 Datalog Screen 33 11 Device Maintenance and Precaution 34 11 1 Maintenance Best Practices 34 11 2 Methods to Cleaning the SP 710B 35 11 3 Storage 35 11 4 pH ORP M...

Страница 5: ...elivery All service interventions are to be reviewed and authorized as correct and complete at the completion of the service by a customer representative or des ignate Pyxis warrants these services fo...

Страница 6: ...th conductivityand pH ORP ina single rugged meter PTSA measurement uses custom signal processing algorithms to compensate for sample color and turbidity interference Wireless and independent use of pH...

Страница 7: ...nuous improvement policy these specifications are subject to change without notice With Automatic Temperature Compensation ATC Replacement recommended every 9 12 months Batteries excluded 3 Unpacking...

Страница 8: ...500 mL FLUO 500 Pyxis Handheld Cleaning Kit SER 002 4 Installation 4 1 Main Module Battery Installation The main module of the SP 710B is powered by four AA alkaline batteries Typical battery life is...

Страница 9: ...odule has a lithium thionyl chloride battery 3 7V ER14250 installed When the bat tery capacity is critically low and the main module displays a LOW BATTERY warning replace the ER14250 battery Use the...

Страница 10: ...Figure 2 Proper orientation of the ER14250 battery 5 Instrument Overview Figure 3 SP 710B User Manual service pyxis lab com 1 866 203 8397 7...

Страница 11: ...n 5 2 Control Keys The SP 710B has three control keys as shown in Figure 3 The left right and ok keys are used to launch actions indicated on the LCD display directly above the keys The labels above t...

Страница 12: ...cell to avoid air bubble entrainment which can interfere with reading accuracy Before beginning a measurement use the sample water to rinse the main module cell at least three times Allow5 10 secondsf...

Страница 13: ...lly compensate sam ple color and turbidity interference If sample turbidity and color values determined are too high a PTSA measurement warning will be displayed In such a case the user should filter...

Страница 14: ...the module is turned on the seal can be positioned anywhere desired NOTE If the module battery capacity is low the indicator light will flash red 2 Press Measure as needed to highlight pH ORP in the...

Страница 15: ...illing solution being diluted or contaminated and increases the electrode life The pH value is calculated from the measured cell potential EMF in mV pH EMF S T pHo 2 S T 0 1986 T 273 15 3 S T in the a...

Страница 16: ...the SP 710B is referenced to the same commonly noted as Ag AgCl 3M KCl The ORP electrode is calibrated using the Zobell s standard using the value of 221 mV at 25 C before ship ping The default ORP sc...

Страница 17: ...N screen Figure 10 6 Press Zero to start the zero blank calibration 7 If the calibration succeeds a checkmark and instructions for the slope calibration will appear Figure 11 8 Rinse the main module s...

Страница 18: ...y updates as shown in Figure 14 and the user can choose one of three options a Press to start the calibration or b Press Cancel to return to the COMBINED CALIBRATION screen or c Press Exit to abandon...

Страница 19: ...see the User Defined Conductivity Calibration section NOTE To exit the calibration procedure entirely long press Calib 7 Press Calib to confirm the specific conductivity calibration desired 8 The dis...

Страница 20: ...y value NOTE To exit the calibration procedure entirely long press Calib 8 Press Calib to confirm the specific conductivity calibration desired 9 The display updates as shown in Figure 19 and the user...

Страница 21: ...screen Figure 21 5 Press Zero to start the zero blank calibration 6 If the calibration succeeds a checkmark and instructions for the 50 ppb slope calibration will appear Figure 22 7 Rinse the main mod...

Страница 22: ...ith 500 ppb Fluorescein standard Fill the sample cell with the standard 16 Press Slope or to start 500 ppb slope calibration 17 If the calibration succeeds a second checkmark Calibration Success messa...

Страница 23: ...buffer Fill the sample cell with the pH7 buffer 7 Allow 5 10 seconds for the pH measurement to stabilize and the padlock to appear 8 Press pH7 or to start a one point calibration 9 If the calibration...

Страница 24: ...nt to stabilize and the padlock to appear 20 Press Calib or to start a three point calibration 21 If the calibration succeeds a checkmark a pH4 Calibration success or a pH10 Calibration success messag...

Страница 25: ...ust be used Table 3 Temperature F C Ag AgCl 1M KCl Ag AgCl 3M KCl Ag AgCl saturation KCl 68 20 234 213 202 77 25 231 209 199 86 30 228 205 196 Use the temperature measured by the SP 710B Follow the st...

Страница 26: ...for main module also shown Press Diagnosis to launch the SYSTEM DIAGNOSIS screen where raw measurement data are displayed Figure 32 The information has no use for normal operation but instead is used...

Страница 27: ...s to ask the user to put DI water into the main module sample cell Figure 33 6 Pour DI water into the main module sample cell 7 Press Confirm or The instruction prompt will disappear and the SP 710B d...

Страница 28: ...Scan to begin scanning for Bluetooth devices 5 Discoverable devices will begin to populate on the display with their name and MAC Address Figure 37 6 If more than one device appears in the Device lis...

Страница 29: ...OK message will appear on the top of the display Figure 41 15 Calibration is now complete Long press Calib to return to measurement mode Figure 36 Figure 37 Figure 38 Figure 39 Figure 40 Figure 41 SP...

Страница 30: ...BTLE Started 5 Press Help to launch the HELP screen Figure 42 6 Press Factory Reset or The display updates as shown in Figure 43 appear and the user can choose one of three options a Press to start t...

Страница 31: ...e phone Do not pair the phone Bluetooth to the SP 710B Open uPyxis Mobile App Ensure that the SP 710B is discoverable by following the steps in the Bluetooth Connection to Devices section Once the app...

Страница 32: ...press Get Firmware Once the new firmware is downloaded press Upgrade Firmware NOTE The firmware update process takes some time and will require the SP 710B to stay within range approximately 10 ft wi...

Страница 33: ...screen the user can view and export the internal log files of the SP 710B by pressing Read Datalogs and selecting the desired datalog these are separated by month The SP 710B will then populate any r...

Страница 34: ...ter MA 485 and the main uPyxis Desktop application Double click the uPyxis Setup exe file to install Figure 49 Click Install to start the installation process Follow the screen instructions to complet...

Страница 35: ...e firmware file contact service pyxis lab com for these firmware files and clicking Upgrade Firmware NOTE The firmware update process takes some time and will require the SP 710B to stay within range...

Страница 36: ...nternal log files of the SP 710B by clicking Read Datalog List and selecting the desired datalog these are separated by month The SP 710B will then populate any relevant log event from the selected da...

Страница 37: ...ct a chemical cleaning using Pyxis SER 02 Handheld Cleaning Solution of the main module cell to remove deposition or film development Use a Q tip to gently clean the inside of the main module cell to...

Страница 38: ...Check see the Main Module Sample Cell Cleanli ness Check section to confirm that the SP 710B is clean Repeat the process as needed until the Cleanliness Check shows Clean 11 3 Storage When the pH ORP...

Страница 39: ...ooth MAC Address for the new module This MAC Address will appear as an available device to pair the SP 710B main module to per the instructions below 11 4 1 Replacement Procedure Follow the instructio...

Страница 40: ...e pH ORP module can be found in its provided COC Certificate of Calibration 6 If more than one device appears in the Device list press to cycle through the devices 7 If no devices or the incorrect dev...

Страница 41: ...the separation between the equipment and receiver Connect the equipment into an outlet on a circuit different from that to which the receiver is con nected Consult the dealer or an experienced radio T...

Отзывы: